Office 365 mailbox migration refers to transferring emails, contacts, calendars, etc. from on premise Exchange and others. When users try migrating Office 365 mailbox, they need to apply some filters to make migration more selective. By applying filters, you can perform a flawless mailbox migration. However, you’ll only get filters option if you use a third-party utility. For quick and efficient Office 365, on-premises Exchange Server/hosted Exchange Server migrations, a dedicated Microsoft 365 migration utility is developed, named Kernel Office 365 Migration tool. This utility comes with user-friendly GUI, advanced functions, and features such as.
- Office 365/on-premises Exchange/hosted Exchange to Office 365/on-premises.
- Automated, direct migration between Office 365 tenants.
- Free trial version to learn software working and migrate 10 items per folder.
- Wide support for all Office 365 plans and Exchange Server versions.
- Maintains original metadata and hierarchy after the migration.
- Migrates mailbox, public folders, archive mailboxes, shared mailboxes, & groups.
- Migrates all – emails, contacts, tasks, appointments, calendars, distribution lists, attachments, etc.
- Migrates public folders between Office 365 tenants.
Filtering options in Kernel Office 365 Migration for selective migration
Once the user has added source and destination accounts for the migration on Kernel Office 365 Migration tool's interface, mapped them, and chosen the Migration Type, they get a set of filtering options to move only the required content to the added destination account.
Let us understand each filter option available in the advanced Kernel Office 365 Migration tool. 
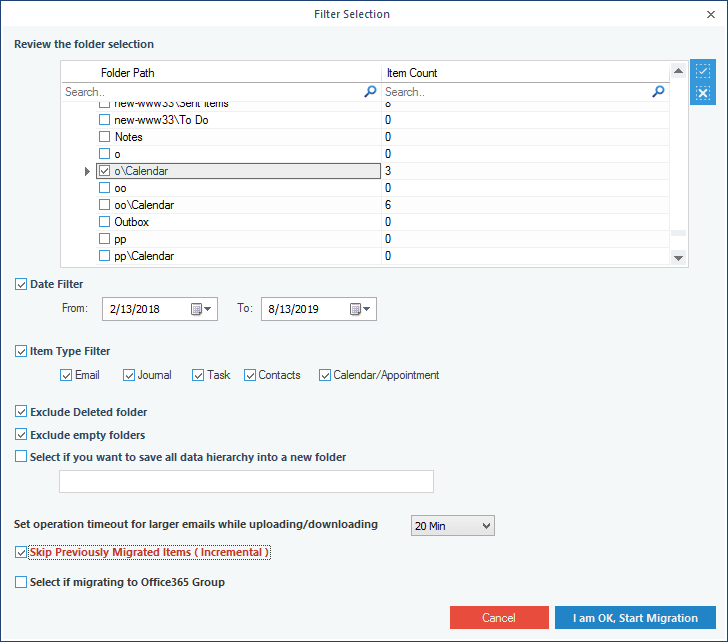
On the Filter Selection page of the software, these are the amenities available for users to filter their source account data before moving it to the destination.
- Review the folder selection: This section lets the user select mailbox folders as per the need by selecting the checkbox against them.
- Date Filter: Using this filter, the user can define a date range to select the source content created/modified within that period by providing the start date in the From section and end date in the To section, by browsing the calendar or manually entering dates in the required format.
- Item Type Filter: It gives the users a choice to select individual mailbox items for migration. They can select the checkbox against the particular item(s) (Email, Journal, Task, Contacts, Calendar/Appointment) to move it to the destination.
- Exclude Deleted folder: By selecting the checkbox against this folder, all the deleted folders from the source mailbox(es) will be excluded and not migrated to the destination.
- Exclude empty folders: It is another useful filter of the software that lets users avoid the migration of useless, empty folders from the added source account mailbox(es).
- Select if you want to save all data hierarchy into a new folder: This filter option includes a checkbox to select this option and a space to enter the new folder name to which the migrated data hierarchy will get saved.
- Set operation timeout for larger emails while uploading/downloading: As the name suggests, this filter can be used to avoid wasting time for larger emails during upload or download in the migration by setting up a time limit in minutes after which the upload/download will be skipped.
- Skip Previously Migrated Items (Incremental): The option can be selected if users do not wish to move already migrated items to the destination using this tool before or to skip migrating duplicate items to the chosen destination.
- Select if migrating to Office 365 Group: This filter option must be selected if you are migrating the source content to Office 365 Group destination.
Conclusion
All these smart filter options in Kernel Office 365 Migration tool are quite helpful for users to move only the required content from the source to the destination account. You just need to create a data migration strategy, and then start executing the migration process by applying filters to mailbox data.


