In a world like today, businesses look for powerful collaboration tools, and SharePoint is one of such efficient tools that facilitates content and document management, file sharing, and fulfils several other purposes. SharePoint to SharePoint migration is something that organizations are looking for?
This can be for upgrading the version or to expand with the growing needs of the business. This article is a thorough guide to understanding the importance of migration and how to migrate from SharePoint to SharePoint easily.
Why perform SharePoint migration?
SharePoint is widely known for its robust security and the fact that it shows no hassle while integrating with Office. Usually, businesses perform tenant to tenant SharePoint migration for one or more reasons as explained below:
- To get access to enhanced security features and updates.
- For merging with other organizations.
- For easy handling of the increasing volume of data.
- To alleviate burden from the administrators.
- Better user experience and productivity growth.
- For collaborating over a specific project with particular team members.
- Backup data SharePoint to recover deleted SharePoint data during hiccups.
Apart from the benefits of migrating data, there are some challenges too that users might face during migration.
It includes migrating permissions/ metadata/ access levels while keeping its structure and ensuring no duplicity in the content migrated at the destination site.
Pre migration activities
Pre-migration activities are important before starting the migration process. It helps you migrate entire data to the destination without errors and issues. Let’s check out each activity that every user needs to follow:
- Make a vision of migration objectives to achieve a successful migration process.
- Examine SharePoint content, such as documents, users, and sites you want to migrate.
- Select the appropriate mean time (when you are free) to start the migration process.
- Admins can assign roles and responsibilities to individuals starting the migration process.
- Conduct a thorough data audit, such as document types, size, and patterns.
- Remove redundant, obsolete, or trivial (ROT) data from source.
- Examine user permissions and access level settings in the destination.
- Create necessary site collections, libraries, and lists in the destination environment.
- Map source users with destination for smooth migration process.
- Allow appropriate permissions on sites and content accordingly.
- For a hassle-free migration, use professional third-party software.
How to execute SharePoint to SharePoint migration?
There are a lot of things that you need to think about and perform before starting the final migration, including pre-migration analysis (to determine the number of user accounts, folders, and files you want to move).
To perform the migration process, you need to make a migration plan, develop a migration strategy (to find the right methods and tools to migrate), and perform post-migration maintenance. Let’s see what some available methods are to migrate data:
- If you want to move SharePoint site to another tenant, you can use, “Save site as template.” With this feature, you can preserve the structure (lists, libraries, and other content) of the site from source to the destination site. However, you cannot use this method to migrate permissions and version history, and the process is also quite time-consuming.
- 2. Another method for migrating SharePoint migration is with the Microsoft’s SharePoint Migration Tool (SPMT). You can migrate from SharePoint (on-premises) to Office 365, but it is incompatible with performing SharePoint Online to SharePoint Online migration.
- While manual methods fail to fulfil the objective, professional SharePoint migration tool is the perfect choice. Manual methods can help to migrate a small amount of data. However, migration tools support unlimited data transfer, keeping the permissions, structure, and version intact.
What makes professional SharePoint to SharePoint migration tool a viable option?
Kernel Migration for SharePoint transfers complete data, including sites, lists & libraries, documents, permissions, version history, workflows, etc. between two SharePoint servers.
The SharePoint migration tool helps in eradicating the challenges that you might face while migrating SharePoint to SharePoint using native approaches.
Some of the efficient features comprise:
- Perform incremental migration of data ensuring no duplicity.
- Data integrity and hierarchy are preserved.
- Migrate permissions and metadata with other site contents.
- Migrate data in bulk with the complete site collection.
- Run on-demand SharePoint migration using ‘Schedule’ feature.
Automated steps to migrate SharePoint Data
Let’s proceed to go through the step-by-step process for SharePoint to SharePoint migration using the professional tool for a quick and hassle-free migration.
Step 1. Download and install the tool from our website.
Step 2. Now, launch Kernel Migration for SharePoint and the home screen of the tool will appear, showing multiple options.
Step 3. From Source pane, right-click SharePoint (On-premises/Online) and then select Add New SharePoint Site.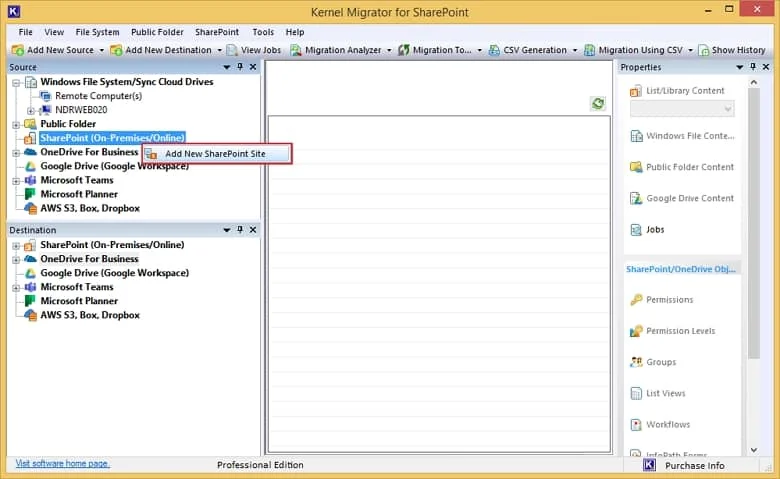
Step 4. Enter a Project Name, Choose Site Connection and Connection Type. Provide the asked credentials to add the SharePoint site and then click OK.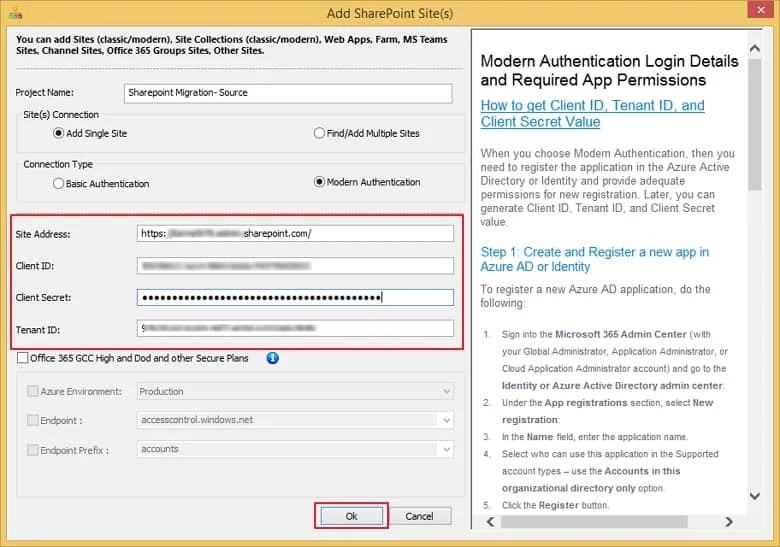
Note: You will get two connection types:
- Modern Authentication: Site Address, Client ID, Client Secret, and Tenant ID.
- Basic Authentication: User Name and Password
Step 5. SharePoint site is now connected in the source.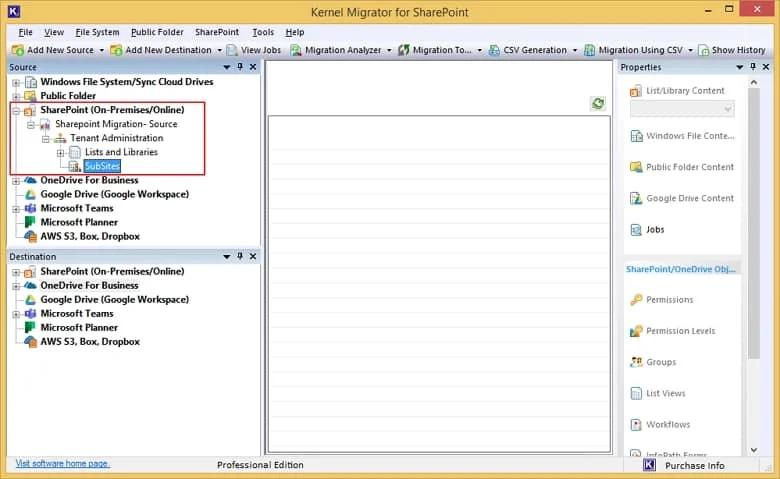
Step 6. Similar to source, go to the destination pane and right-click on SharePoint (On-premises/Online) to add the destination site.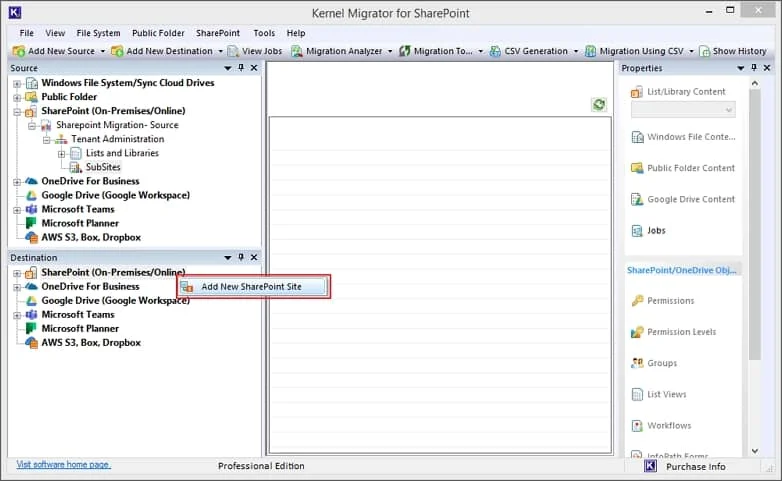
Step 7. Enter the Project Name and provide the credentials based on the Connection Type selected and click OK to proceed.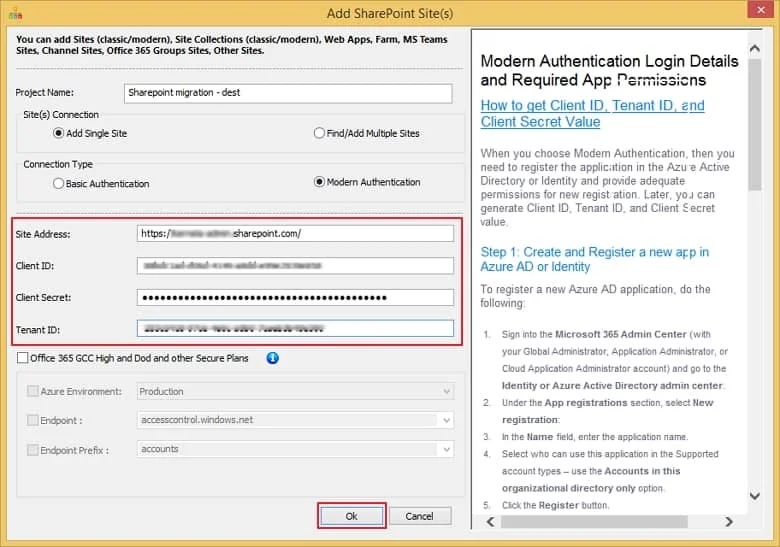
Step 8. SharePoint site is now connected in the destination pane.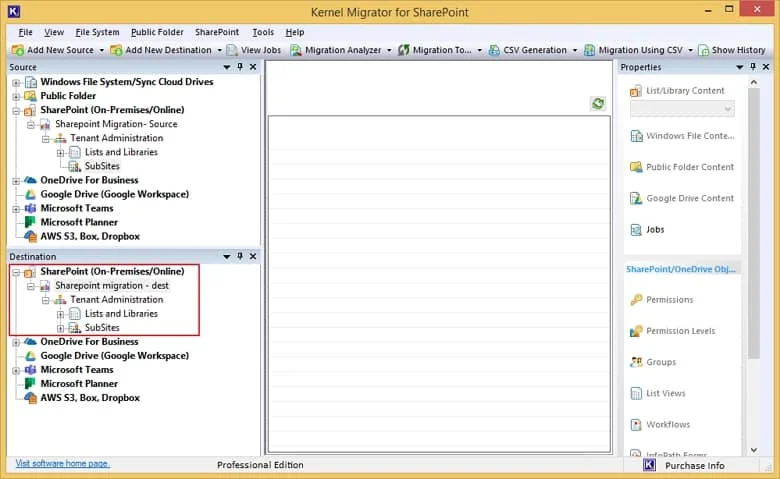
Step 9. Now go to the Source pane, expand the Project Name and right-click on the Tenant Administration and select Copy To.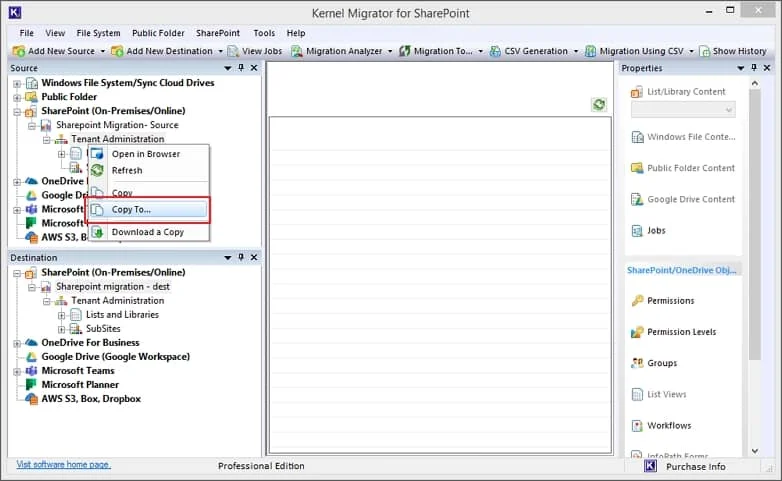
Step 10. In the Source screen, select the added source and then click on Edit Source Selection to select the desired source type.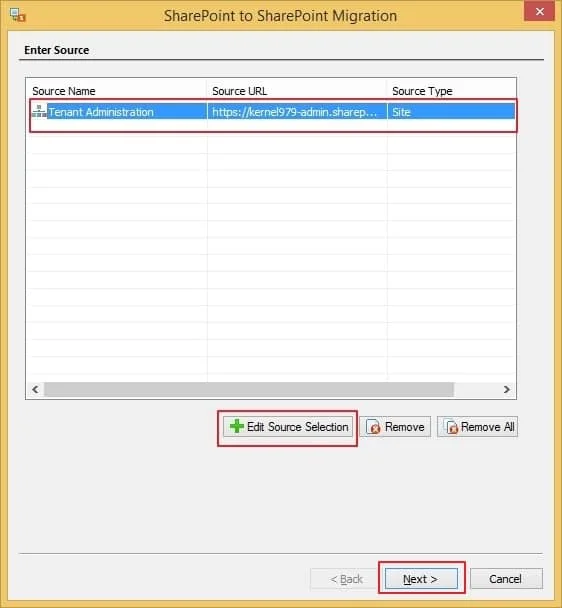
Note: After selecting the source from available options (Site, List/Library, Item Level), click Next.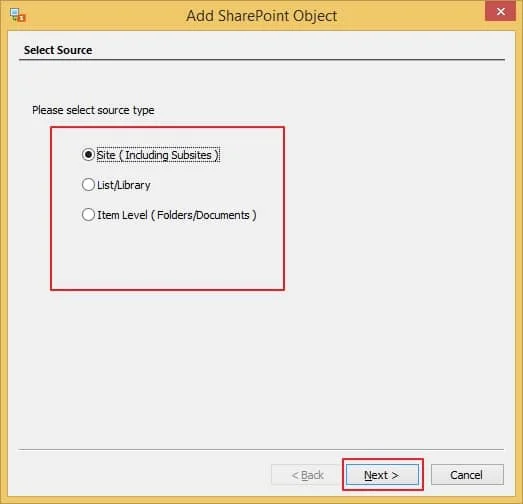
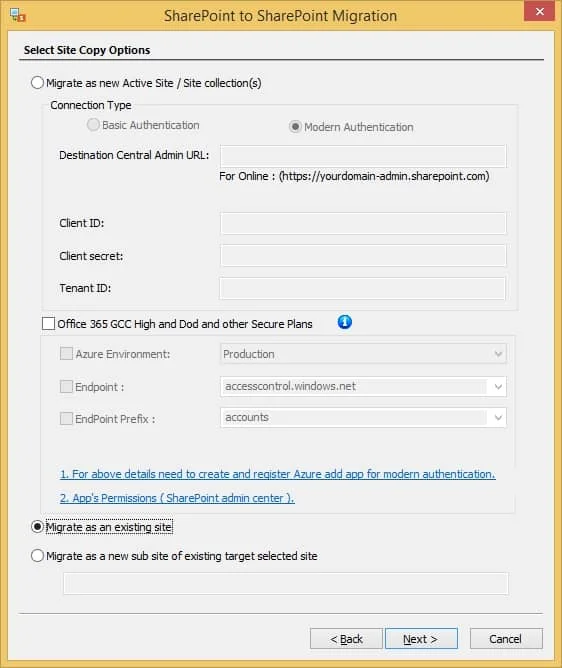
Step 11. From the Select Site Copy Options screen, choose from the given options:
- Migrate as new Active Site/ Site Collection(s).
- Choose authentication method and accordingly provide the destination credentials as requested.
- Migrate as an existing site.
- Migrate as a new sub site of existing target selected site Then, click Next.
Step 12. Next step is to select the destination where you want your source to be. Click on the Site URL drop down to choose particular site, then click on Browse button to define Site/Subsite URL.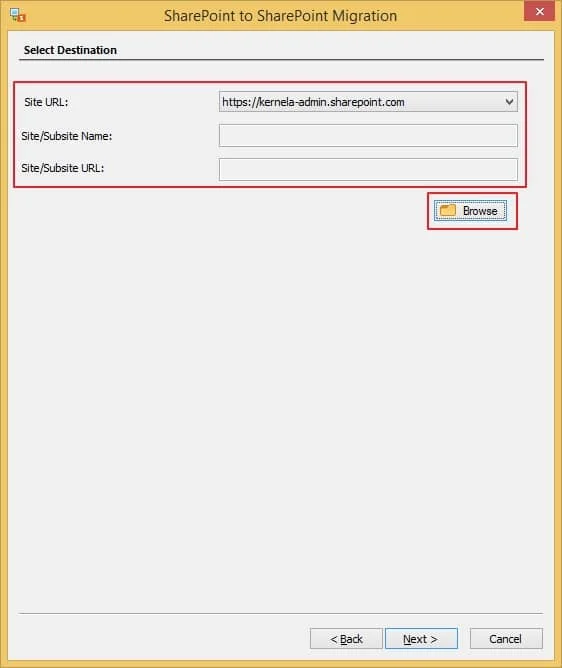
Note: From the tree-like structure of SharePoint source site, pick the Destination Site/Subsite for SharePoint to SharePoint migration. Click OK to proceed.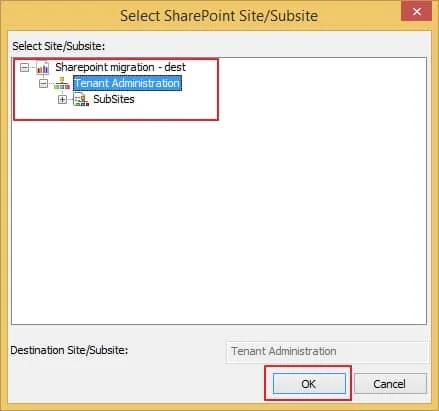
Step 13. Once selected, the empty fields on the Select Destination wizard will be filled automatically. Click Next.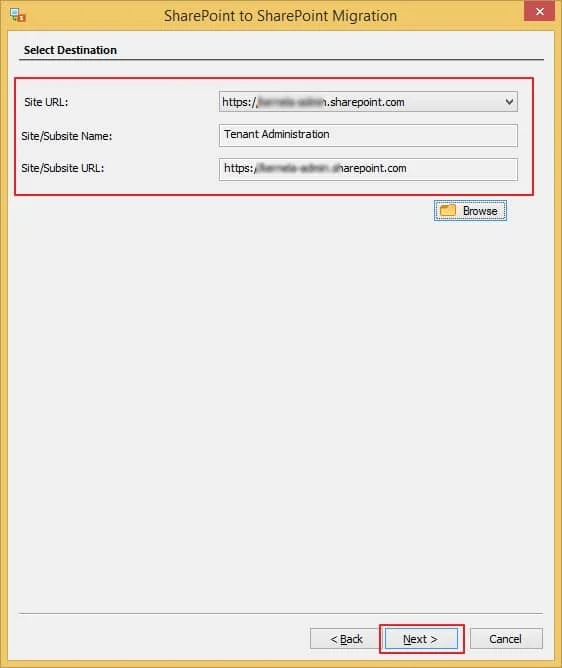
Step 14. Now select from the give Site Copy Options categorized as Site Migration Options and Look and Feel (Same As Source).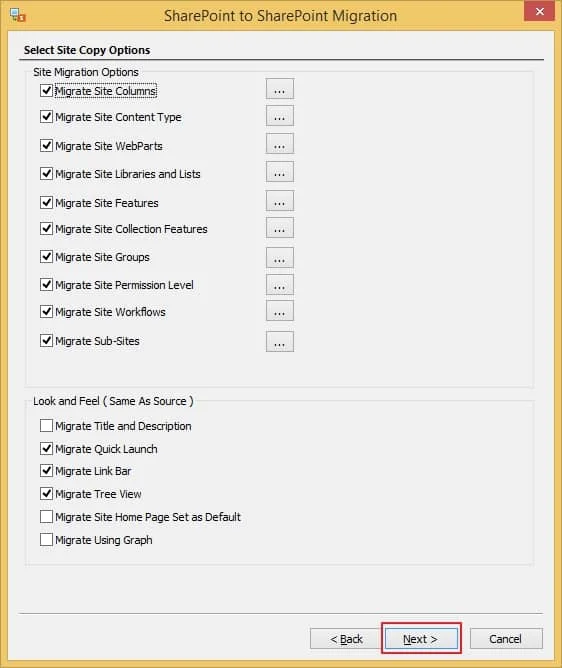
Step 15. Similarly, select List / Library Copy options from the list and click Next.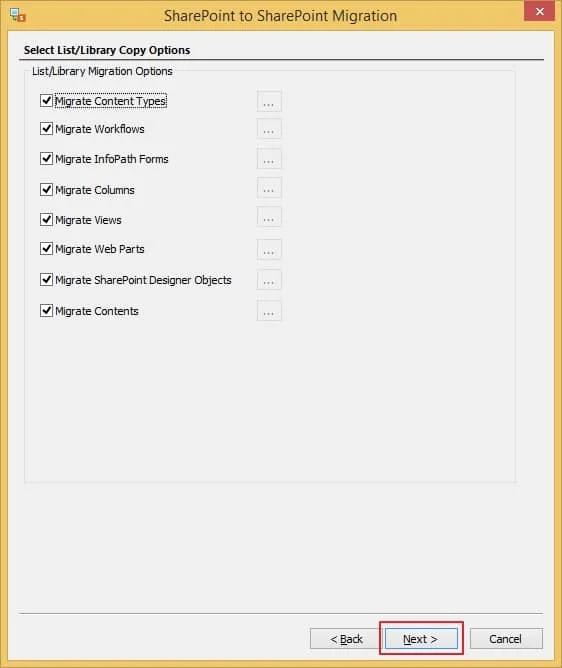
Step 16. Click on Migrate Permissions to move Site, Site permission levels, List & Library, Folders & Items. Select Remap Users and provide credentials if you want to map permissions to another user.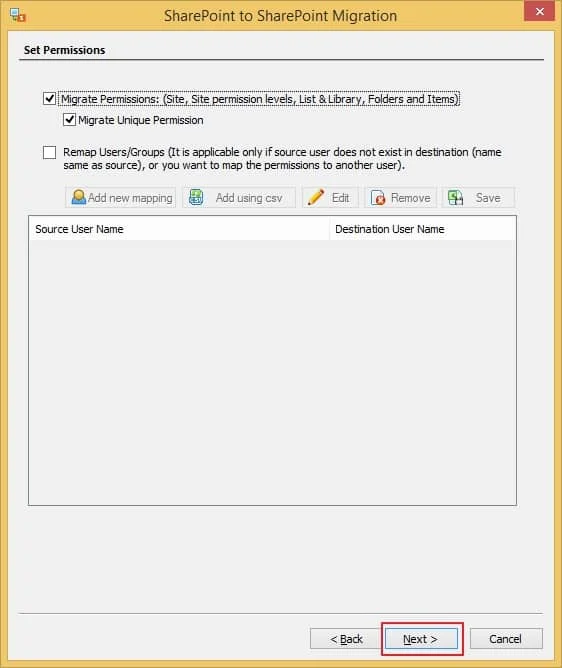
Step 17. Select Execute Immediate to run migration instantly or click on Schedule to run SharePoint to SharePoint transfer later.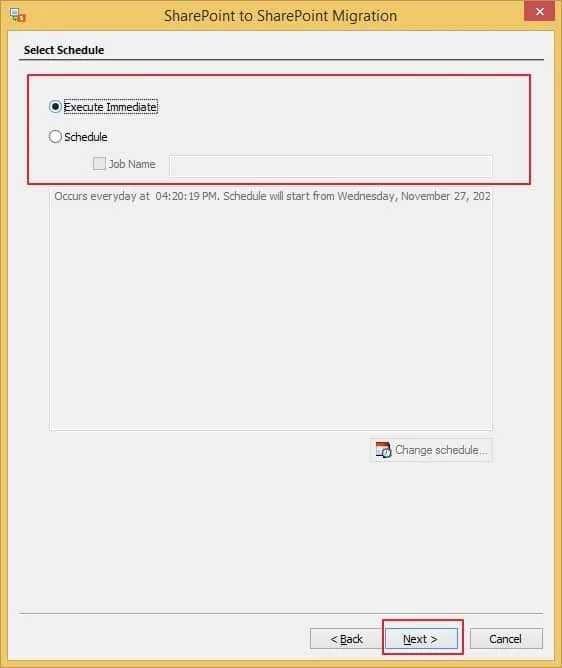
Step 18. Once all choices are made, check the Migration Summary and click Next.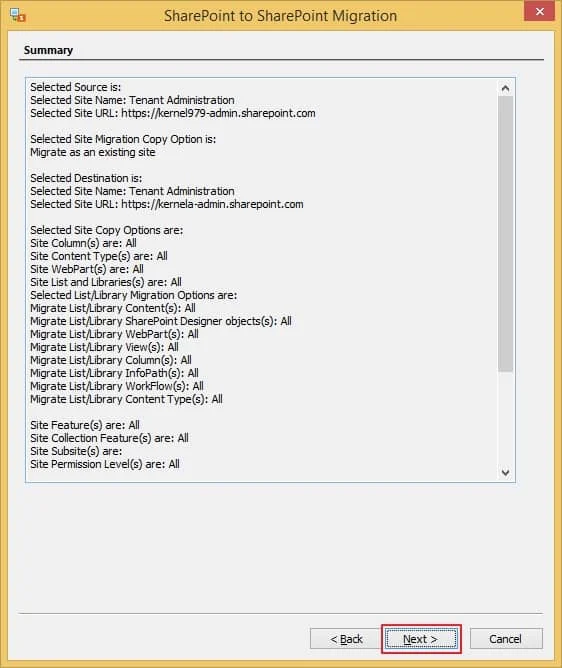
Step 19. This will begin the process of transfer using the SharePoint to SharePoint migration tool.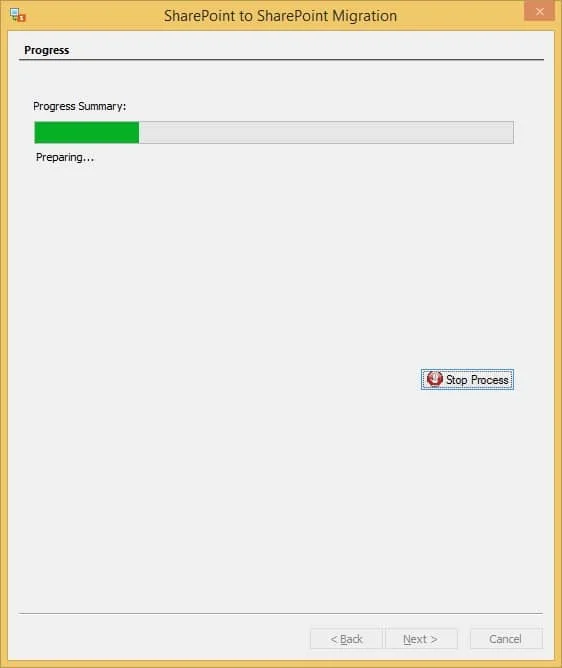
Step 20. Once the process is finished, you can see all the details of the process in the Completion Summary.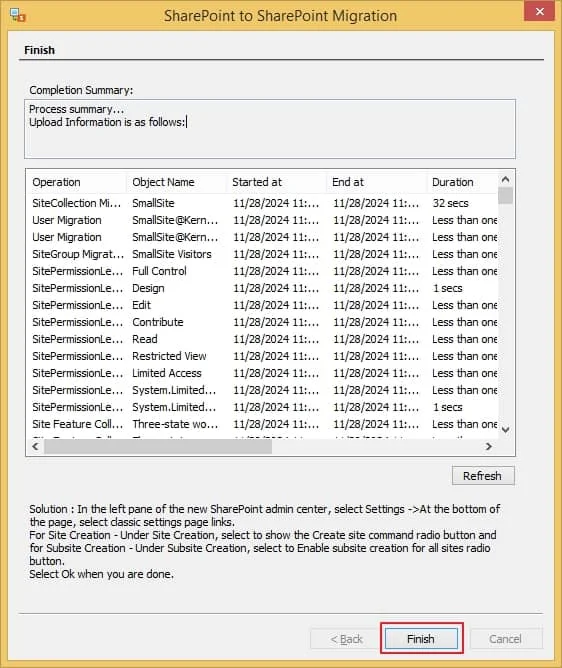
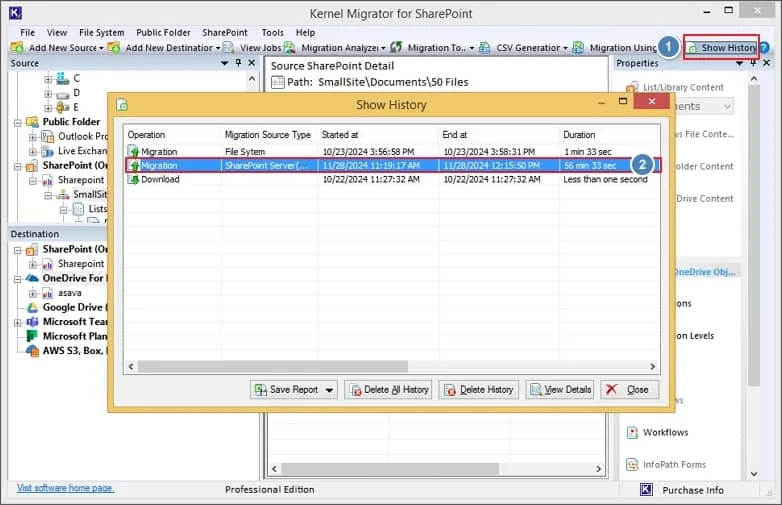
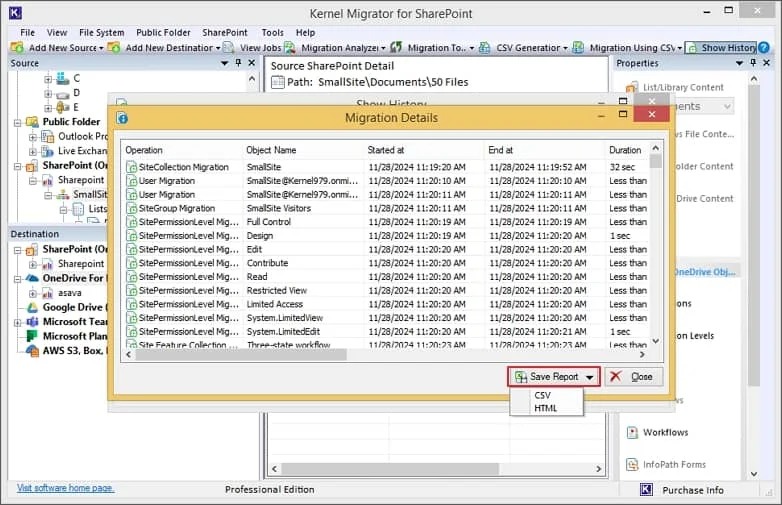
Note: You can also Save the report to your system as a CSV file.
- To do this, go to Show History, then select the migration completed recently and double-click over it.
- This will open the Migration Details. Click on Save Report and choose the format as CSV or HTML. Define the location and click OK.
Post migration activities
Post migration activities are important after the migration process. It helps you to verify entire data in the destination without facing any issues. Check out what to do after the migration process:
- Compare your source and target environment to confirm whether your data has been successfully migrated.
- Access your few documents in the destination to verify their formatting and metadata.
- Review permissions, access levels, and settings.
- Test all the key features, such as workflows, custom lists, search functions, and other integrations.
- Verify all the document versions in your destination.
- Admins need to give new SharePoint training to their users.
- Inform them about the migration completion message and key changes they must navigate.
- Delete unnecessary or duplicate content.
- Review and verify site structures or navigate to optimize.
Conclusion
SharePoint migration is a complex procedure and requires a thorough understanding of the platform and planning of each stage to avoid data loss and keep the structure of data at the destination.
Doing this using manual or native methods is a bit tricky and can even lead to business downtime. Nevertheless, performing migration using a professional SharePoint to SharePoint migration tool like Kernel Migration for SharePoint is a smart move to save time as well as resources.
Frequently Asked Questions
Q. Is it possible to migrate to multiple sites using the SharePoint to SharePoint migration tool?
A. When entering the SharePoint credentials on the Add SharePoint Site (s) wizard, select Find/Add Multiple Sites in the Site(s) Connection. This will open the Site Collection from where after entering the details for Central Admin, you can select the sites you’re planning to migrate to the destination SharePoint server.
Q. Is it possible to migrate SharePoint permissions using this tool?
A. Migrating SharePoint between tenants using this efficient tool is very easy. It helps to copy all the elements from Source to the destination. To do this, simply mark the checkbox Migrate Permissions on the Set Permissions wizard of the tool. The tool also helps you ensure that unique permissions are transferred between two SharePoint servers.


