SharePoint is an advanced tool and is a part of Microsoft 365 suite applications. The unique features offered by the tool serve as a great option for managing the collaborative and document-sharing needs of an organization. The platform can be configured in both offline (SharePoint on-premises) and online (SharePoint Online) mode. This blog will focus on how you, as a user, can perform SharePoint Online to SharePoint Online migration safely without losing any data.
Reasons why to migrate SharePoint Online to SharePoint Online?
Moving SharePoint data across different tenants or even the same tenant is a challenging task, requiring adequate technical expertise. So, why would anyone want to get their hands dirty with a job as complicated as SharePoint migration? Let's see why:
- Events like business mergers and acquisitions are major reasons for an enterprise to migrate SharePoint to SharePoint Online in a different tenant. Data from all the businesses involved in the partnership will be moved to a single SharePoint Server for centralized data management.
- The user may want to migrate only an individual site to another SharePoint Server. May be for a particular project or specific team collaboration.
- Scenarios like shifting a department may also trigger the need to transfer entire content related to that department into a new server created specifically for that category.
- You can also perform SharePoint to SharePoint Online migration to create a backup. Backup also helps in cases when you must recover deleted SharePoint data.
Why are manual methods not reliable for SharePoint to SharePoint Online migration?
Currently, there are only a few free manual methods that exist to migrate SharePoint to SharePoint. However, experts and professionals recommend skipping them for the following reasons. Let's explore the points that make the native methods unreliable for SharePoint Online to SharePoint Online migration.
- Most people recommend trying a free utility called SharePoint Migration Tool (SPMT). It is a free tool from Microsoft specifically designed for SharePoint to Microsoft 365 migration. However, this tool only allows data transfer from SharePoint On-premises server. It cannot perform SharePoint Online to SharePoint Online migration. Similarly, PowerShell cannot help with SharePoint Online data transfer since its cmdlets are also based on SPMT tool.
- Another popular way of moving SharePoint site is by using the option “Save site as template.” This allows you to save the site structure like lists & libraries and allows you to include the site content as well. It is a great option if you want to move a SharePoint site to another server. However, this option has certain limitations, too. You cannot migrate SharePoint permissions and file version history with this approach. Also, manually downloading and uploading each site to the new SharePoint server is a tedious task requiring ample time.
The above methods are not reliable for complete SharePoint to SharePoint Online migration. However, if you only have a small amount of data like a few documents to transfer. Then we recommend you open the SharePoint documents and download them. Later, upload the data to the new SharePoint Server site manually.
Why choose a professional tool to migrate SharePoint Online to SharePoint Online?
An efficient SharePoint to SharePoint Online migration involves the complete transfer of sites, lists libraries, documents, workflows, version history, site permissions, configurations, and other site contents. To transfer so many data objects, you must use a tool designed specifically to handle such complex data transfer. Kernel Migration for SharePoint is one such sophisticated tool that serves as a one-stop solution for all your migration needs. The SharePoint migration tool is embedded with powerful algorithms to streamline the SharePoint to SharePoint Online migration task. Additionally, it also supports data migration across different cloud platforms such as OneDrive for Business, Google Drive, and Microsoft Teams and enables users to take backups of popular cloud-based storage services like Amazon S3, Box, and Dropbox.
Prominent features of the tool are:
- Maintains complete data integrity throughout the migration.
- Retains original file/folder hierarchy and structure.
- Migrate complete site data along with version history, metadata, and permissions.
- Allow users to schedule the migration and track the real-time data transfer process.
- Support Microsoft 365 GCC High, DOD, and other secured Office plans.
How to move data from SharePoint Online to SharePoint Online?
Now, let’s see the step-by-step process of migrating SharePoint data with the Kernel Migration for SharePoint tool. Follow the steps carefully to achieve a quick data migration.
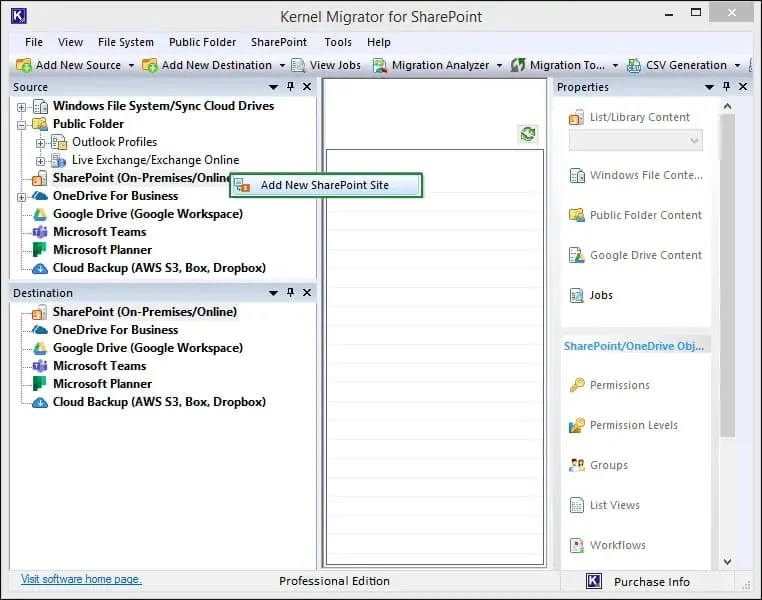
- Download, install, and open the software, go to the source pane, and right-click SharePoint (on-premises/Online). Select Add New SharePoint Site.
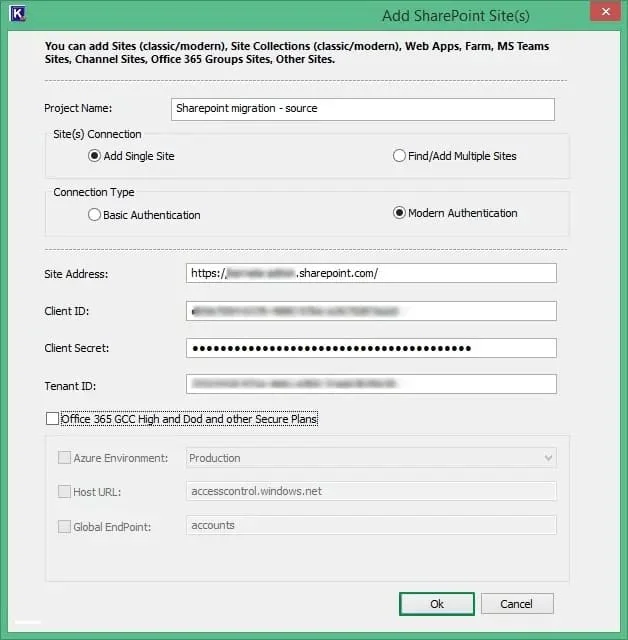
- Provide a Project Name and site (s) Connection. Choose a Connection Type (Basic Authentication or Modern Authentication) to connect to the source.
- Select No, when tool asked for “Do you also want to add this SharePoint server as a destination?”
- Similarly, go to the destination section and add the SharePoint site where you want to migrate the data. After adding both source and destination, you can check the item by double clicking the project name.
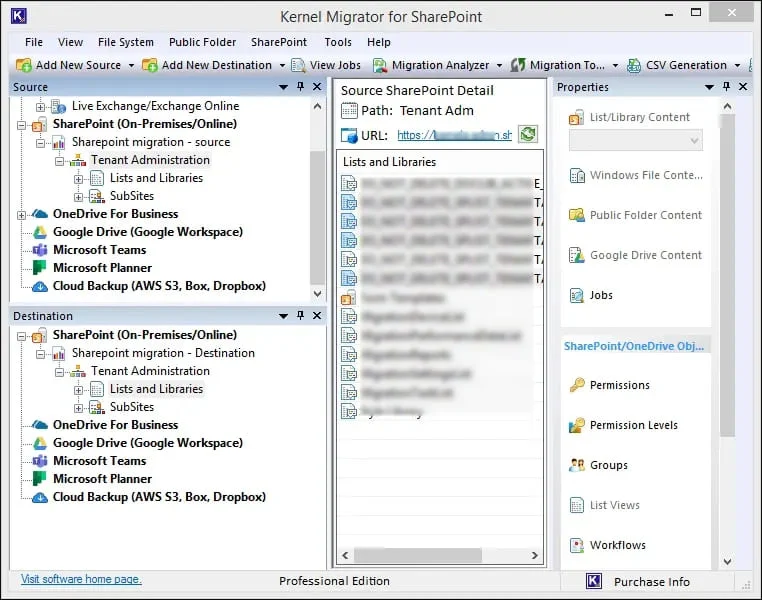
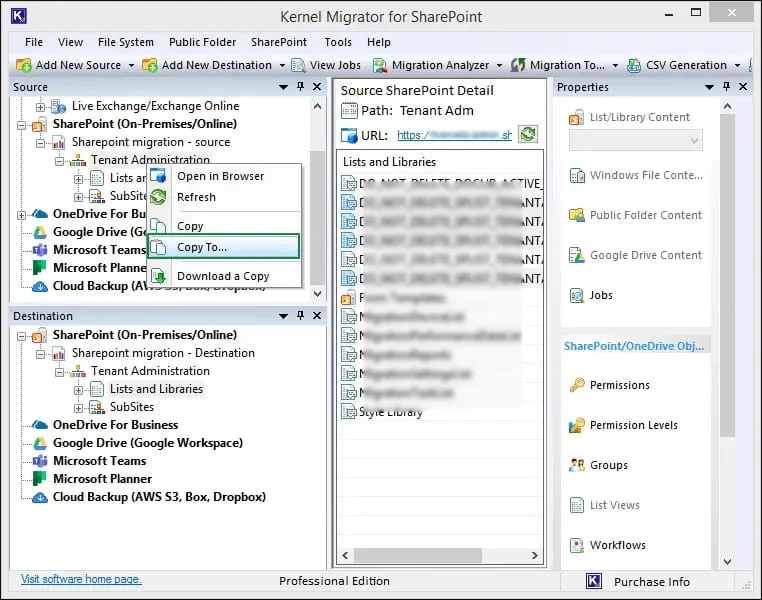
- To begin the migration, expand the project you added to the source and right-click. Now, select ‘Copy To.’
- This will open the Enter Source wizard, showing the Source Name, Source URL, and Source Type. Click Next.
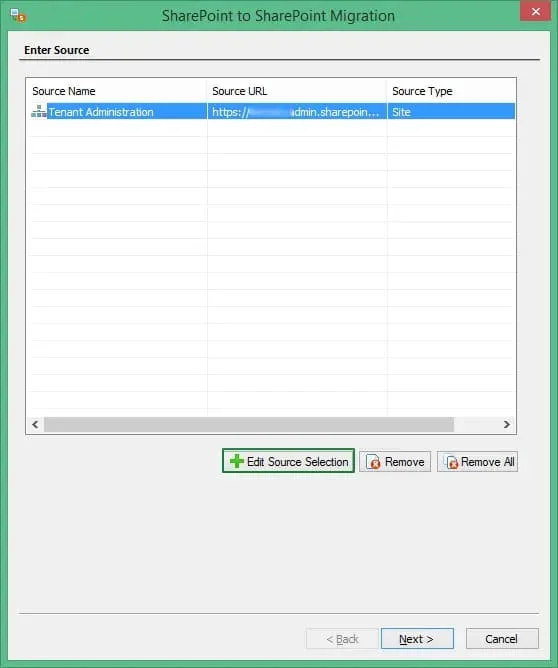
Note: You can change the source type to Site, List/Library, or Item Level (Folders/Documents) by clicking Edit Source Selection.
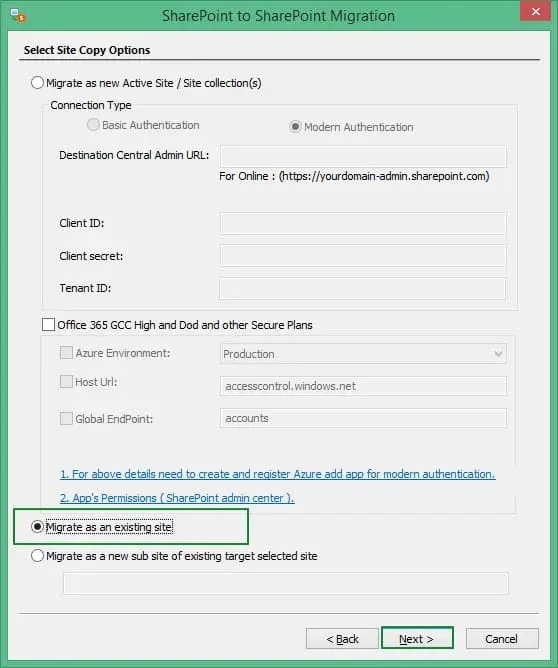
- Choose a migration option and click Next.
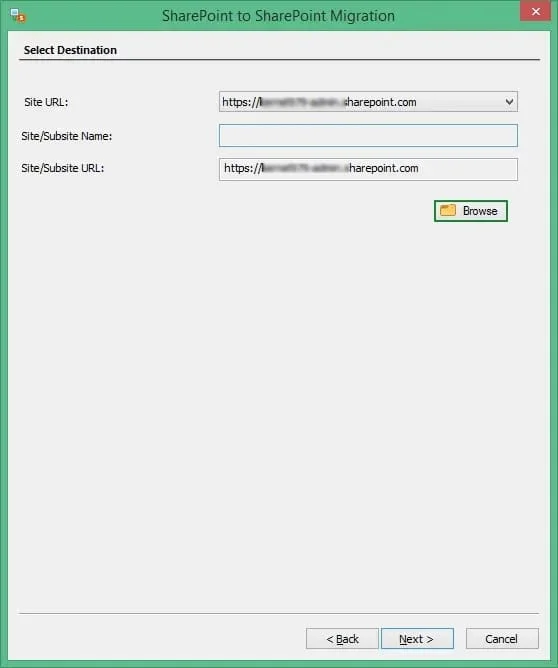
- First, use the Site URL dropdown to choose the destination site and then click the Browse button to select the subsites. Once the destination subsite is selected, click Next to move ahead.
- Select the properties and attributes that you want to migrate along with the data from the SharePoint site. After selection, click Next.
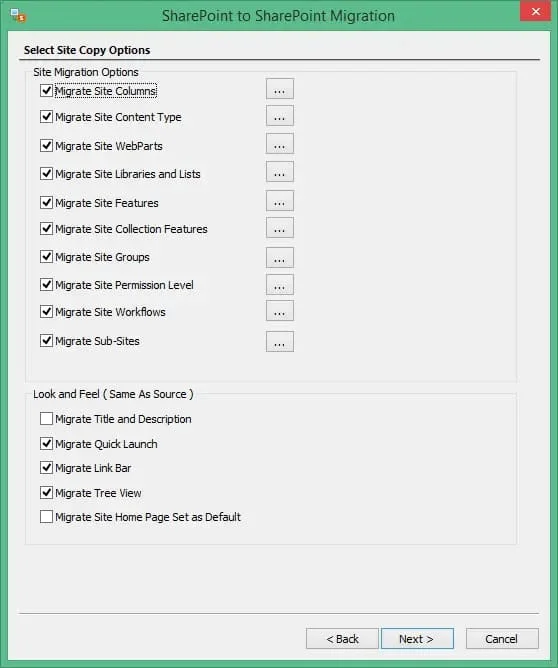
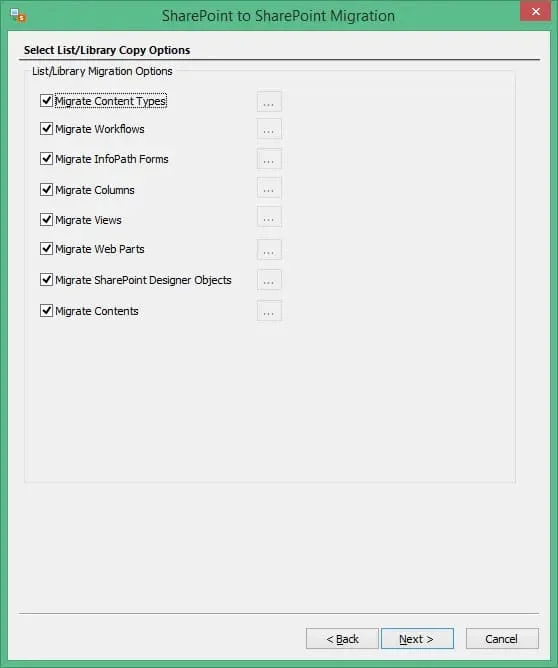
- Choose List/Library attributes and click Next.
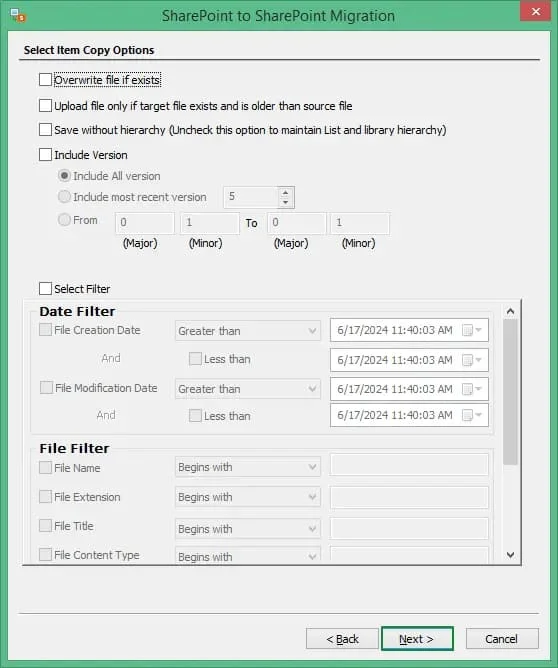
- Apply filters to customize the data transfer. Then, click Next.
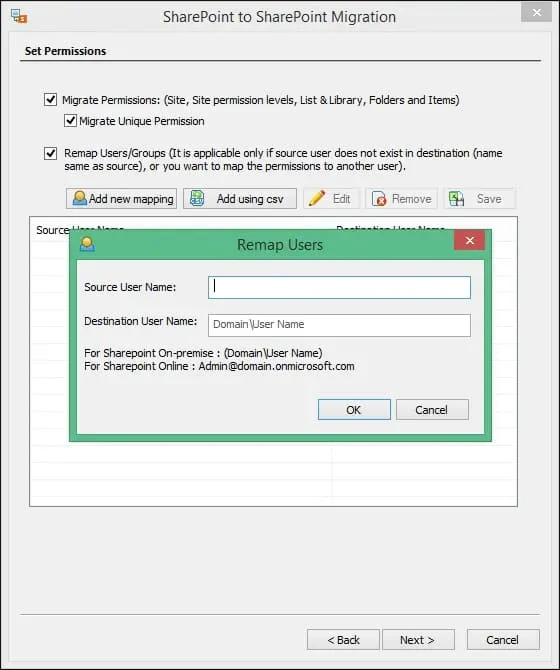
- Select the option Migrate Permissions to transfer the predefined site permissions. You can also remap users and permissions by checking the second box, selecting Add new mapping, and then providing the details asked. Click Next to proceed with the migration.
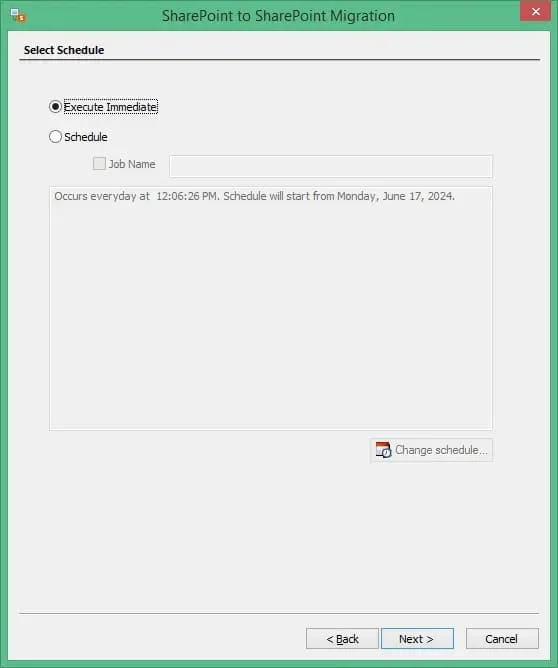
- Use the schedule feature to select a suitable timing to start the migration or you can begin the transfer immediately. Click Next.
- A summary section shows the selected items for migration, desired destination, chosen features, filters, etc. Quickly go through it and click Next.
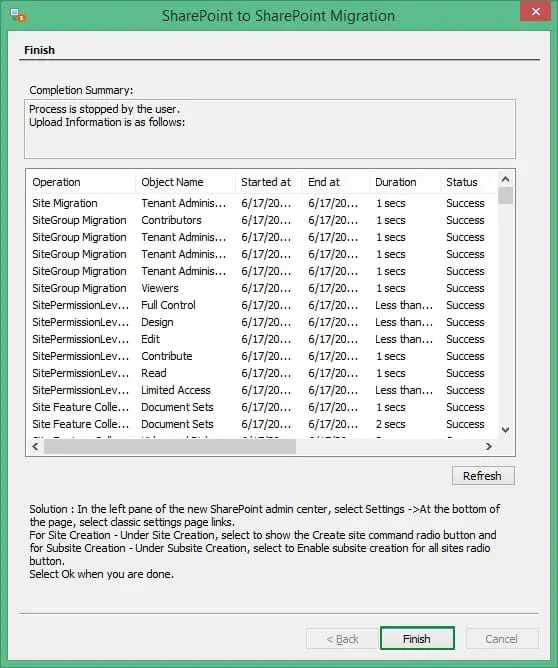
- When the migration is complete, you can see a completion summary showing the status of each migrated item. Click Finish.
Conclusion
SharePoint Online to SharePoint Online migration is a demanding task, manual techniques are not feasible to handle such complex data transfer. Employ the Kernel Migration for SharePoint to facilitate a secure and swift data transition. It’s a complete solution package to perform accurate SharePoint migration, data backup, etc.
FAQs
Q. Can I transfer a single site during SharePoint Online to SharePoint Online migration?
A. For a single site SharePoint to SharePoint Online migration, you can use the option “Save site as template” with site content. Later, upload the template along with data to the new SharePoint server.
Q. Can the SPMT tool help with SharePoint to SharePoint Online migration?
A. No, the SPMT tool can only perform SharePoint On-premises to Microsoft 365(SharePoint Online) migration. To perform a SharePoint to SharePoint Online migration you must use a professional 3rd party tool, like Kernel Migration for SharePoint.
Q. How do you check SharePoint Online storage?
A. You can either use SharePoint Online Admin center or PowerShell to check SharePoint Online Storage. The storage information can help you in case you are planning for a SharePoint Online to SharePoint Online migration.


