The popular collaboration and document sharing platform SharePoint from Microsoft is available for both platforms, on-premises and online. However, the online version of SharePoint allows users to access data from anywhere and offers numerous benefits such as better performance, better availability and more. This blog will provide you with an easy tool and a proper step-by-step guide to migrate SharePoint 2016 to SharePoint Online. But before that, let’s discuss the reasons why we need to migrate from SharePoint 2016 to SharePoint Online.
Reasons for SharePoint 2016 to SharePoint Online migration
- Cost efficiency: Using SharePoint Online removes the need for maintaining expensive on-premises infrastructure which reduces IT maintenance costs.
- Enhanced accessibility: SharePoint Online enables users to access their documents and collaborate from any location with an internet connection.
- Scalability: With SharePoint Online, organizations can easily scale their storage and resources based on their growing needs.
- Improved Security: With SharePoint Online you get more robust security measures, including data encryption, latest security patches, and automatic backups.
Why choose a professional tool over the native methods for SharePoint 2016 migration to SharePoint Online
To safely transfer SharePoint content, Microsoft offers two manual ways – SharePoint Migration Tool (SPMT) and PowerShell. However, these methods lack advanced features like scheduling migration, data filters, and more. The limitations of SPMT and PowerShell are given below:
- Manual ways lack the capability of complex migrations and can mostly handle only basic data transfer.
- You cannot migrate site permissions and version history with the SPMT tool and PowerShell scripts.
- Manually configuring complete migration may be confusing for users.
- Migrating to SharePoint Online using PowerShell queries is a complex process and may be confusing for users.
- The native methods have file size limitations and require special administrative permissions at the target site.
- When you migrate SharePoint 2016 to SharePoint Online, the target site remains inaccessible. This will hinder work productivity.
How to carry out SharePoint 2016 to SharePoint Online migration with a professional tool?
To successfully migrate SharePoint 2016 to SharePoint Online, you must use a robust tool like Kernel Migration for SharePoint. This specialized tool can handle the comprehensive transfer of sites, lists, libraries, documents, workflows, version history, site permissions, configurations, and other site contents. The SharePoint migration tool acts as an all-in-one solution for your migration needs, equipped with powerful algorithms to simplify the data transfer process. Moreover, it supports data migration across various cloud platforms, including OneDrive for Business, Google Drive, and Microsoft Teams.
Key features of the Kernel Migration for SharePoint tool
The software has several advanced features to ensure an efficient and secure migration procedure. Here’s the list of some prominent features:
- Complete data integrity is promised throughout the migration process.
- Ensure that the original file/folder hierarchy and structure are kept.
- Migrate SharePoint site permissions, version history, and metadata.
- Offers advanced features like migration scheduling.
- Real-time updates are displayed during SharePoint 2016 to SharePoint Online migration.
- Support Microsoft 365 GCC High, DOD, and other secured Office plans.
Steps to perform SharePoint 2016 migration to SharePoint Online
The step-by-step process of data transfer from on-premises to online SharePoint is given below:
Step 1. Download the Kernel Migration for SharePoint tool.
Step 2. Install and launch the software on your system.
Step 3. Right-click SharePoint (On-Premises/Online) in the source pane and select Add New SharePoint Site.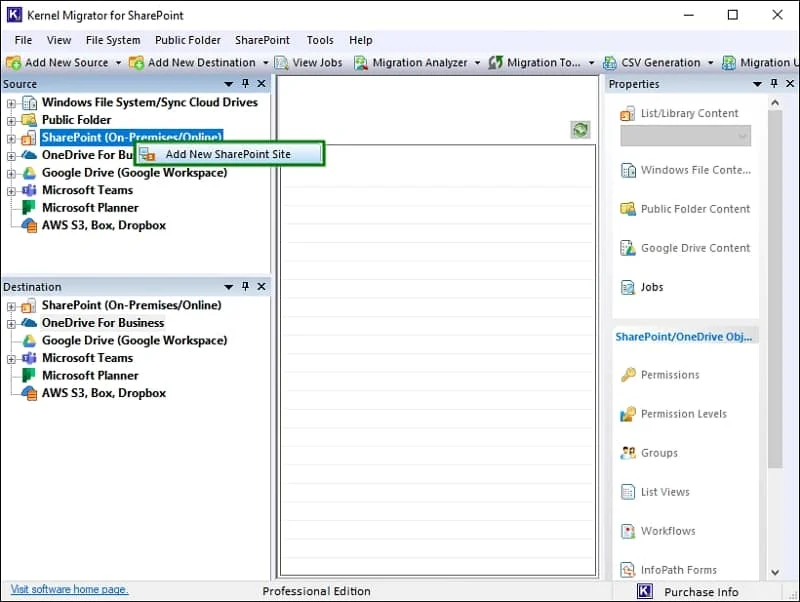
Step 4. Input a name for the project and select Site(s) Connection type. Choose a Connection Type (Basic Authentication or Modern Authentication) to connect to the source.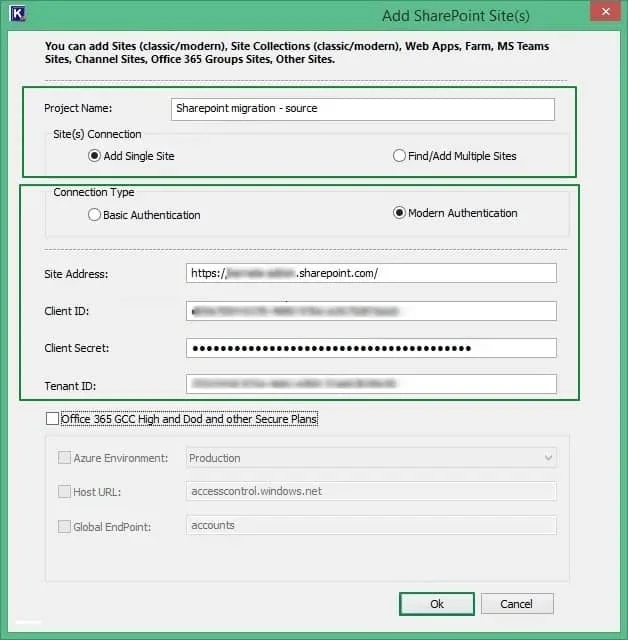
Step 5. Choose No, when tool asked for “Do you also want to add this SharePoint server as a destination?” Now, navigate to the destination section and just like in the previous step, add the target SharePoint site.
Step 6. Double click the project name to view the added sites.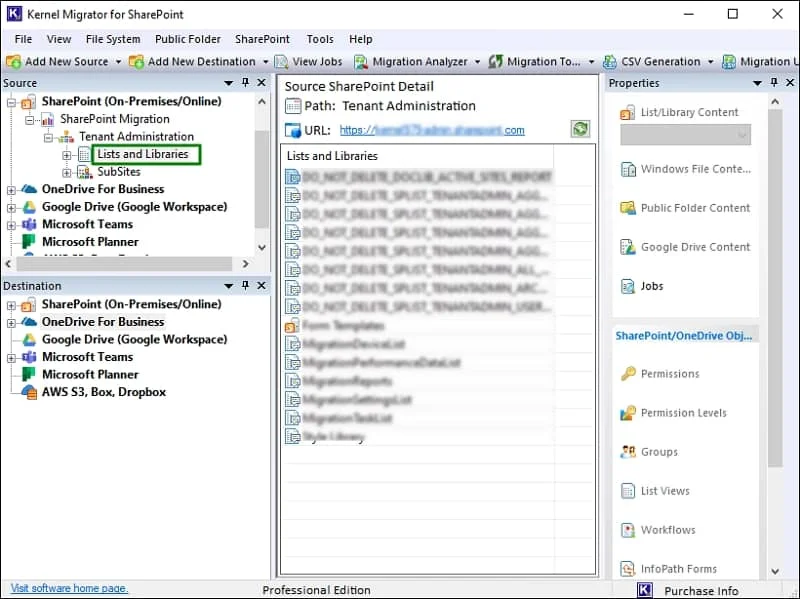
Step 7. For initiating the migration, double click and expand the project and right-click the expanded entity. Now, select ‘Copy To.’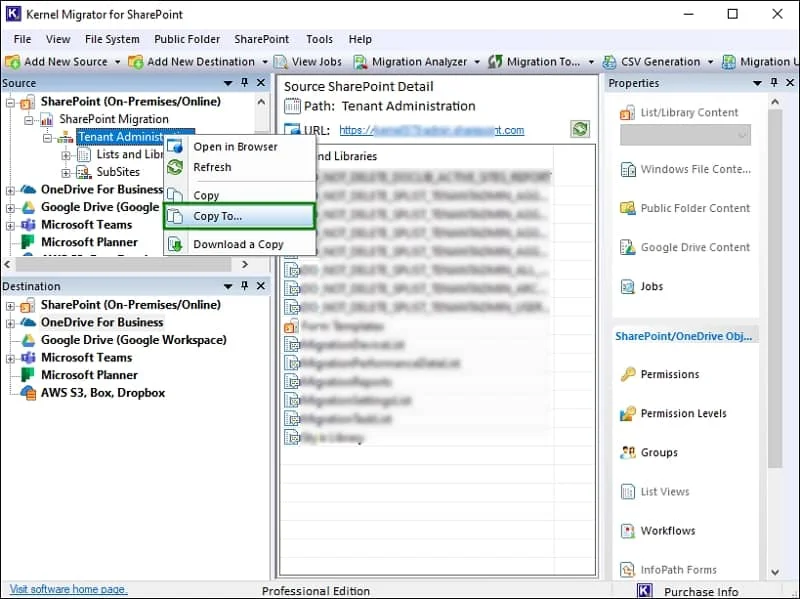
Step 8. The Enter Source window shows Source Name, Source URL, and Source Type. Click Next. If you want, you can change the source type by clicking the Edit Source Selection.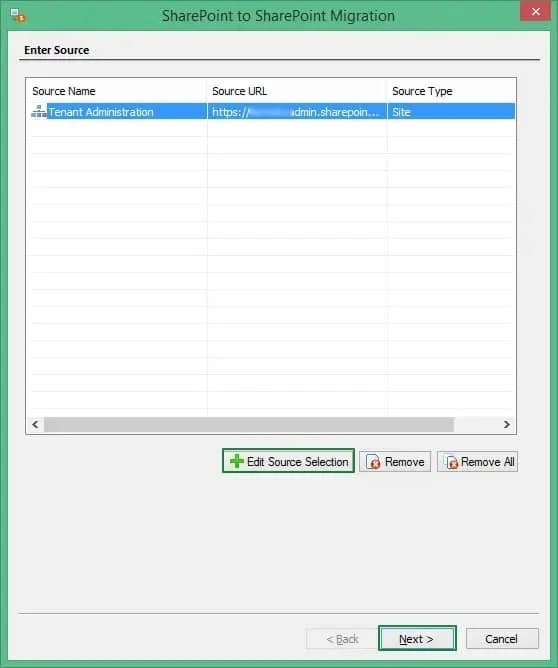
Step 9. Choose a migration option and click Next.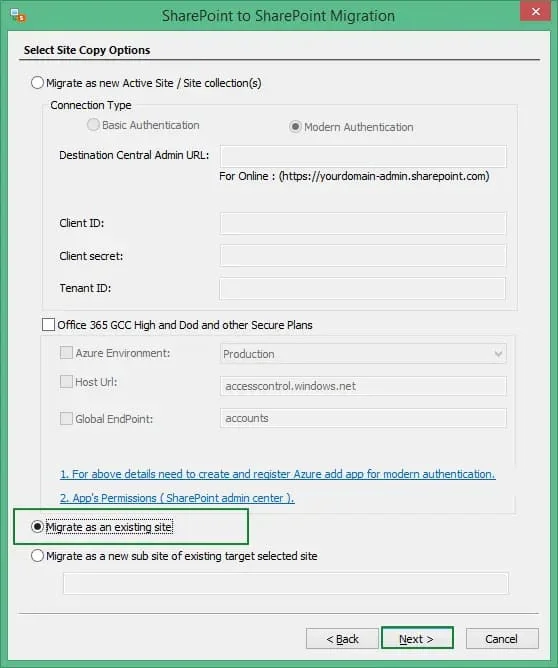
Step 10. Now, use the Site URL dropdown and choose the destination site. Then select the subsites by clicking on the Browse button. Click Next to move ahead.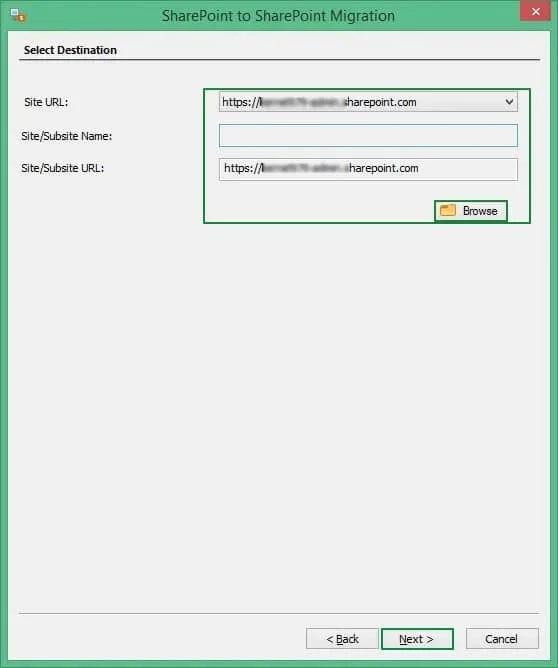
Step 11. Select the properties and attributes that you want to migrate along with the data from the SharePoint site. After selection, click Next.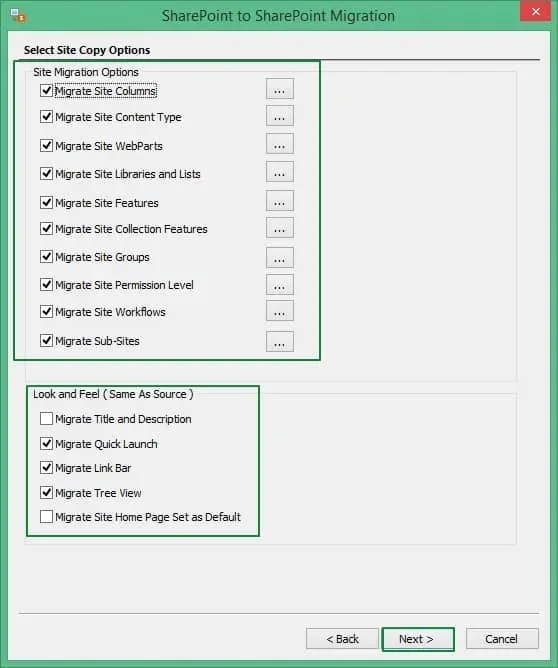
Step 12. Choose List/Library attributes and click Next.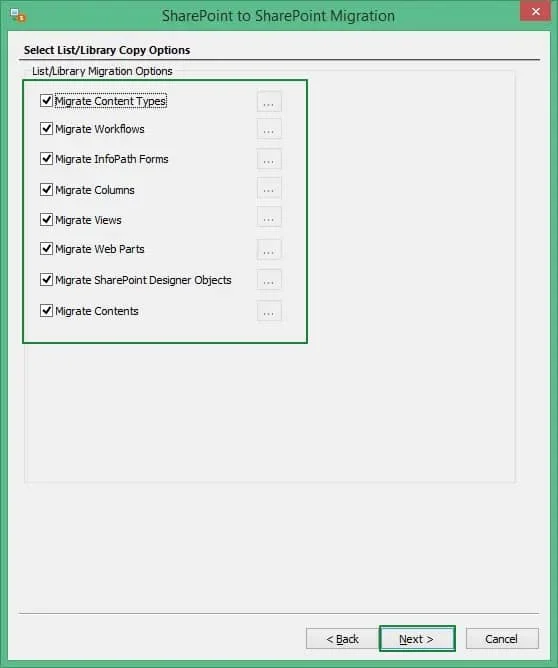
Step 13. Customize the data transfer by applying filters. Then, click Next.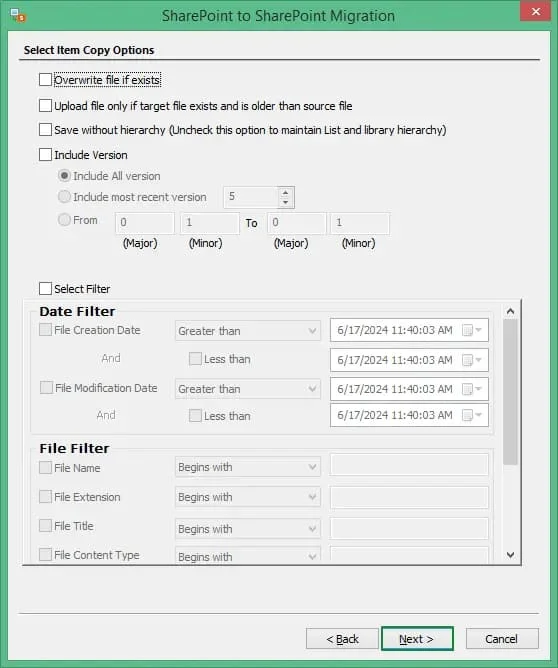
Step 14. To transfer your site permissions, select the option Migrate Permissions. You can also remap users by checking the second box and clicking Add new mapping. Click Next to proceed with the migration.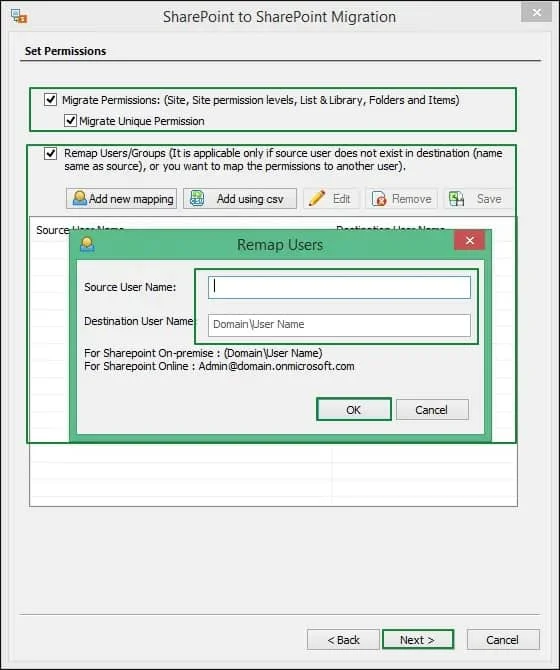
Step 15. To begin data migration instantly select Execute Immediate. You can also configure the SharePoint 2016 to SharePoint Online migration for a later time by selecting Schedule option. After selecting any option Click Next.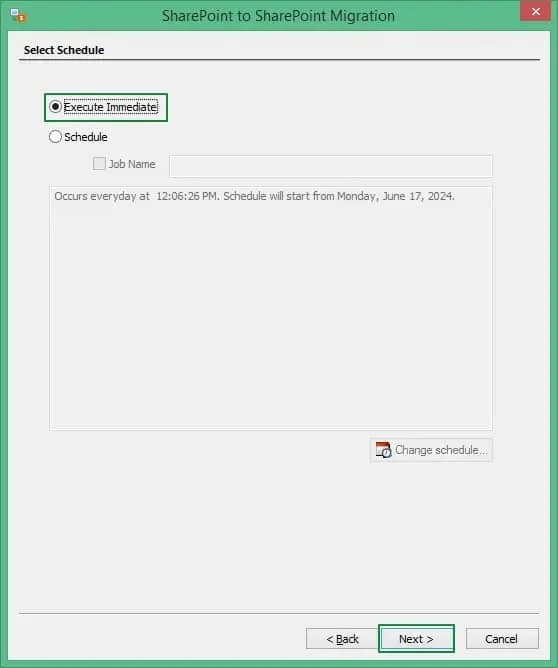
Step 16. A summary section shows the selected items for migration, desired destination, chosen features, filters, etc. Go through it and click Next.
Step 17. When the migration is complete, you can see a completion summary showing the status of each migrated item. Click Finish to exit.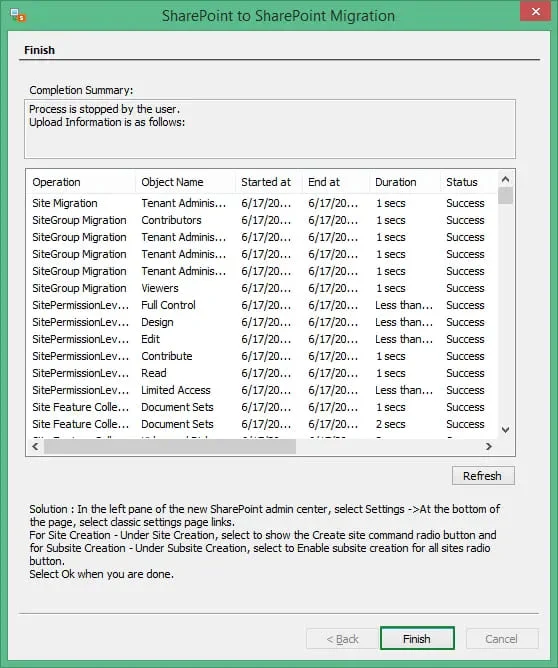
Conclusion
Migrating from SharePoint 2016 to SharePoint Online can be a complex task, but with the right tools, it can be done efficiently and securely. We also recommend checking SharePoint site access permissions before initiating SharePoint 2016 to SharePoint Online migration. The Kernel Migration for SharePoint tool ensures a smooth transition with complete data integrity. The tool preserves original file structure, permissions, and metadata.
FAQs
Q. Is there a way to schedule the migration process using the manual methods?
A. No, the SPMT tool and PowerShell do not offer advanced features like migration scheduling. To schedule SharePoint 2016 migration to SharePoint Online you must use Kernel Migration for SharePoint tool.
Q. What are the main benefits of SharePoint 2016 to SharePoint Online migration?
A. Migrating to SharePoint Online offers several benefits, including cost savings on IT infrastructure, enhanced accessibility and collaboration from any location, scalability, improved security, and more.
Q.How long does the migration process typically take?
A. The duration of the migration process depends on several factors, including the volume of data, the utility being used i.e. native tools or professional tools. Professional tools like Kernel Migration for SharePoint offers real-time tracking to help manage the process efficiently.


