An Exchange administrator is responsible for a range of tasks within an organization working on an Exchange Server environment. One such task is to export Exchange to PST, a crucial step for backup and data management. As part of the role, you need to always be ready to handle and resolve all sorts of challenges that come your way.
One important role is taking a regular backup in the form of the archive file. Several archiving tools are present at your disposal to take the backup, each with its own techniques to save the Exchange mailbox data in the PST file. There are often situations when you need to export mailbox data for a particular time period. Taking backup or exporting data of all the mailboxes doesn’t seem to be meaningful, so you’ll need to mention the date-range to save only the emails received or sent in the selected period. You can utilize the Exchange Management Shell commands or a professional tool that facilitates easy export of Exchange mailbox from a specific date range.
Please Note: You can perform an export of the Exchange mailbox to a PST file for Exchange 2016, 2013, and 2010 versions.
The idea of exporting mailbox data for a specific date range instead of exporting the entire mailbox data is great. By doing this, one can save a lot of storage space by not exporting useless data. You can do this using Exchange cmdlets or using a professional tool.
Let’s explore to learn about the methods that allows you to export Exchange mailbox for specific date range to PST.
Method 1: Run New-MailboxExportRequest filters in PowerShell:
Fortunately, Exchange Server supports PowerShell commands that allows you to manually export mailboxes to PST for a specified date range. Follow the simple commands for sent and received mailbox folders for exporting the data to PST file:
The command for Received emails:
New-MailboxExportRequest -ContentFilter {(Received -lt ’02/01/2018′) -and (Received -gt ’12/31/2017′)} -Mailbox report –FilePath [FilePath]\$($_.alias).pst
The command for Sent emails:
New-MailboxExportRequest -ContentFilter {(Sent -lt ’02/01/2018′) -and (Sent -gt ’12/31/2017′)} -Mailbox report -FilePath [FilePath]\$($_.alias).pst
Please Note: The name of the Exchange mailbox is “Report”, used in PowerShell commands.
After the completion of the export process, you can delete the export command by another command.
Get-MailboxExportRequest | Remove-MailboxExportRequest
Limitations of Manual Method:
Here are some drawbacks that explain why manual methods do not seem to be the right choice to export Exchange mailbox to PST:
- Require full administrator rights.
- Must follow correct syntax.
- Require technical expertise.
- Likely to face data loss scenarios.
Method 2: Use EDB to PST Converter Software
Kernel for Exchange Server allows to export any Exchange mailboxes to PST. It provides a date range filter to export items of a particular date range to PST. Furthermore, the tool has no limitations like the manual method that can make export Exchange to PST challenging.
The second and the most suitable method that IT experts advise to export specific Exchange mailbox data by date range is a third-party tool for converting EDB files to PST file. The most recommended EDB to PST converter tool that is facilitated to segregate data by date range and converts it to PST file successfully is Kernel for EDB to PST.
Follow the simple steps given below to export Exchange mailboxes for a specific date range with the help of the software:
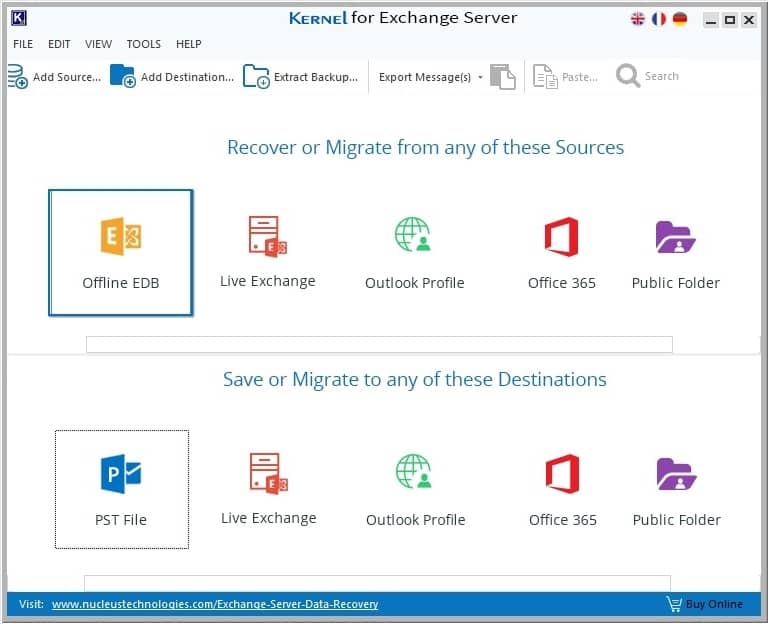
- Install and run the software, click Offline EDB to add as source.
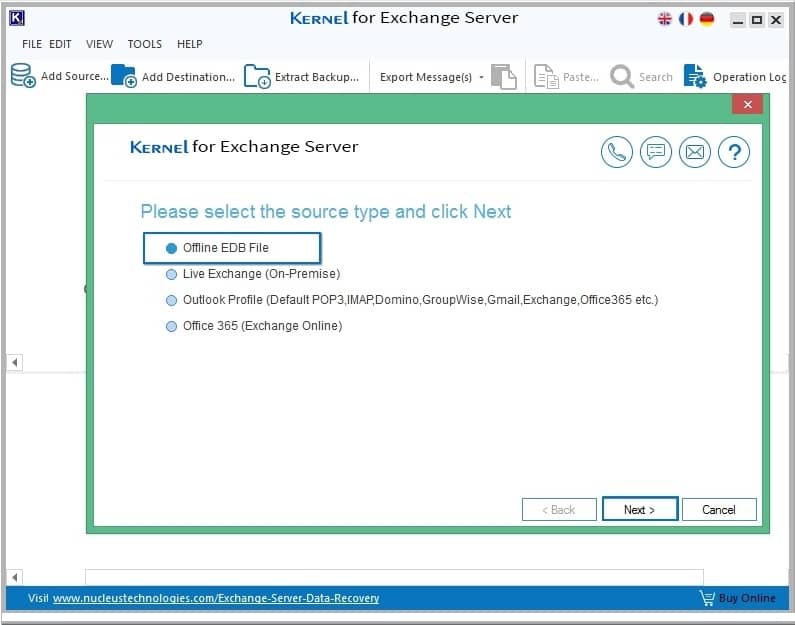
- Select source type from the given list of platforms to choose from and click Next.
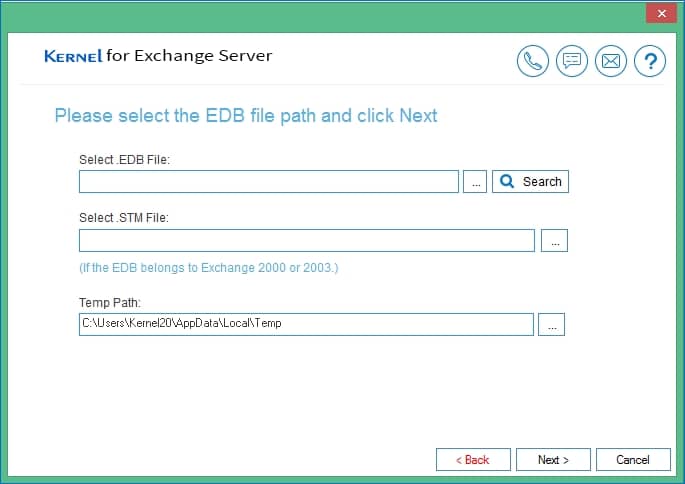
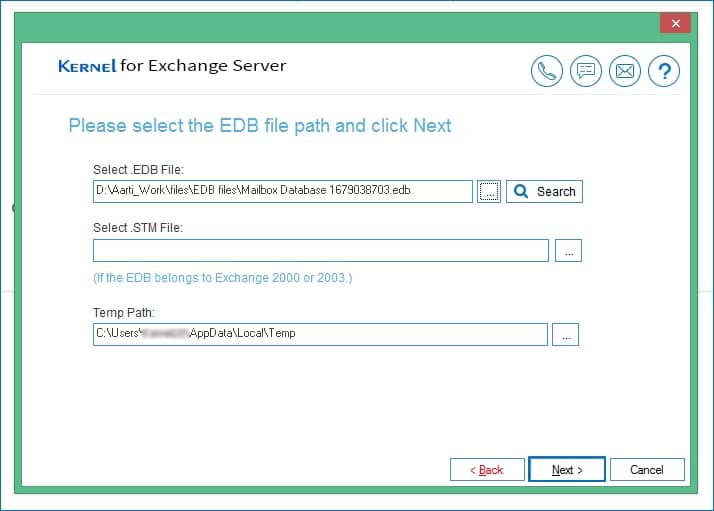
- Click on ellipsis (…) or select the folder and then use Search button find EDB files.
- Add the EDB files from your local storage.
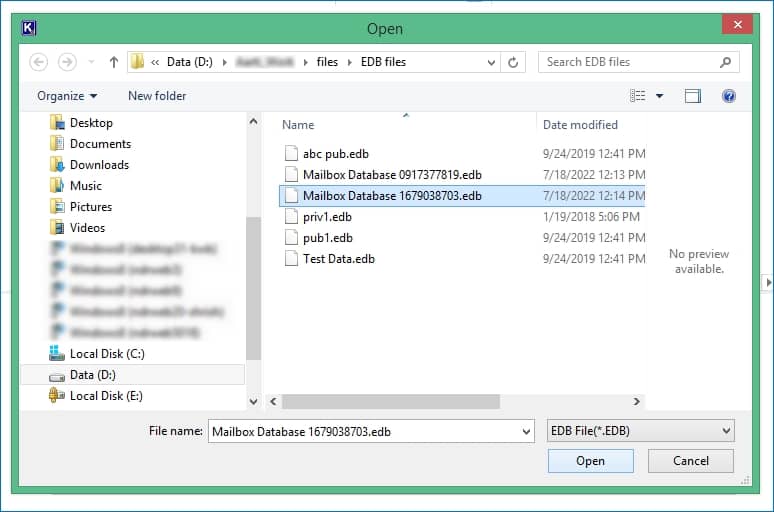
- Once you’ve defined the path of your EDB files, click Next.
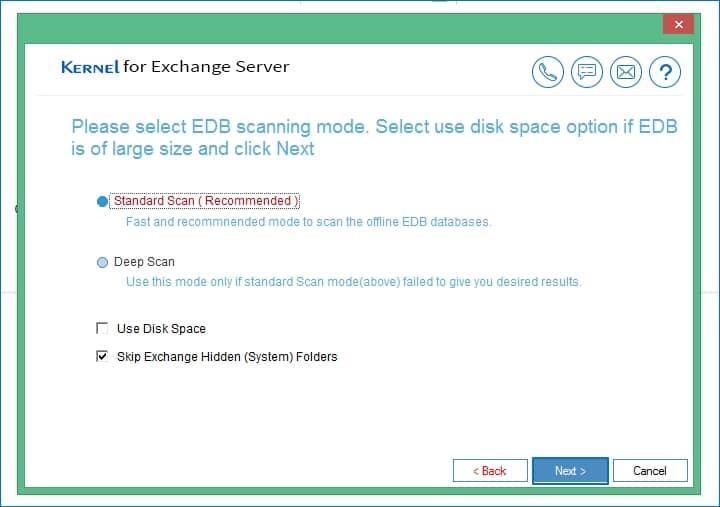
- Add the EDB files from your local storage Select the EDB scanning mode amongst Standard Scan and Deep Scan mode and click Next button to proceed further.
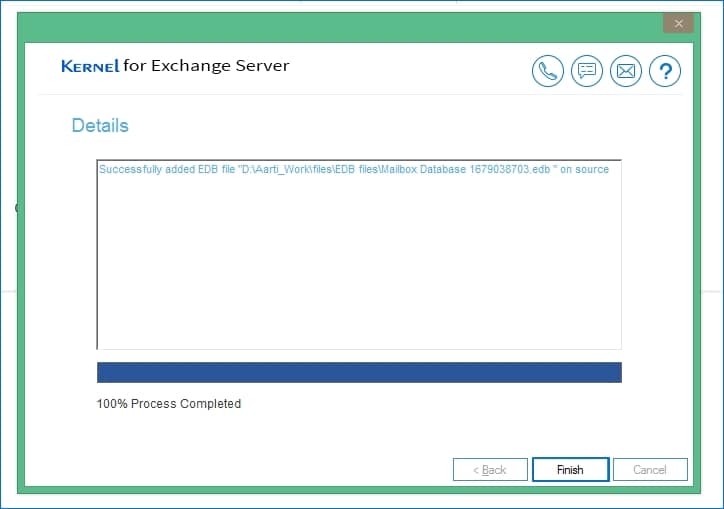
- The wizard shows that the scan is complete, and files are added to the source pane in the tool.
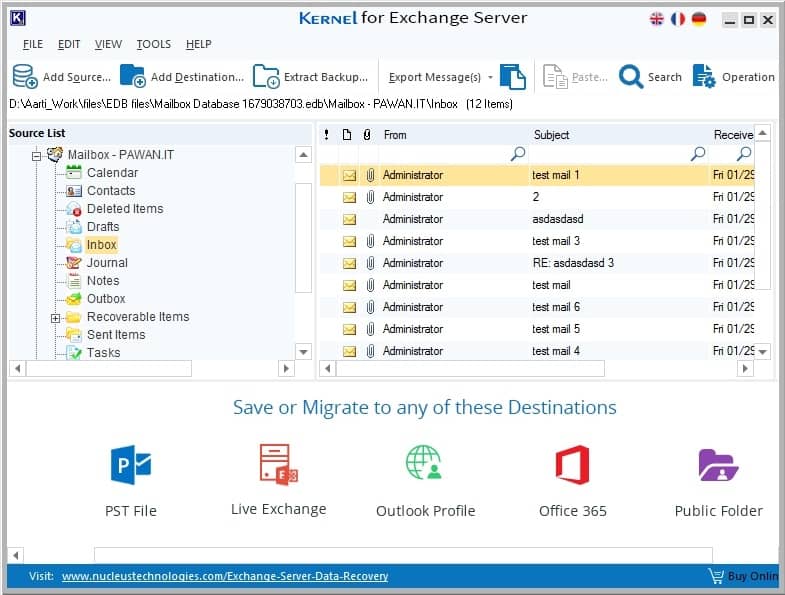
- All the mailboxes from the selected mailbox are added in the source, you can preview its contents by double clicking on a folder.
- Now, click on Add Destination to specify a location where to want to export Exchange to PST.
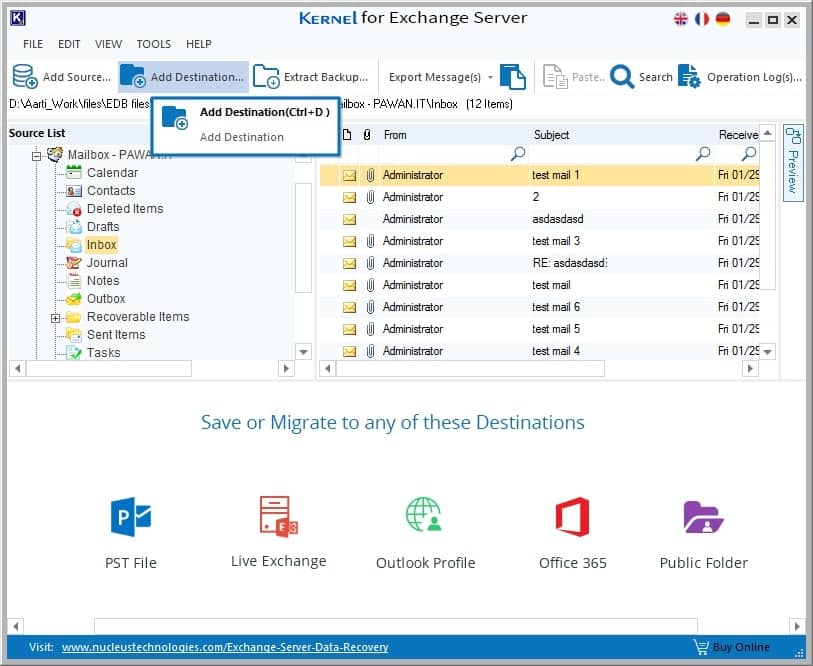
- Choose Create New PST File from the destination options and click Next button.
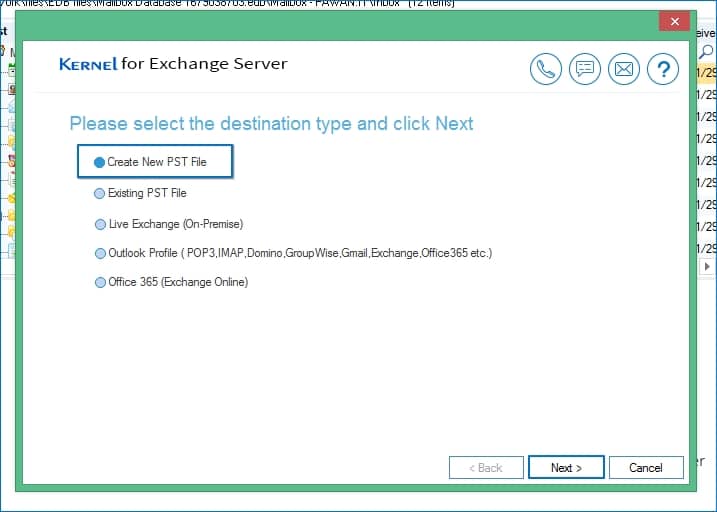
- Provide the location to save your new PST and name the folder in which the data will be exported. You can also Unicode the PST for protection of data.
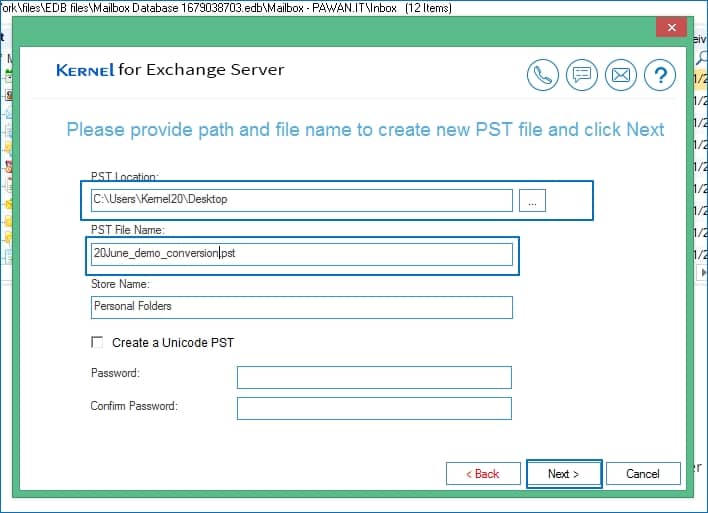
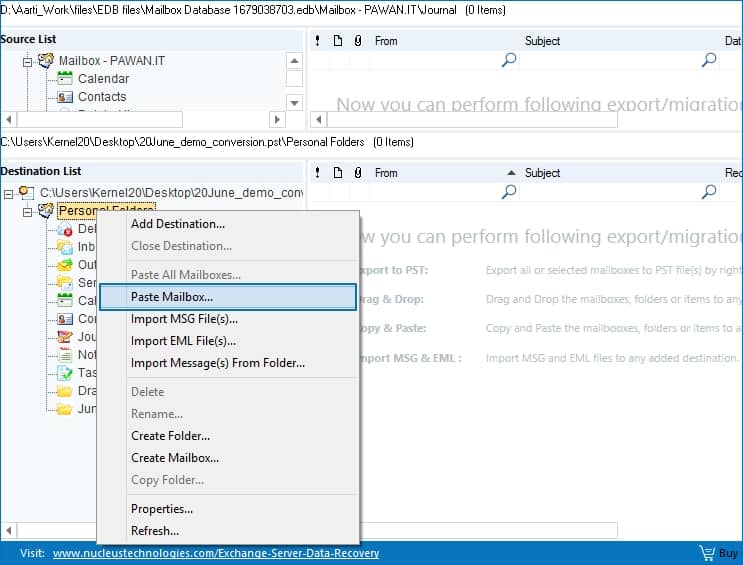
- Copy the desired mailbox that you want to take to the destination by using the right-click.
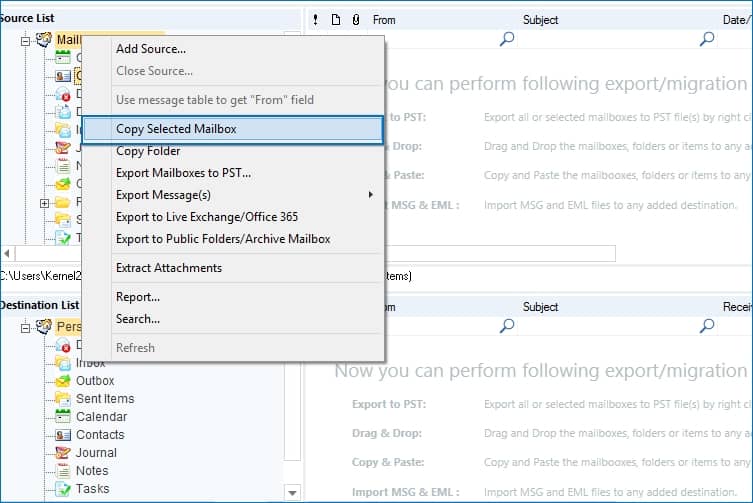
- Now, paste the copied mailbox in the previous, refer the screenshot provided for clearly understanding the step.
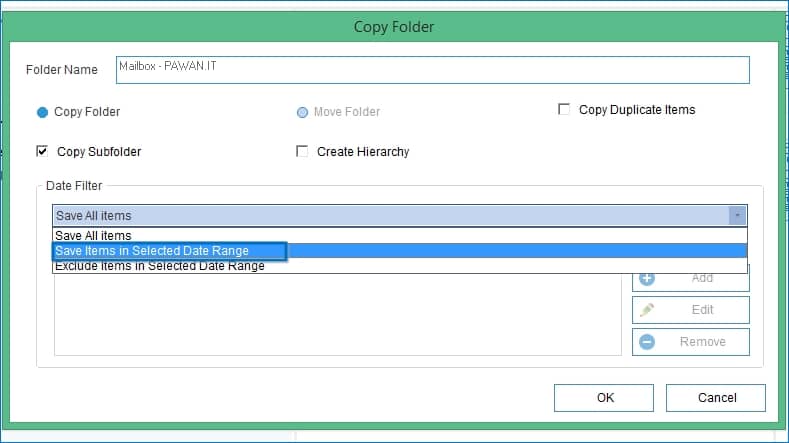
- Once you’re done, you will be prompted with Date Filter option for exporting specific date range data from EDB mailbox to PST by selecting Save items in Selected Date Range from the drop-down list.
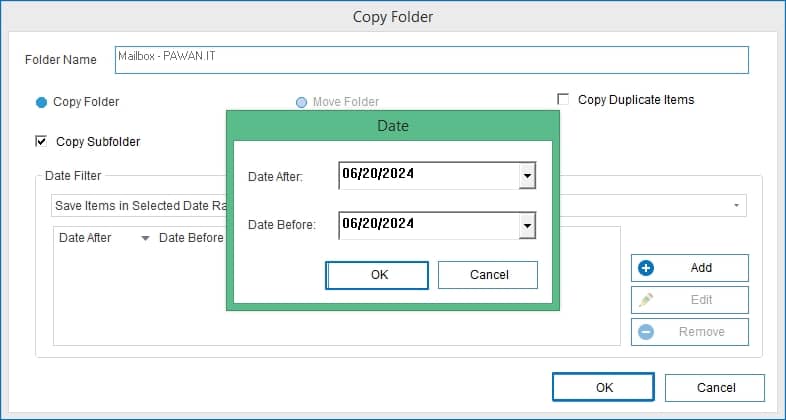
- Click the Add button to add Date After and Date Before for exporting specific data to PST. Click OK to finish the export process.
- Once the export is complete, you’ll see the operation logs explaining the details of the items exported from the mailbox.
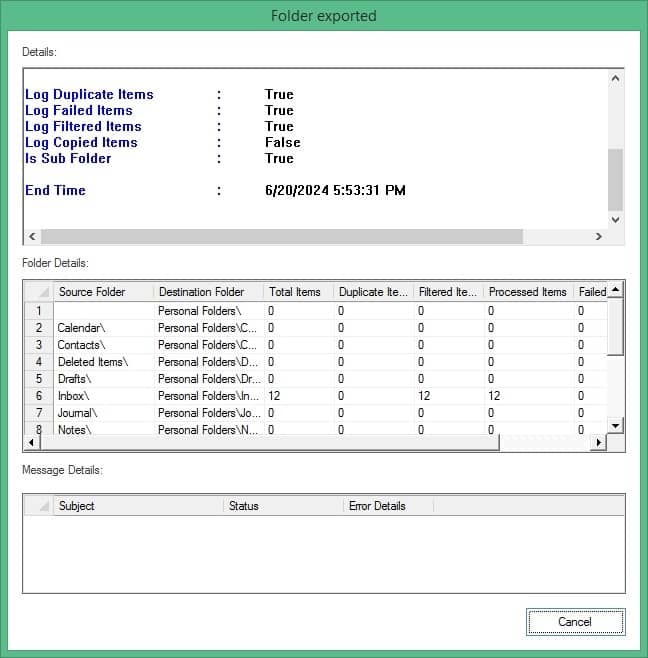
Follow the above steps precisely to export exchange to PST, filtered to your desired date range. This EDB repair tool saves data with 100% data integrity and original folder hierarchy.
Final words
With EDB to PST converter you can not only convert EDB to PST, but you can also export Exchange to PST from Live Exchange, Outlook profile, Office 365 and Public folders to PST file, Live Exchange, Outlook profile, Office 365 mailbox, and Public Folder. This hassle-free Exchange recovery tool understands all the nuances.


This tool reduces the difficulties of filtering emails of a specific date range and allows the precise migration of the EDB file data. The process is short and result-oriented.