Microsoft Outlook provides various features to enhance your email messaging experience. One of them is the ability to add images to your email messages. Images play the most vital role in every email as they help you to view your ideas, quotes and thinking through a picture. You can add an image file as an attachment or paste/insert it in the mail body itself. Both ways have their pros and cons.
Inserting the image in the mail body makes it easier to view the image directly. Mail body and the image can be viewed simultaneously on the same screen for better understanding. It is preferred when you are explaining a scenario along with a screenshot or example in images. For an image added as an attachment, you need to open or preview it in another window. The image can’t be viewed directly but has to be opened, saved, or downloaded first. This method is suitable when you have multiple images as attachments, or the recipients need the image files before using them.
No matter the two methods you use to send your email, you may need to resize your image. For an inserted image, you may need to crop it to remove unwanted information or resize the image to better fit with the email contents. For image attachment, resizing can help reduce the image size allowing you to send more image files in a single email.
Well, there are multiple ways to resize images in Outlook email.
- Insert and resize images in the body of an email message
- Attach an image to your email and resize it
- Resize an image using Kernel Bulk Image Resizer tool
We’ll discuss each of the above methods in a more detailed manner.
Note: Some like Gmail, Yahoo, and Exchange restrict mailing large files. Typically, while sending a large image file as an attachment, users often encounter alert saying, “Your file is too large to send.” This situation can be handled by resizing the image file in Outlook mail.
Insert and resize images in the body of an email message:
To insert and resize an image file inside the body of an email message, follow the steps given below:
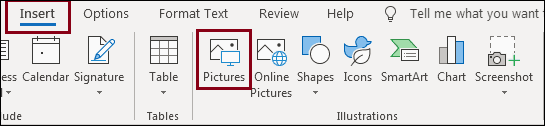
- Insert image: Inside the body of your email message, click on the desired location where you want to insert an image. Click on the Insert option from the menu bar and then choose Pictures from the Illustrations group.
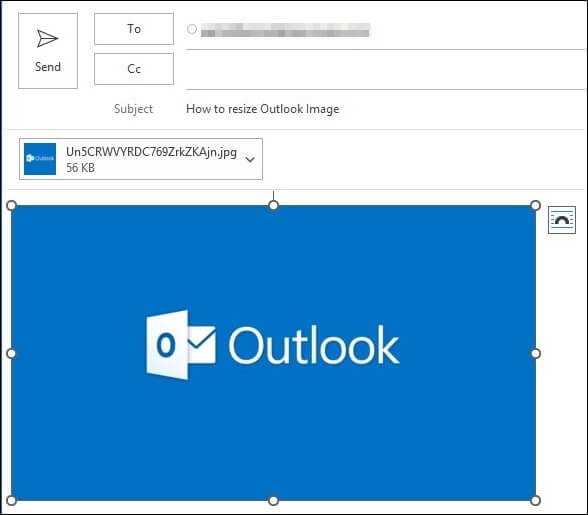
- Resize an image: If you want to resize an image, click on the image to display circular sizing handles located at each corner of the image.
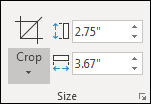
- Resize an image to exact dimensions: Occasionally, you have to send an image to exact dimensions. In that case, Select the image > Click on the Format tab from the Menu bar and go to the Size group. Enter the required dimensions for your image.
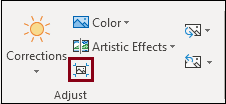
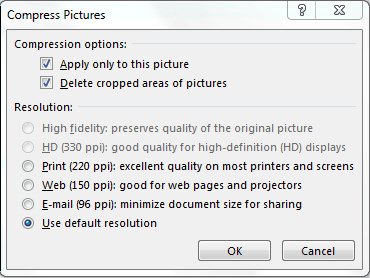
- Compress images to reduce the file size :- Compressing an image reduces the file size. Though it maintains the height and width of the image but degrades its resolution. Images with lower resolution have a smaller file size.
Select the image > Click on the Format tab > Click on the Compress Pictures icon from the Adjust group.
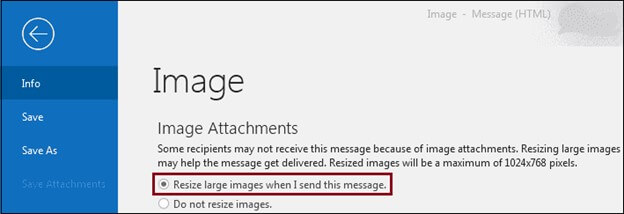
Whenever you need to attach an image to an Outlook message, you can resize the large images to a maximum resolution. If you have embedded the picture in the body of the message, you cannot resize the image in Outlook. You have to resize it before embedding. To do so, follow the below steps:
- Start with a new email message.
- Click Attach File in the Insert tab, or even you can drag and drop an image from File Explorer to the Subject field.
- Select the File tab in the message window.
- In the Image Attachments section, select Resize large images when I send this message from the Info tab.
- Click the Message tab to get back to your email.
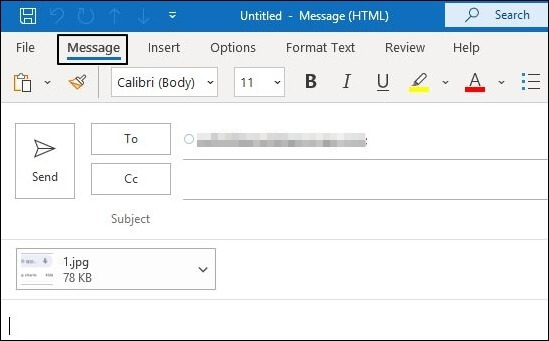
- Now, after completing your message, click Send.
Though many tools are available to resize images before using them as attachments but choosing the best one out of all the apparatus requires a real hustle. Therefore, be smart and go for Kernel Bulk Image Resizer. This tool provides several advanced features which are mentioned below.
With this software, you can:
- Resize your images without causing any distortions.
- Resize multiple images at the same time.
- Specify JPEG quality for the images.
- Flip, rotate, and resize your images.
- Save the images using different formats like JPEG, JPG, PNG, BMP, TIF, TIFF, and GIF.
Concluding Lines
Outlook’s images are essential to present your email uniquely. Outlook has its own criteria to send images. Thus, you have to resize the image, so we have mentioned all the possible ways to resize an image in Outlook. However, these methods are lengthy and time-consuming. To save time and effort, use the recommended way to resize your images through the Kernel Bulk Image Resizer tool. The tool provides a broad approach for resizing images based on different formats. Moreover, the tool works uninterruptedly, irrespective of the number of images you want to modify.