Microsoft Outlook is popular among daily users and professional businesses. It seamlessly connects with multiple servers and email accounts like IMAP, POP, SMTP, Exchange, and Office 365. The software's adaptability is further enhanced by its availability on two major OS platforms, Windows and MacOS, which gives users a sense of flexibility and control over their work.
When the users need to connect Outlook for Mac with Office 365, then they must know the correct method as it requires sound information from both platforms. Let's see the reasons and know how to configure Office 365 in Mac Mail.
Reason to configure Office 365 in Outlook for Mac
Every Mac user who uses Office 365 would want to configure Outlook for Mac in their system. However, some common reasons that states why users often configure their Office 365 account with Outlook include:
- To access all the Office 365 emails and messages offline.
- When Outlook for Mac is the primary email app for communication.
- To avoid opening an Office 365 account again and again just to access emails.
- For better productivity and faster communication.
Now, you know why people configure Outlook for Mac, so let’s move to the procedure to configure Office 365 in Outlook for Mac.
How to configure Outlook 365 in Mac?
If you come across how to configure Outlook 365 in Mac, then this section will help you to resolve the issue. The configuration process of Office 365 in Mac is complex and needs to be performed carefully. Here is the detailed procedure outlined below to easily configure Office 365 account in Mac mail:
Install Outlook for Mac
The process to install Outlook for Mac is simple and it only takes a few minutes to install it on your system. But before we move on to the steps, make sure you are using the updated version of Mac. The steps to download and install are divided into two sections as per your requirements.
Note: When you are installing Outlook for Mac, two download options will pop up: a company key or personal product key, or an Office 365 license that comes with the Office Suite downloadable version.
Company or Product Key
- If you own the product key, you need to follow this link: https://www.microsoft.com/en-us/download/details.aspx?id=45492 & then tap on Download.
- Once you have the software on your system, go to Finder and tap on Downloads.
- Open the downloaded file Microsoft_Office_2016_Installer.pkg
- As the installation wizard pops up, hit Continue and let the installation begin.
- Next, you need to fill in the Mac login details and finish the installation
- Type up your product key, and you are all set with Outlook on your Mac.
Office 365 license
- Visit Office.com and tap on Sign-in. Feed in your ID and password.
- Next, go to Settings and click the Office 365 Settings option.
- From the Software tab, choose the option Install to start your download.
- As we have the Microsoft_Office_2016_Installer.pkg file, access it and begin the installation.
- Click on Continue to move ahead, and installation will be done in seconds.
- Once you get a pop-up quoting your Mac login password, enter your details and complete your installation.
Configure Outlook for Mac
As we have followed the process of installing Outlook for Mac on our system, we’ll now configure it to access Office 365 mailbox or Exchange mailbox. Here are the steps, follow them carefully:
- Launch Outlook for Mac and click Tools from the Menu bar.
- Click Account and then Add an Account window will appear on the screen; click Exchange or Office 365 from the options.
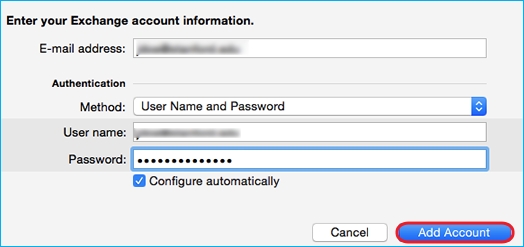
- In the opened wizard, add the details for your Office 365/Exchange account, such as:
- Email address
- Select User Name and Password from the Method dropdown
- Username and password

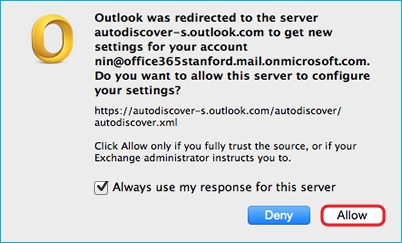
- In the pop-up window, check the checkbox Always use my response for this server; then click Allow.

Your Office 365 account will be configured with Outlook for Mac. This method is helpful even when you’re already using Outlook for Mac with another email account.
However, if you don’t have an existing profile in Outlook for Mac, then all you need to do is launch Outlook on the system and a welcome screen will be provided with Add Account wizard. Select the account type you want to configure and then follow the mentioned above to configure Office 365 in Outlook for Mac.
What if your OLM files become inaccessible?
OLM files hold crucial information and hence need to be kept safely. If your files become inaccessible, then you must resolve the issue soon to save them from further issues. Kernel for OLM to PST tool works best to resolve all Outlook for Mac related issues. This OLM to PST converter repairs the OLM file and converts it to multiple file formats. Here are some of its features listed below:
- Easily converts the repaired OLM file into formats such as PST, EML, MSG, HTML, etc.
- The software allows you to import Outlook OLM to Gmail, Exchange server, Office 365, Yahoo, etc.
- Get the option to find particular emails and preserve your data hierarchy in their original form.
Conclusion
Outlook for Mac is ideally used by businesses that rely on the Mac system for their internal and external communications. Besides, it also provides connectivity to Exchange and Office 365 mailboxes in Mac environments. However, for the scenarios when your OLM file is inaccessible, or if you want to access OLM emails in Windows Outlook, use Kernel for OLM to PST to convert OLM to PST and get access to your mailbox items again.

