Read time: 7 minutes
Setting SharePoint permissions is quite complex, but at the same time, it is a crucial task for any administrator or owner of a library or list. Permissions allow you to control who has access to your data so that sensitive information is only seen by those who need it.
By default, SharePoint sites, lists, and libraries inherit permissions from their parent site. However, when necessary, you can break permissions inheritance and assign unique permissions to specific items.
It is important to note that when a list or folder contains more than 100,000 items, you can’t break permissions inheritance on the item itself. But there are still ways to assign unique permissions in these cases.
In this article, we will help you through the steps to break permissions inheritance, assign unique permissions, and more so that your SharePoint data is secure and accessible to those who need it.
View the Permissions page in SharePoint
All the instructions given below on setting and customizing permissions in SharePoint are applicable to Microsoft Lists, SharePoint in Microsoft 365, SharePoint Server Subscription Edition, SharePoint Server 2019, SharePoint Server 2016, and SharePoint Server 2013.
For a list or library
- Go to the library. Open the library, tap on Settings and go to the Library settings.
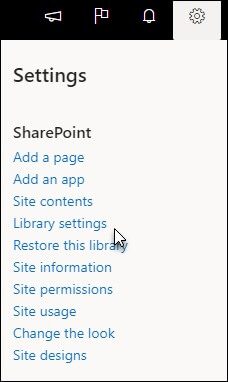
- In case you cannot find Settings, go to the Library or List tab and open the ribbon. Select Library Settings or List Settings on the ribbon.

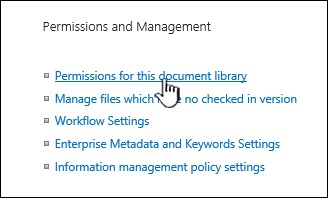
- Within Permissions and Management, choose Permissions for this list or Permissions for this document library.
For a survey
- Open the survey and go to Settings.
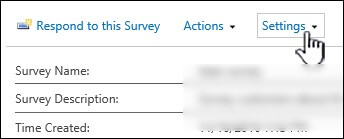
- Select the dropdown and choose Survey Settings.
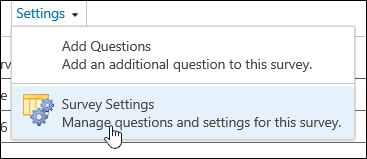
- From the Settings page, choose Permissions for this survey.
Breaking permission inheritance in SharePoint
Lists, libraries, or surveys become parents for their items when their permissions are broken, and changes are made to their permissions. New permission settings will now be inherited by items under that parent (unless the items have their own unique permission settings). For breaking inheritance and assigning unique permissions, here are the steps to follow:
- Open the list, library, or survey.
- Navigate to the Permissions page.
- Choose the option Stop Inheriting Permissions.
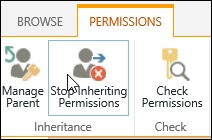
With just these three steps, you can easily break permission inheritance in SharePoint.
Assigning unique permissions in SharePoint
Before granting unique permissions, you need to break inheritance from the parent site. To grant unique permissions, follow these steps once you have broken inheritance:
- Open the list, library, or survey. Navigate to the Permissions page
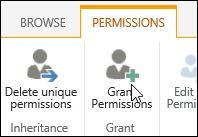
- Tap on Grant Permissions on the Permissions tab.
- From the Share… dialog box, Select Invite people, and type the names of the people or group you wish to give access to under the Enter names or email addresses… box.
- The option Share everything in this folder can be checked or unchecked, including items with unique permissions. By setting unique permissions on an item, you can grant or restrict access to that item. It is only available for folders.
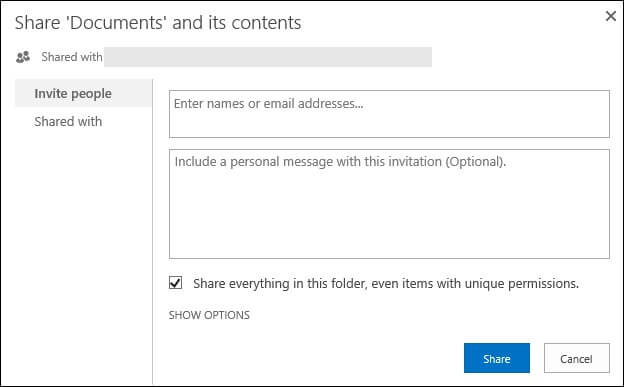
- By default, the permission level for those you invite is Edit, which means they can make some changes to the list, library, or survey. Select a permission level and change it if you wish to grant a different permission level, such as Read only.
- In the Invite people box, everyone will receive an email message. You can prevent this by clicking Show options, then unchecking Send an email invitation.
- As you are done, tap on Share.
Changing SharePoint permissions levels
Prior to changing unique permissions, you need to break inheritance from the parent site. Change permissions after breaking inheritance by following these steps:
- Open the list, library, or survey. Navigate to the Permissions page for the list, library, or survey.
- Under the Name list, checkmark the box of the user or group that you want to change permission levels for.
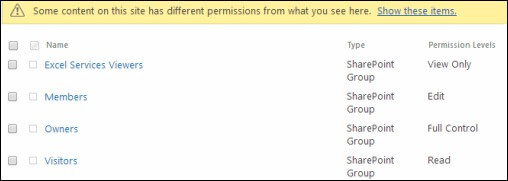
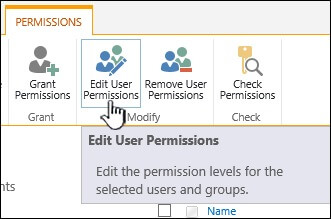
- Choose Edit User Permissions.
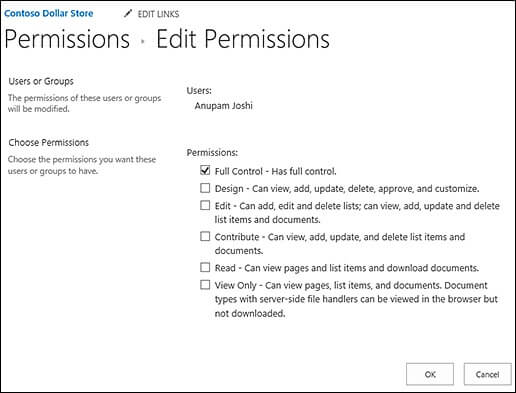
- Within Permissions, checkmark the permission level box you want for the users or groups.
Remove the SharePoint permissions
For removing permissions from users or groups with full access, here are the steps to follow:
- Open to the list, library, or survey. Navigate to the Permissions page for the list, library, or survey.
- Under the Name list, checkmark the box of the user or group that you want to remove permissions.
- Choose the option Remove User Permissions.
When it comes to setting SharePoint permissions, one needs to have a complete and accurate inventory of user roles, access levels, and permissions. However, this can become quite cumbersome when dealing with a large-scale migration project, especially when migrating to multiple platforms such as SharePoint Online, 2019, 2016, 2013, and 2010.
This is where the Kernel Migration for SharePoint tool comes in handy. With its new login wizard, users can quickly connect to multiple sites and easily manage their permissions. Moreover, with its enhanced and rapid SharePoint list and library migration support, users can have complete control over their data migration and migrate data in bulk to SharePoint. So, if you want to simplify your SharePoint migration and moderation tasks, Kernel Migration for SharePoint is the way to go.
Last say
Managing SharePoint permissions is critical to maintaining your organization’s data security and access controls. We have tried to put every aspect related to SharePoint permissions with our in-depth research. From setting persimmons to removing permission in SharePoint, we have got you covered. Follow the steps carefully and get all your permission issues sorted out in no time.
Moreover, for any SharePoint permissions migration or other related issues, we recommend you to go for the Kernel Migration for SharePoint tool for its easy to use interface along with advanced capabilities. Try out the trial version of SharePoint Migration tool and be equipped with its top-notch functionalities now.


