Read time: 9 minutes
SharePoint migration is among the most complex data migrations that almost every organization has to do at least once. The SharePoint 2010 to SharePoint 2016 migration is not as simple as clicking the update button on your Windows. You have to manually follow a series of interconnected steps to make the transition possible. Therefore, many SharePoint admins struggle when migrating for the first time.
If you are a complete beginner to SharePoint migration and wondering what to do and how to do it, then don’t worry, as I will be your guide in achieving a successful migration. I have experience with almost all the variations of SharePoint migration. However, keep in mind that the current method of SharePoint migration doesn’t allow you to directly migrate SharePoint 2010 to SharePoint 2016. We will first migrate to SharePoint 2013 and then to SharePoint 2016. If you want to directly migrate to SharePoint 2016, then you have to use a third-party SharePoint migration tool.

What are the Reasons for SharePoint 2010 to SharePoint 2016 Migration?
SharePoint 2016 version brings a lot of new capabilities to the consumers. A few reasons and key points to know before migrating to SharePoint 2016:
- Large File Support: The new SharePoint 2016 server is better at handling large files, which is crucial for modern content management.
- MinRole Feature: This feature simplifies the farm topology deployment and management to get better performance for specific server roles.
- Hybrid Configuration: With SharePoint 2016, you can integrate with Office 365 or SharePoint Online. This feature will provide more flexibility to your work.
- Fast Site Collection Creation: The new version significantly reduces the time to create new site collections for new teams or departments.
- New Compliance Features: Better data compliance management capabilities with strict policies towards data safety and usage.
- WOPI Protocol Support: Allows improved integration of Office Online Server to easily access, edit, and save various office documents like Word, Excel, etc.
Download an automated tool, Kernel Migrator for SharePoint to perform bulk migration from SharePoint 2010 to SharePoint 2016.
Manual Method for SharePoint 2010 to SharePoint 2016 Migration
Microsoft has not yet released any tool that supports migrating SharePoint 2010 to SharePoint 2016. You need to first move to SharePoint 2013 and then upgrade from SharePoint 2013 to SharePoint 2016. To prevent any data loss, make sure to backup all your SharePoint sites.
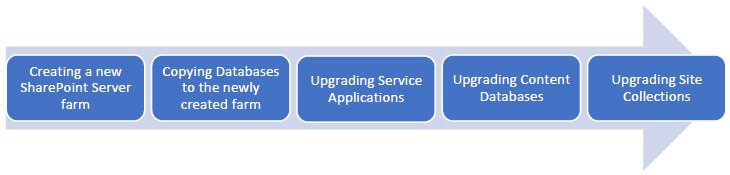
The migration involves many steps. To make things easy and understandable, we’ll discuss the complete migration process in a series of five major steps, which will be further divided into more steps.
Step 1. Create a SharePoint Server 2013 Farm
You must do a proper analysis of your current SharePoint environment and future needs before you finalize the hardware and software configurations for your new farm.
- Collect detailed SharePoint server information from the current SharePoint environment.
- Turn off services like PowerPoint Broadcast Sites and Web Analytics in SharePoint Server 2010 to avoid errors.
- Save passphrase for Secure Store service application of SharePoint Server 2010 for use in new SharePoint Server 2013.
- Now, install SharePoint Server 2013 in the new environment with all required language packages, using Microsoft SharePoint Products Preparation Tool.
- Create service applications like Business Data Connectivity service, User Profile Service, Secure Store service, etc., on your new farm.
- Apply the SharePoint 2010 farm configuration settings to the new farm and configure the new farm.
Step 2. Copy the Database to the New Farm
To move your database to the new environment, you have to find all the databases storing your SharePoint data. Then backup and restore them in the SharePoint 2013 farm.
A. Finding all the Content Databases
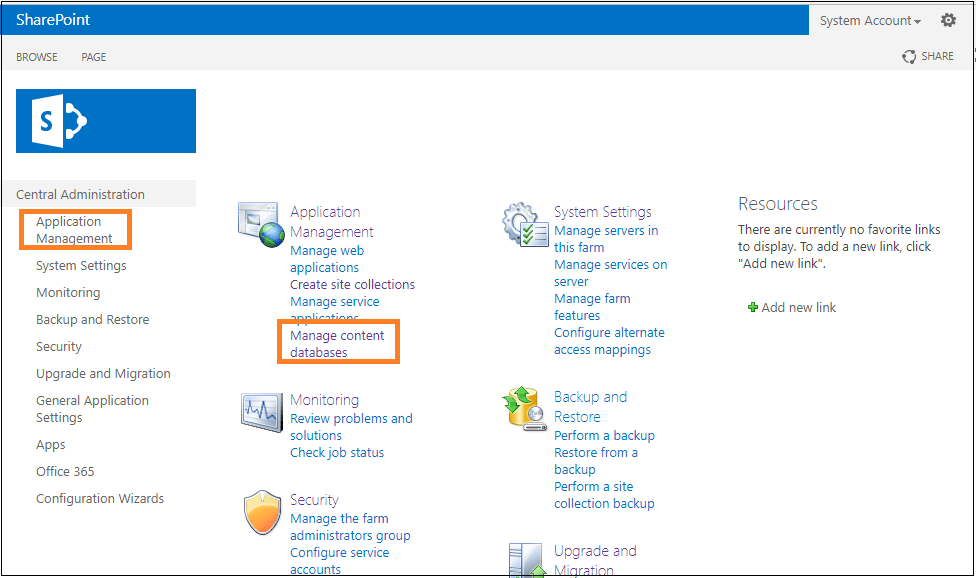
- If using central administration, navigate to Central Administration >> Application Management >> Manage Content Databases.
- If using the PowerShell, run the following cmdlet:
B. Backup SharePoint 2010 Content Database
- First, confirm that the user account performing this procedure is a member of db_owner fixed database role for the databases.
- Open SharePoint 2010 SQL Server Management Studio. Go to Object Explorer, connect to the Database Engine instance, select the server and then expand Databases.
- Choose your database and right-click on it. Select Tasks and click Backup.
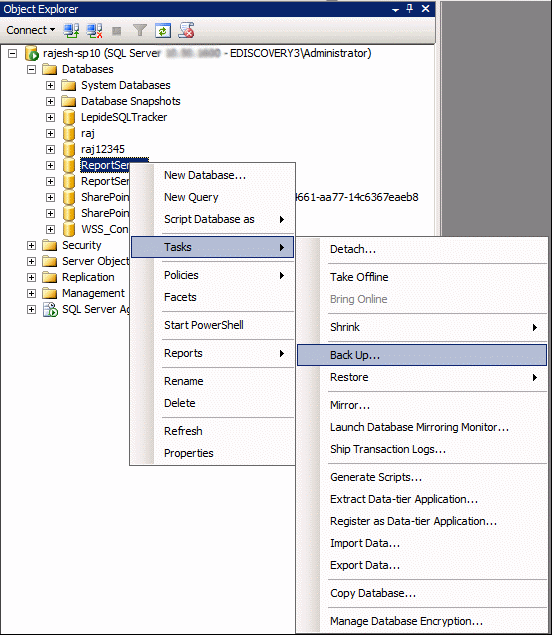
- In the opened Back Up Database dialogue box, within Source section, confirm database name in Database box.
- In Backup type box, select Full and within Backup component, select Database.
- In the Backup set section, type a different name or leave the default name as the backup set name in the Name field.
- Specify backup destination type (Tape or Disk) or add a different destination type by clicking Add option.
- Finally, click OK to back up the content database content.
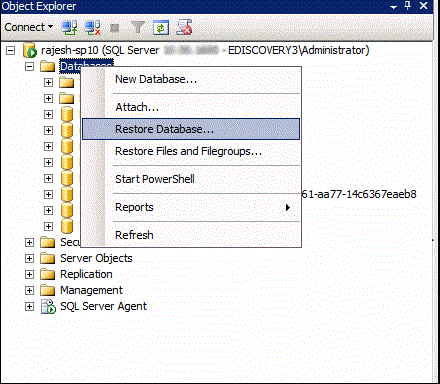
C. Restore Database to SharePoint 2013 SQL Server
- Right-click the Databases and select Restore Database.
- Select the database file, and follow the steps to restore SQL Server from the BAK file.
Step 3. Upgrade the Service Applications
Now, we will upgrade the databases and service applications with the following steps:
- Configure all the required service applications for the new SharePoint 2013 environment.
- For all the service applications that existed on the SharePoint 2010 farm, create a web application on the SharePoint 2013 farm also.
- Install all the server-side customizations and attach the content databases.
- Test the databases and upgrade them.
Step 4. Upgrade Site Collections
The next step is to upgrade site collections. It is required to change the old look and functionalities of the SharePoint Server 2010. For that, site collection administrator needs to migrate all site collections to SharePoint Server 2013. For this, just click on the links available on the upgrade reminder banner in the site collection.
To verify Site Collection upgrade, within the Site Collection, go to Site Settings > Site Collection Administration > Site Collection upgrade > Review Site Collection Upgrade Status. Thus, you can view the upgrade status for the Site Collection.
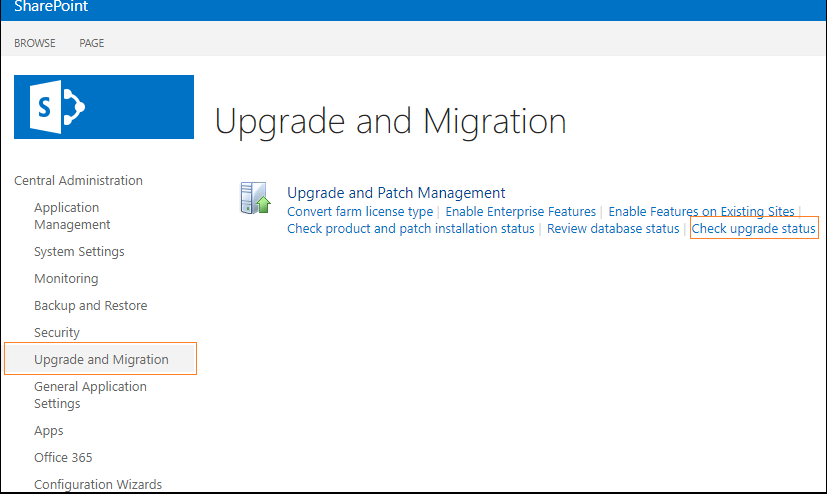
Step 5. Verify the Database Upgrade
You can easily get the upgrade status from the Upgrade Status page in Central Administration (follow Central Admin > Upgrade and Migration > Check upgrade status).
Important Point: After executing the above-discussed five steps, your SharePoint 2010 data will be migrated to SharePoint 2013. You have to follow the exact same steps again to migrate SharePoint 2010 to SharePoint 2016. But this time, the source will be SharePoint 2013, not the 2010 version.
Direct SharePoint 2010 to SharePoint 2016 Migration
To save your time, you can skip doing the manual SharePoint migration process twice. With a professional SharePoint migration tool, you can directly migrate from SharePoint 2010 to SharePoint 2016. Kernel Migration for SharePoint is a powerful and easy-to-use tool that helps users with all types of SharePoint migration.
Features of the third-party SharePoint migration tool:
- Migrate SharePoint 2010 (or any other version) to any SharePoint version, including SharePoint Online.
- Support SharePoint Online to SharePoint Online migration between tenants.
- Transfer complete SharePoint data like Site, Documents, Lists, Libraries, Custom workflow, Web parts, etc.
- Allows migrating SharePoint permissions, metadata, user mapping, schedule migration, and many more.
SharePoint 2010 vs. SharePoint 2016: Quick Comparison
Check out the table below to quickly understand the differences between SharePoint 2010 and 2016 versions:
| Features | SharePoint 2010 | SharePoint 2016 |
| File Size Limit | 2 GB | 10 GB |
| Cloud Integration | Limited / No native hybrid features | Have hybrid capabilities with Office 365 |
| Performance | Not optimal in today’s time | Enhanced performance, especially for large file uploads |
| Mobile Experience | Not user-friendly | Improved responsive design for mobile devices |
| Compliance & Security | Basic features | Advanced eDiscovery, data loss prevention (DLP) |
| Hardware Requirements | Low resource requirement | High resource requirement due to increased capabilities |
Pros and Cons of SharePoint 2010 to SharePoint 2016 Migration
Go through the merits and demerits of migrating SharePoint 2010 to SharePoint 2016 to decide if the migration is worth it for your organization.
Pros of SharePoint 2010 to SharePoint 2016 Site Migration:
- The upgraded SharePoint version allows easy handling of larger files and more users simultaneously.
- Experience the SharePoint hybrid setup and boost your productivity.
- Get a better & responsive user interface and new features to help with work.
- More robust rules and policies for stronger data protection.
- Migrating to SharePoint 2016 makes it easy for future upgrades like SharePoint 2019 or SharePoint Online.
Cons of SharePoint 2010 to SharePoint 2016 Site Migration:
- Direct migration can only be done with a third-party SharePoint migration tool. With the manual method, you have to first upgrade to SharePoint 2013 and then to SharePoint 2016.
- The migration requires a technically skilled user with knowledge of SharePoint, SQL Server, and PowerShell.
- Manually migrating twice (2010 to 2013 & 2013 to 2016) will take considerable time.
- The complexity of the task makes it prone to issues like configuration errors or data loss.
- Have to deal with downtime. You might not be able to do your daily tasks as long as migration is running.
- Post-migration, you have to train the workforce to adapt to the new SharePoint environment.
Conclusion
SharePoint 2010 to SharePoint 2016 migration is a critical step for your business growth. Using the database attach method discussed in this blog, you will be able to move to SharePoint 2016. However, the manual two-stage process is complex and should only be performed by a technically skilled user to avoid data corruption or loss. For an effortless SharePoint migration, you must try Kernel Migration for SharePoint. The tool simplifies the task, reduces downtime, and automates the complete migration process.
Frequently Asked Questions
Ans: No, you cannot directly move from SharePoint 2010 to SharePoint 2016. You must first upgrade to SharePoint 2013, and then from SharePoint 2013 to SharePoint 2016.
Ans: The manual method involves a lot of complicated steps and is time-consuming. Additionally, you need to have knowledge of SharePoint site creations, service application creations, SQL Server backup & restore, and many other SharePoint aspects. For a non-technical user, a SharePoint 2010 to SharePoint 2016 migration is not possible without using a professional SharePoint migration tool.