Read time 4 minutes
Organizations and businesses hold certain events and meetings as a part of corporate governance and branding. Calendar feature is specially designed in email clients like Microsoft Outlook to mark the date for a particular meeting or event to be held. Such events can be created in the Calendar along with the details like title, description of the event, venue details, and other information. Once a Calendar event is created, it can be shared easily within the organization through the Share Calendar option.
Types of Microsoft 365 Calendars
Microsoft provides an easy-to-manage calendar and scheduling system that seamlessly integrates with a range of applications available in the Office 365 suite. Creating calendars in Microsoft 365 is easy through Exchange Online, Outlook, SharePoint, and Microsoft Teams. You can access them on all devices, whether laptops, desktops, or mobile phones, anytime and anywhere. Here are three basic types of calendars you can access in Office 365:
- Personal calendars are generally used for scheduling or managing personal appointments, reminders, and tasks.
- Group calendars allow a group to access scheduled events or tasks related to the whole group. These calendars are meant for large projects and team tasks.
- With shared calendars, multiple users can view and manage a shared calendar. These are suited for planning collective activities among the members of a team.
How does sharing calendars in Outlook help?
Shared calendars are meant to boost cooperation, collaboration, and task management in Microsoft 365 among team members. Before we learn how to share calendars, let us look at some benefits of calendar share in Outlook:
- Integrate with other Office 365 applications
Office 365 calendars seamlessly integrate with a range of Microsoft 365 applications like Outlook, SharePoint, and Teams. When you share calendars in Outlook, you can send invites or schedule meetings with other users and shared calendars in SharePoint supports centralized planning and meetings for the team using the same SharePoint sites.
- Easy accessibility
With shared calendars, multiple users have access to view, edit, and add events in the calendars. The admin has complete control to allow permission levels to the users to decide which user can have full or restricted control.
- Client meetings and event planning
With the shared calendars, you can also manage client meetings and plan different events in coordination with external parties like workshops, webinars, seminars, or conferences.
How do you share Microsoft 365 calendars?
Sharing Calendars is an option in the email client application so that multiple users can be updated easily. As we know, the Outlook email client allows the configuration of email servers, IMAP servers, and platforms like Microsoft 365. We shall configure Microsoft 365 account in the Outlook email application first and then try to share Calendars.
Having completed the Microsoft 365 account configuration in the Outlook application, we can now focus on sharing the Microsoft Calendar with other Outlook users.
Steps for Sharing Office 365 Calendar Using Outlook
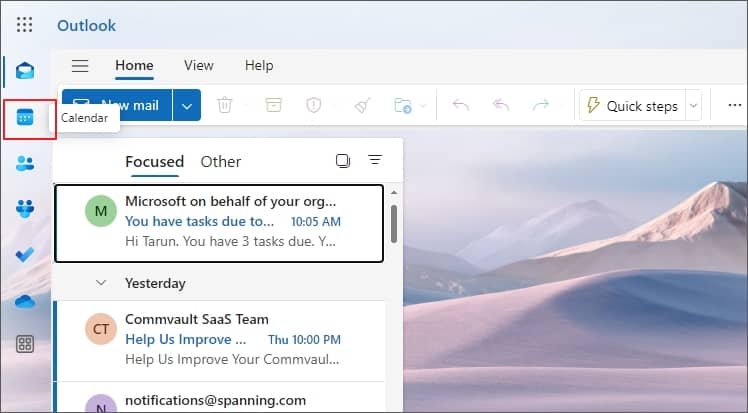
- Start the Microsoft Outlook application.
- Click on the Calendar icon (bottom left of the page).
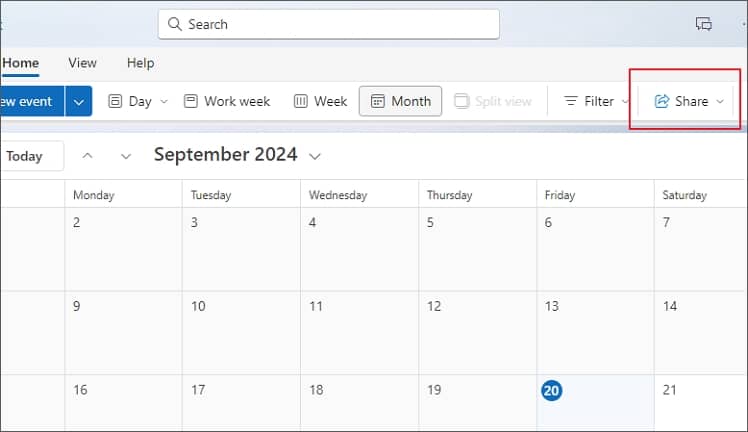
- Go to the Home menu and click on the Share Calendar option.
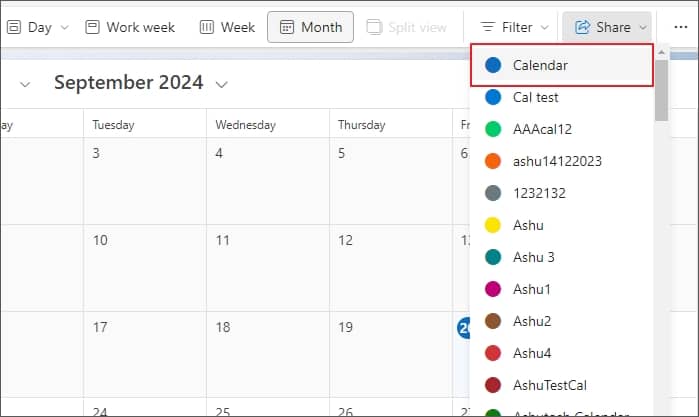
- From the drop-down list, select the Calendar that you want to share.
- Click the Add option on the Calendar Properties dialog box.
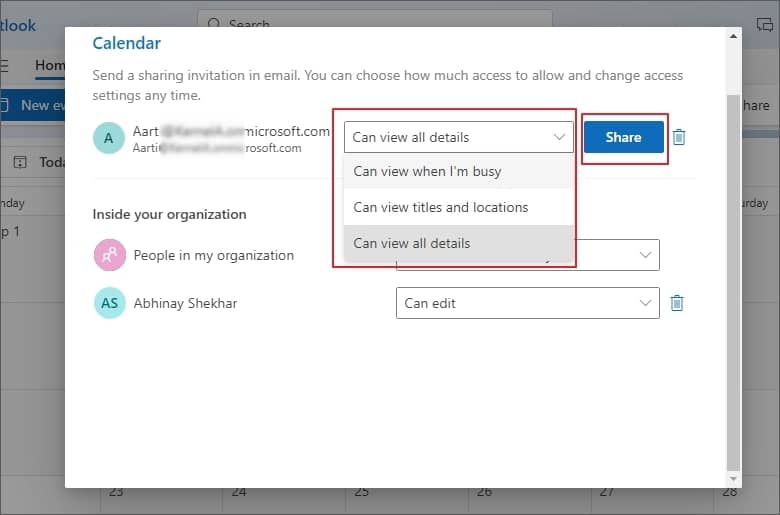
- On the Add Users dialog box, you can either search for the particular Outlook user from the address box or type the email address in the provided space and then click OK.
- Now, move to the Permissions tab and select the added username or email address that you want to share the respective Calendar. From the Permissions section, select one of the permissions as per the requirement and then click OK.
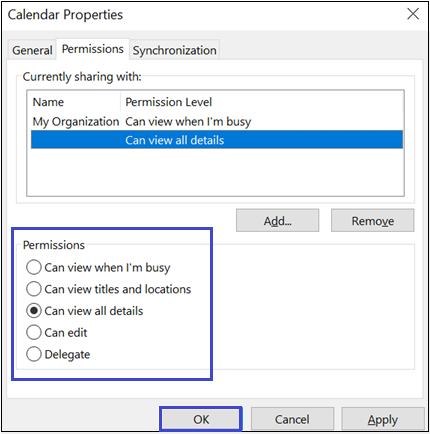
Available Permissions- Can view when I’m busy – Allows to view availability
- Can view titles and locations – Allows to view subject, availability, locations of events/ meetings
- Can view all details – Allows to view complete details
- Can edit – Allows to edit the Calendar details
- Delegate – Allows delegating the Calendar permissions to another user
- Once the above step is performed, an email with the Calendar sharing invitation is sent to the Outlook user selected in the 6th step.
- The recipient user must click on the Accept link from the received email to view the Calendar event on his Calendar list.
Note: If a user does not want to continue sharing the Calendar, then he can easily stop sharing by selecting the shared calendar name from the Calendar Permissions property and clicking on the Remove option from there.
Sharing calendar using Outlook on the Web
Another way to share calendar is via Outlook on the web. Follow the given steps to share calendar in Outlook on the Web:
- Open Outlook on the Web using your web browser.
- Tap on the Calendar icon from the left pane of the window.
- From the top ribbon beneath Home tab, select Share option.
- Select the calendar that you want to share with others.
- Now, specify the email id of the users you want to share the calendar with and allow the action they can perform.

- Allow the permissions to the user and as you press the Share button, an email will be sent to the mentioned users, to allow them access and open calendar share in Outlook.
Important considerations to avoid “This calendar can’t be shared” error in Outlook
- Check the validity of the email address
- Check if the email address is from Microsoft 365 Group (it must not be)
There is another way to share calendar in Outlook by publishing it to a web page.
To publish a Calendar, users must have a web server supporting WebDAV protocol (World Wide Web Distributed Authoring and Versioning). For its information, you can take guidance from the Internet Service Provider or the Server Administrator.
Note: When sharing contacts or calendars outside your organization, if you encounter an error, the necessary permissions in sharing policy are not configured. To perform this, ask your Microsoft 365 administrator to allow sharing calendars outside the organization.
How to publish a Microsoft 365 Calendar?
Follow the process to publish a calendar to a web page.
- Launch the Microsoft Outlook application.
- Go to the Calendars and then from the Home menu, click on Publish Online and then select Publish to WebDAV Server option.
- Provide the WebDAV Server path location in the Location box, use provided publishing options, and click OK.
- Now Microsoft 365 Calendar is published to a Web page with all details to be viewed by the Outlook and other users.
Note: Publishing a Calendar would not allow sharing updates to the Calendar once it is published.
So, these are the possible manual ways to share Microsoft 365 Calendar to Outlook users.
However, many Office 365 users want a permanent backup of Office 365 data, including calendars. For this, we propose we propose a reliable office 365 backup and restore solution – Kernel Office 365 Backup & Restore that performs the most reliable and secure Microsoft 365 backup to Outlook PST file. It also performs the restoration of PST files back to Office 365.
Conclusion
Office 365 calendar share in Outlook can be done using any of the ways explained above. In circumstances when Office 365 crashes or goes through downtime, there are chances of data loss and it would be a great practice if you include Office 365 backup in the strategy. You can use Kernel Office 365 backup & restore to export calendar data to different file formats to save on your device.