Read time: 11 minutes
A Shared mailbox is a unified service that allows several Office 365 users and teams to collaborate and communicate simultaneously. You can also say it is a centralized inbox for groups and teams. But sometimes, users complain about the Office 365 Shared mailbox not showing in Outlook, which hampers the workflow exponentially. Let’s understand with a user query:
“I can access the Office 365 Shared mailbox through my teammate’s Outlook, but it does not appear in mine. Why is my Shared mailbox not appearing in Outlook, and how can I troubleshoot this issue?”
To resolve the above query and users’ concern about the Office 365 Shared mailbox not showing in Outlook issue, we’ve prepared this guide. Here, you will get the reasons and an adequate resolution.
Why is my Office 365 Shared Mailbox Not Showing in Outlook?
Among many reasons behind the Office 365 Shared mailbox not appearing in Outlook issue, we’ve shortlisted some common ones. These are:
- Permission issue: You may not have the necessary permissions to access the Shared mailbox in your Outlook.
- Misconfigured Outlook Profile: Wrong configuration with your Outlook profiles also leads to Office 365 Shared mailbox not showing in Outlook issue.
- Synchronization issue with Exchange mode: Sometimes, the enabled Cached Exchanged Mode fails to sync properly, which vanishes the Shared mailboxes from Outlook.
- Using outdated/incompatible Outlook: Several users work on older Outlook, which is not compatible with Office 365.
- Corrupted Outlook Profile: Abrupt shutdown, malware attacks, file system errors, etc., corrupt the Outlook profile, which may also disappear your Shared mailbox in Outlook
- Failure of Auto-Mapping feature: When the Auto-Mapping feature doesn’t work, your Shared mailboxes may not appear in Outlook.
How to Fix Office 365 Shared Mailbox Not Showing in Outlook Issue?
Here are a few workable stepwise solutions that may fix Office 365 Shared mailbox not appearing in Outlook. Go with each and make your choice accordingly:
Method 1. Add a new Shared Mailbox Manually
When the Shared mailbox has some issues, you may also face an error message: ‘The folder you selected is not available’. Now, it’s time to create a new Shared mailbox. Follow the steps for the same:
- Open Outlook and go to the File Select the Account Settings option in the Account Settings dropdown.
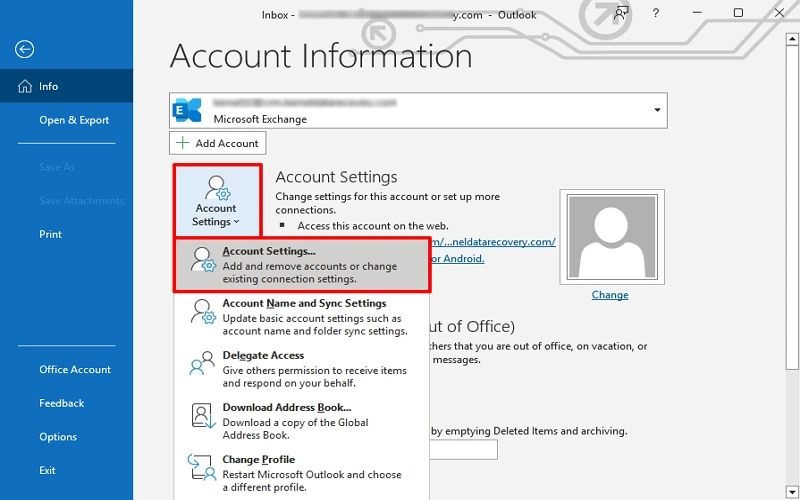
- Choose your Exchange account and click on Change.

- Click on More Settings in the Exchange Account Setting wizard.
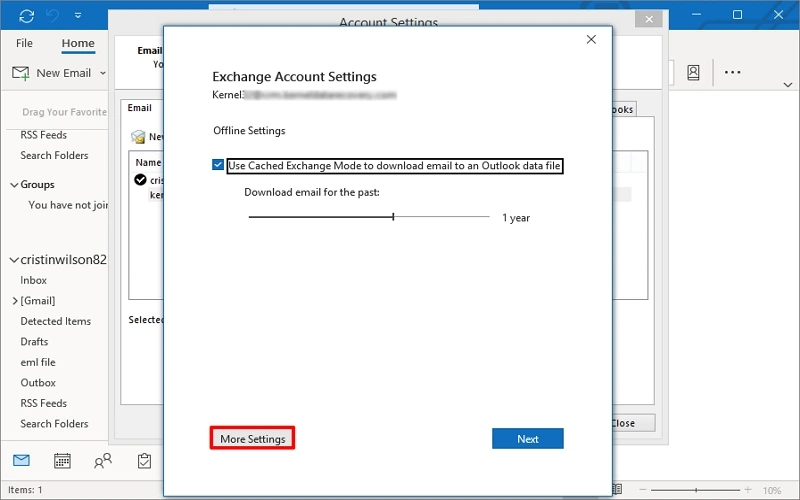
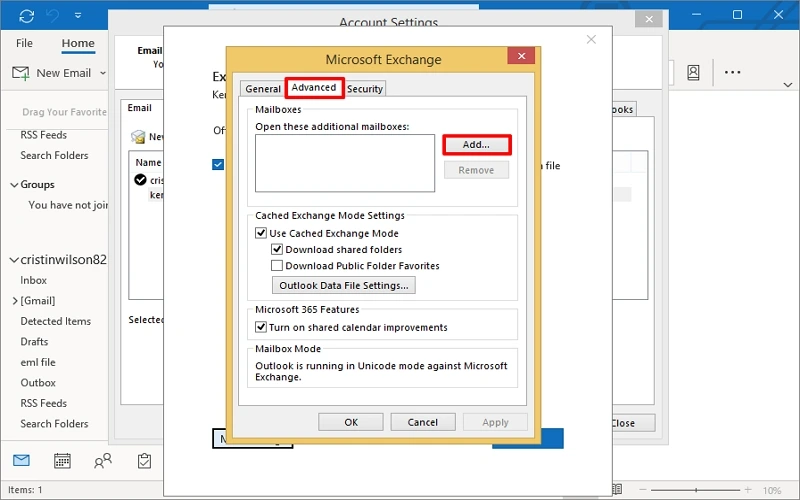
- Go to the Advanced tab, click on the Add button, enter the Shared mailbox name, and click on OK.
Restart your Outlook. You will be able to see the Shared mailbox in your Outlook profile.
Method 2. Check for the AutoMapping Feature
In Office 365, the AutoMapping feature maps the Shared mailbox to your Outlook account automatically. When the Outlook OST file size increases more than the optimal size, it stops storing data from the Shared mailbox. So, disable the AutoMapping feature and add the Shared mailbox. These are the steps to disable the Automapping feature in Office 365:
Step 1. Connect Office 365 with PowerShell
- Locate and open Windows PowerShell and run the below command:
$Credential = Get-Credential
It will ask for your Office 365 credentials. Enter them and click OK.
- Connect with Exchange Online (Office 365) with the below command:
$ExchangeSession = New-PSSession -ConfigurationName Microsoft.Exchange -ConnectionUri “https://Outlook.Office365.com/powershell-liveid”” -Credential $credential -Authentication “Basic” -AllowRedirection
- Input the below command to import the Exchange Online session:
Import-PSSession $ExchangeSession
Step 2. Run the Command to Remove Permission for the Shared Mailbox:
Remove-MailboxPermission -Identity information@xyz.com -User michael@microsoft.com” -AccessRights FullAccess
The command will remove the access rights of the information Shared mailbox to the user Michael.
Step 3. Delete the Shared Mailbox.
- Open Outlook and go to the File Choose Account Settings from the Account Settings dropdown.
- Select your Exchange account and tap on Change.
- The Exchange Account Setting page will be displayed. Click on More Settings.
- Go to the Advanced tab, select your Mailbox and tap on the Remove
Step 4. Restore the Full Access Permission with the following command:
Add-MailboxPermission -Identity information@xyz.com -User michael@xyz.com -AccessRights FullAccess -AutoMapping:$false
The Automapping will be disabled.
Step 5. Add the Shared mailbox as a regular account in Outlook that will be visible. Outlook will create a new data file (OST) for the newly created Shared mailbox.
Method 3. Enable Troubleshooting Logging Option
In Outlook, Enabling Troubleshooting Logging can also help to fix the Office 365 Shared mailbox not showing in Outlook issue. Below are the steps to enable the troubleshooting logging option:
- Open Outlook, click on the File tab and go to Options.
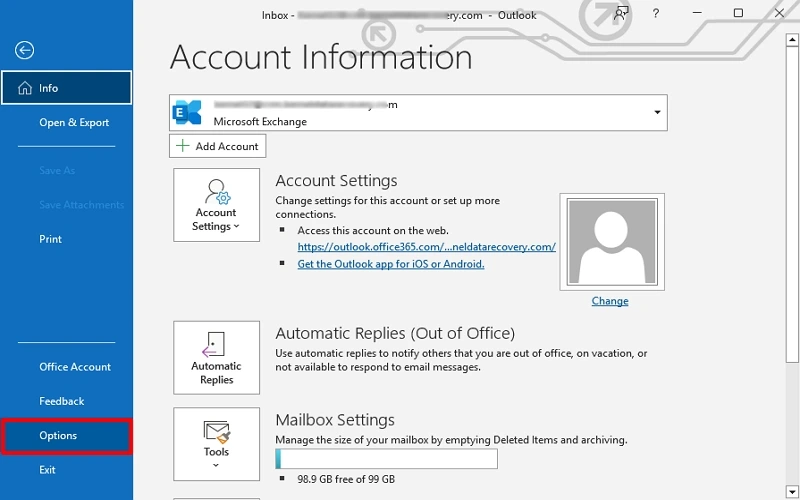
- In the Advanced tab, check the option Enable Troubleshooting logging available in the Other section and click OK.
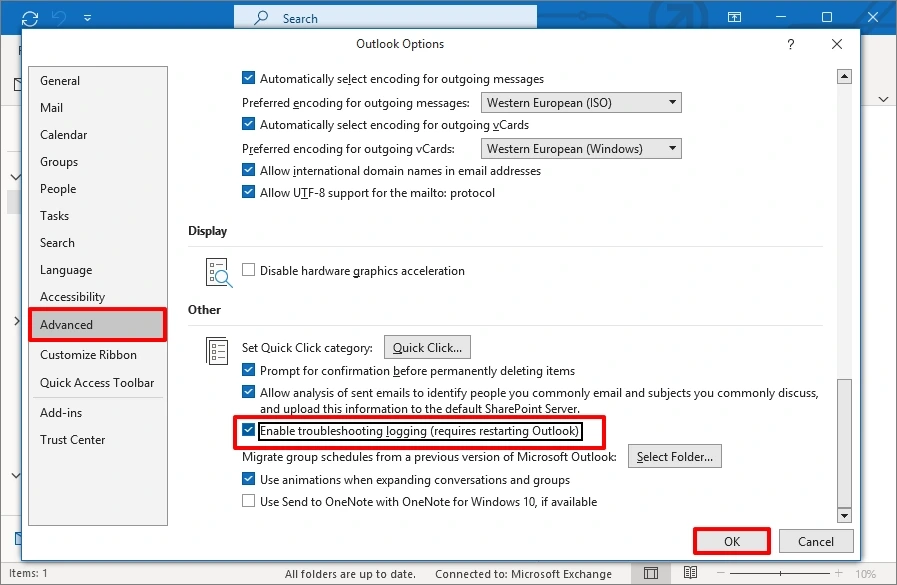
After performing all these steps, restart Outlook and check whether the Shared mailbox is appearing.
Note: You can also check the log files with the below command in Run Window
|
%localappdata%/Temp folder or C:/Users/UserName/AppData/Temp folder |
By analyzing the logs, delete the temp file and access Shared mailboxes in your Outlook again.
Method 4. Recreate the Outlook Profile
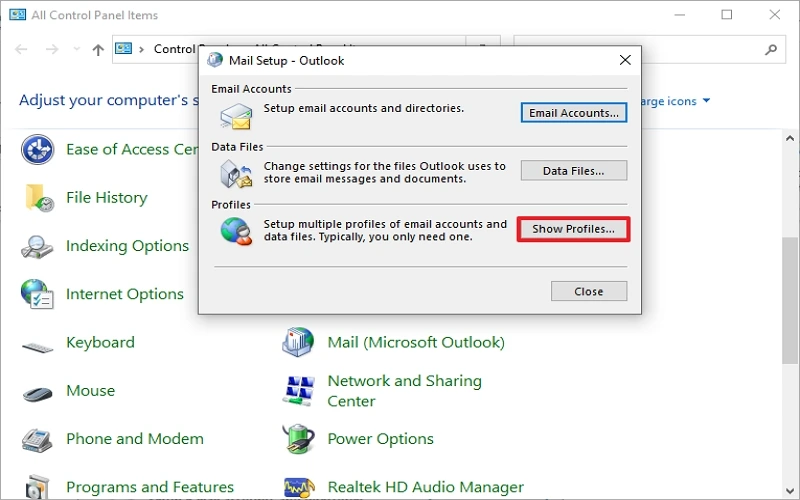
In some instances, your Outlook profile may be damaged/corrupted, which results in the Office 365 Shared mailbox not appearing in the Outlook issue. So, recreating the Outlook profile may resolve this issue. Follow the steps to do the same:
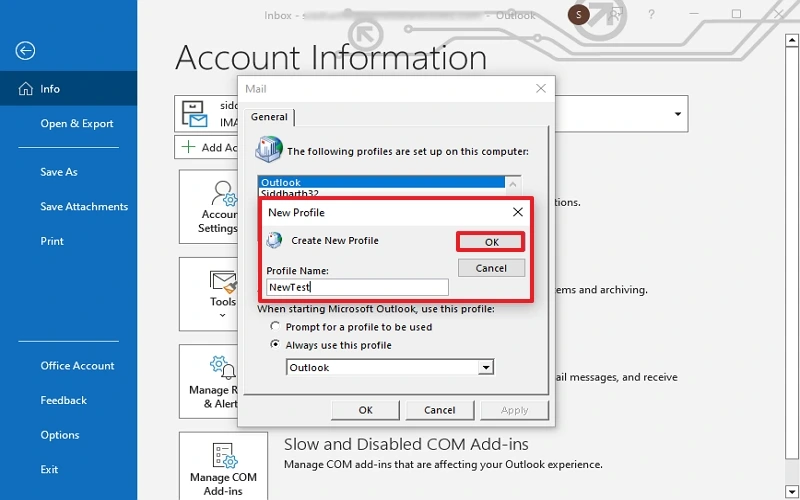
- Close Outlook. Open Control Panel, click on Mail and tap on Show Profiles.
- Now, click the Add button, input the name for your profile, and click OK.
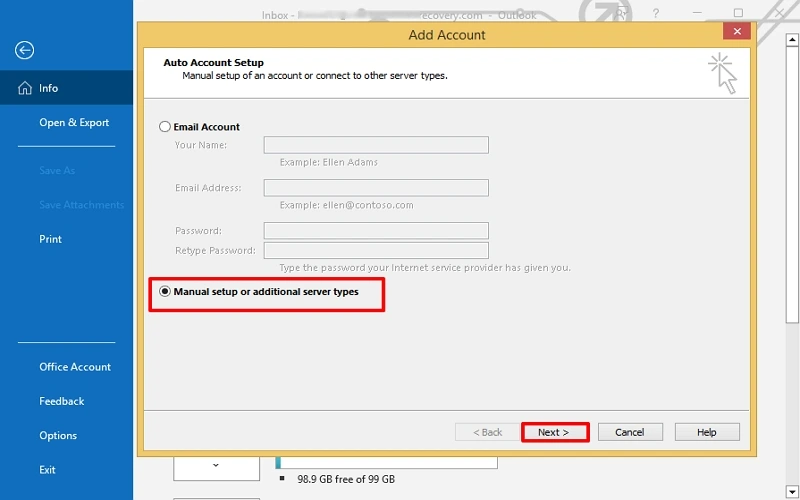
- You will be redirected to Auto Account Setup. Check the Manual Steup or Addition Sever type option and click Next.
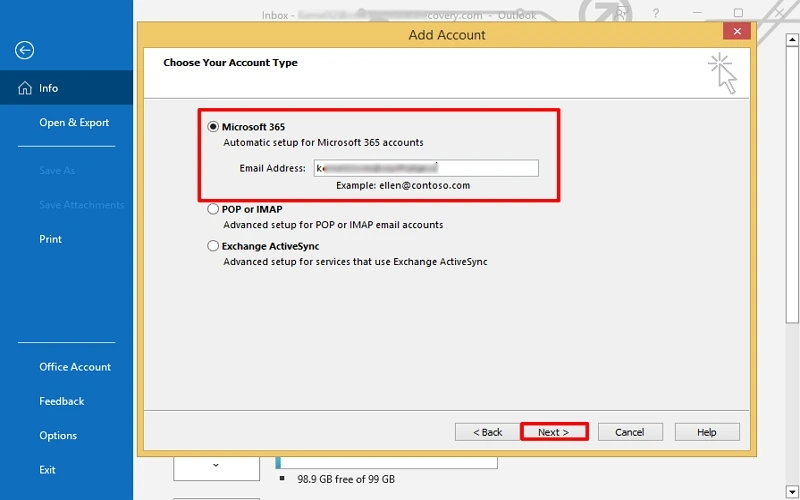
- In the Choose your Account type screen, click on Microsoft 365 and input your email address. It will configure your account immediately. Input your Microsoft credentials and follow the further setup.
- Wait for some time until the synchronization between Microsoft 365 and Outlook is finished.
After this, check whether the Shared folder is visible in Outlook.
Basic Tips to Fix Office 365 Shared Mailbox Not Showing in Outlook Issue
Here are some basic tips to follow that may help to restore your Shared mailbox in Outlook. These are:
- Update your Outlook with the latest version.
- Manually press the Send/Receive button in Outlook.
- Try to enable/disable the Cached Exchanged Mode in Outlook.
- Remove the faulty add-ins and disable the proxy firewall setting temporarily for testing.
Drawbacks of Manual Workarounds
Manual procedures are not always helpful; they also have some limitations that hinder the desired results. Some of the drawbacks are:
- Requires technical expertise.
- High risk of data loss/theft.
- May provide unauthorized access to your Office 365 data.
With the above solutions, your Shared mailbox will appear in Outlook effectively. However, it is not guaranteed that these solutions are permanent fixes. You may also face the Office 365 Shared mailbox not showing in Outlook issue repeatedly. To counter this issue, it is recommended to prepare your existing tenant then securely migrate to Office 365 another tenant.
However, Microsoft’s native solution to Office 365 migration requires PowerShell commands, which are complex to perform. So, you need a reliable third-party Office 365 migration tool for an easy and secure migration procedure.
Migrate Office 365 Mailboxes Directly with a Professional Tool
To escape the risks and drawbacks of manual workarounds for Office 365 migration, opting for an automated tool is necessary. Kernel for Office 365 Migration tool is the best solution for hassle-free migration to all Microsoft 365 accounts. You can also perform Office 365 tenant to tenant migration effectively with ultimate data security. Some other features and functionalities of the tool are given below:
- Migrate unlimited mailbox between Office 365 tenants.
- Embedded with Delta migration features that help to prevent data duplicity.
- Migrate every component of Exchange Online, SharePoint, Online OneDrive, Microsoft Teams, and Microsoft Planner.
- Migrate Office 365 Shared mailbox to Office 365 groups with full accuracy.
- Migrate permissions of SharePoint sites, lists and libraries effectively.
- Equipped with advanced filters to migrate selective or entire mailboxes.
- Extensive support with Office 365 GCC High, GCC, DOD security.
- Compatible with all business plans and subscriptions of Microsoft 365.
Summing Up
We hope that the above methods and valuable tips helped you to fix Office 365 Shared mailbox not showing in Outlook issue. But these fixes are temporary, and you may face this issue again. To prevent this, you should migrate your Office 365 mailbox to another tenant. So, use our Office 365 migration tool for an uninterrupted, and secure transition. Check out the efficiency of the tool for free with its trial version. Download now!
Commonly Asked Questions
A- For some reason, your Shared Mailbox is not showing in your Outlook account. Try to migrate your Shared Mailbox to another Office 365 tenant and access your Office 365 Shared Mailbox in another tenant.
1. Download Office 365 Migration Tool in your system.
2. Add source Office 365 admin account.
3. Select a specific user that keeps a Shared mailbox.
4. Add a destination Office 365 account.
5. Map source user to destination user.
6. In following window, select mailbox that has a Shared Mailbox.
7. Apply essential filters for selective data migration.
8. Generate and download a detailed migration report in a CSV file.
A- In the Shared with Me section, the newer version of Outlook shows Shared mailboxes and requires approximately 24 hours after granting all permissions.
Shared mailboxes are limited to 50 GB without a license. For a higher size limit, you’ve to purchase Exchange plans.
There could be many possible causes for this issue, such as folder permission issues, large-sized mailboxes, cached modes issues, synchronization issues, etc. To counter these issues permanently, migrate all your Office 365 data to another tenant immediately.