Read time 5 minutes
Microsoft 365, formely known as Office 365, is a renowned cloud-based platform among businesses as it helps them stay organized. It offers advanced technology and high-end security to keep your data synchronized and secure. As the demand for Office 365 is increasing, users need to migrate their mailboxes. By creating a checklist, you can avoid various hindrances that may come in between the migration process. After creating a checklist, you can simplify the process and make it error free.
This blog is drafted for discussing the necessary Office 365 pre and post migration checklist to help users in performing accurate migration without any loss.
What is the need for creating Office 365 checklist?
Changing one platform to another is necessary when users find a better and advanced alternative. One such alternative to other cloud-based platforms is Office 365 or Microsoft 365. While migrating to Office 365, one must maintain a checklist to skip any possible loopholes. The need for creating checklist is as follows:
- It reduces the risk of errors and downtime by simplifying things for you.
- If you migrate data by following the step-by-step procedure, you can minimize data loss risk.
- Migration can be performed in a structured way with full data integrity.
Pre and post Microsoft 365 migration checklist
The detailed pre and post checklist of Office 365 mailbox migration is provided below at length. Let’s have a look at it:
Pre-migration checklist
The pre-migration tasks are divided into several points. Let us discuss them in detail:
- Prepare end users in advance: Planning and preparation start with proper communication among the organization members. Before starting the migration project, each user should have complete information about the migration plan, how it is going to be executed, and what will be the impacts and changes within the organization due to this migration. Other important considerations of pre-migration check are migration day, time frame, and resource management. The plan should be discussed among the members on a rough basis to get ideas from different brains, and after the brainstorming, the administrator should draft a proper project plan for the migration without any discrepancies in it. You can use the checklist prepared by Microsoft for effective premigration planning. You can add or modify this checklist according to your requirements.
- Prepare On-premises inventory: Next pre-migration task is to prepare the inventory for the on-premises Exchange. The details you should have before the migration are:
- Name of user mailboxes (shared resources) and their sizes & email addresses.
- Storage locations, client (browser, operating systems, Office applications) versions, and configurations.
- Network settings (DNS hosts, proxy and firewall configuration, internal switches, internet connectivity, intranet sites, and available bandwidth).
- Online meetings, instant messaging, integrated application systems, configured DNS records, etc.
- Inspect current environment: Some checks and reviews are required on the current on-premises Exchange environment. Here are some of them:
- Methods to create or synchronize the accounts.
- Licenses needed by user accounts.
- The requirement of backups/backup policies.
- Network capacity and its suitability for migration.
- Basic training requirements for end users.
- Authentication criteria for user accounts.
- Antivirus, firewall, routers upgrade requirements.
- Prepare of data to be migrated: Before starting the migration, make sure that the data is ready. Some points to be check are:
- Active Directory is updated.
- Not-in-use accounts are removed.
- UPN of the source and target environments match.
- Email addresses are valid within proxy addresses attribute.
- Archiving facilities required (offline or online) in the future.
- Compliance requirements.
- Set up Office 365 Account: It is the final task while planning the Office 365/Microsoft 365 migration. Set up your Office 365 accounts with the below-given considerations.
- Get Office 365 subscription and license.
- Verify domain names.
- Configure – security permissions, applications for use, directory synchronization for Office 365 (optional), and single sign in (optional).
- Perform test migration.
Post-migration checklist
To make the migration process successful and correct, perform the below listed points:
- Perform email redirection and caching: After migration, the emails accounts of users need to be redirected to Office 365. Also, check the Outlook profile folders again and confirm whether the status is “This Folder Is Up To Date” for each folder.
- Assign licenses to the migrated mailboxes: The mailboxes migrated in Office 365 account must be assigned licenses as it will get disabled after a period of 30 days without any license assignment. So, for long term use, it is recommended to assign licenses to mailboxes as soon as possible.
- Create Autodiscover DNS records: Another important post-migration task is to configure Autodiscover DNS records in Office 365. Doing this would help the users to connect their user mailboxes to Outlook email clients as well as other mobile clients.
- Decommission the source environment: Once you are confirmed that the mailboxes have successfully moved to your Office 365 account, have assigned licenses, and everything is working fine, then you can decommission the old on-premises Exchange Server. However, it is suggested that you decommission it only when no synchronization is expected in the future with the source, and permanent migration to target is accomplished.
Hence, these were the important considerations to follow before and after the migration of the on-premises Exchange to Office 365. The manual migration of On-Premises Exchange to Office 365 is not a simple task to perform. Each step is crucial, and so one needs care and expertise to accomplish such a migration. The best way is to use a professional Office 365 Migration tool. We recommend Kernel Office 365 Migration tool for the migration of mailboxes. This tool performs migrate on premise to exchange in the simplest manner. It also integrates simple ways to carry out some pre and post-migration tasks.
On-premises Exchange to Office 365 – Some pre & post migration tasks
To streamline on-premises Exchange to Office 365 migration, you can utilize Kernel Office 365 Migration tool. Following are the points to consider:
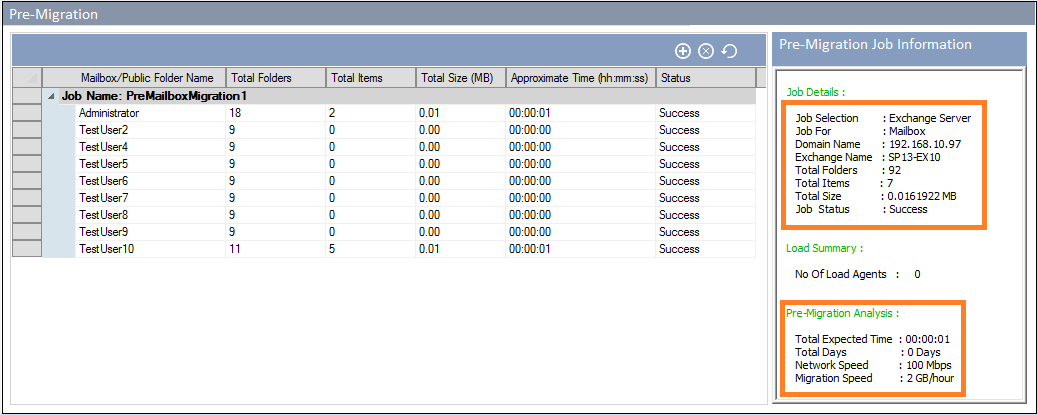
- Pre-Migration analysis for mailboxes and Public Folders
This feature in Kernel Office 365 Migration helps users to get an estimate about the time needed to perform the migration (based on the size of data added for migration). It also displays information like Total Folders, Total items, Total size, Network Speed, and Migration Speed.

- Migrate Outlook Rules and Folder Permissions
Users can utilize this feature in the tool to migrate the Outlook rules and folder permissions after the completion of the migration task.
Conclusion
Just like the migration task, the pre and post-migration tasks are also crucial. Many things are to be considered before and after performing migration from Exchange and Office 365. However, a professional tool like Kernel Office 365 Migration integrates many features to perform these tasks automatically. The tool allows selective email filters for Office 365 mailbox Migration.


