Read time: 6 minutes
A company named XYZ Group is planning to acquire a new organization named ABC Group. Since the entire business data is stored on Microsoft 365, there’s an urgent need to migrate Office 365 to Office 365 account/domain.
Businesses planning to merge or acquire with other organizations working on O365 often require migration. Transferring mailboxes, users, and other data is easy, but the real challenge is with migration of the domain. This is because one domain can be attached to one Office 365 account at one time.
As there are no direct methods to migrate domains between O365 tenant, it is suggested to use Trusted Office 365 Migration Software. Use this guide to migrate Office 365 to Office 365 account/domain without failure as detaching a domain can be a lengthy process.
Difference between Office 365 Account and Domain
Before we migrate Office 365 to Office 365 account/domain, let’s learn the difference between the two.
| Features | Office 365 Domain | Office 365 Account |
| Definition | Uniquely defines the identity of an organization online. | Identifies a user account with an Office 365 subscription. |
| Purpose | Create and manage multiple users’ email addresses and passwords to access Microsoft’s services. | Defines the way and what applications a user can interact with. |
| Scope | Across the organization. | User-specific accounts. |
| Availability | Available until the domain expires or is deleted. | Available until the account is deleted or deactivated. |
| Storage | Shared by the users within the organization. | Personal storage for each account. |
How to Migrate Office 365 to Office 365 Account/Domain?
The process to migrate Office 365 domain to another tenant is categorized into different phases. Let’s go through them one by one.
Phase 1: Migrate Office 365 Mailboxes to Office 365
Migrate all your mailboxes emails to the new tenant securely to avoid any potential data loss. However, there is no native approach available to move your mailboxes (primary, archive, or shared mailboxes). Therefore, we’ll use the best Office 365 to Office 365 migration tool to finish the migration.
Kernel Office 365 Migration tool is a suitable choice to migrate Office 365 Mailboxes to Office 365 even without technical knowledge.
Note: Make sure you follow the Office 365 migration checklist to avoid any glitches during the process.
Step 1: Launch Kernel Office 365 migration tool and click Add Source from the home screen to migrate Office 365 to Office 365 account/domain.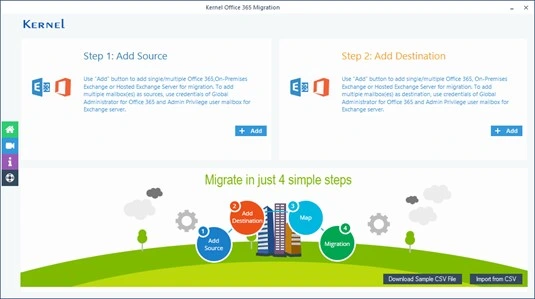
Step 2: Enter the Office 365 account credentials. Select ‘List all Mailboxes using above credentials’ and click Get User Mailboxes. It will list all the mailboxes linked with the admin account, select the mailboxes that you want to export, and click Add.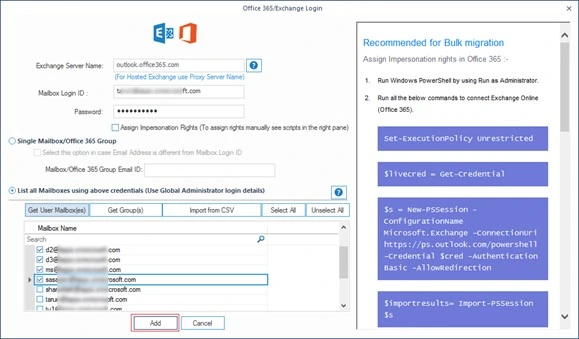
Note: Use a global admin account to add mailboxes.
Step 3: Follow the same procedure to add the destination mailboxes.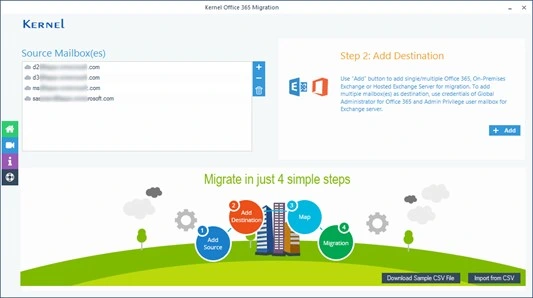
Step 4: Map source mailboxes to the destination mailboxes and click Set Filter and Migrate.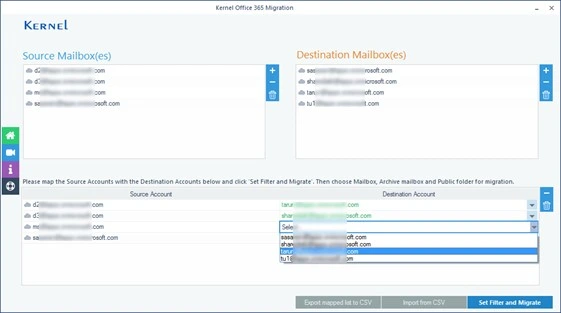
Note: Use a CSV file with the mapped source and destination mailboxes to skip the long process of adding the source & destination.
Step 5: Select the type of mailbox (Mailbox, Archive Mailbox, or Public folder) and click Migrate.
Step 6: Apply specific filters, such as Item Type, Date, and Folder. Select the ‘Skip previously migrated items’ option to migrate only the recent items. Click I am OK, Start Migration.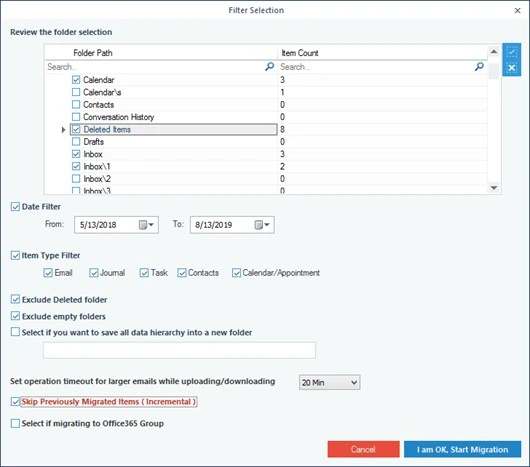
Step 7: As the process starts, the tool will show real-time progress. After completion, click OK to end the process.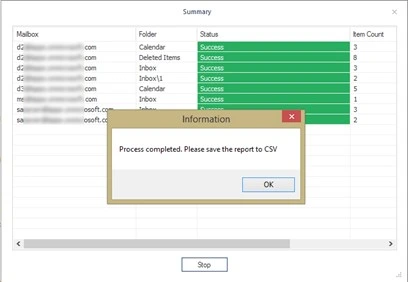
Note: To save the migration report, click Save Report to CSV.
Phase 2: Remove Domain from Source Office 365 Tenant
After mailboxes migration, move source users to the destination tenant and then follow the detailed process to remove domain from the Office 365 tenant in the source. This step is critical because accessing a domain with two tenants is not possible.
So, use the Exchange Admin Center to move from one Office 365 account to new office 365 account and then detach the domain.
Phase 3: Add Old Domain to the Destination Tenant
Your domain is now isolated from the source environment; attach it to the new tenant in the destination. Follow the steps below to add a domain to a new tenant:
Step 1: Open Microsoft admin center and go to Settings>Domains.
Step 2: Select Add domain and enter the domain name. Click Next.
Step 3: Select how to verify the domain ownership from the three ways:
- Add a TXT record to the domain’s DNS records
- Add an MX record to the domain’s records
- Add a text file to the domain’s website
Note: We suggest you proceed with the first way to verify.
Step 4: Choose how to make the DNS changes required for Microsoft to use your domain from the given options:
- Choose Add the DNS records for me if your registrar supports Domain Connect.
- Choose I’ll add the DNS records myself to attach only specific Microsoft 365 services to your domain or to skip it for now and do this later.
Step 5: If you select to add DNS records yourself, select Next and to your registrars’ website to set up your domain. Tap on Finish.
Phase 4: Move Data to Destination Domain
Now, create user mailboxes in the new domain and migrate Office 365 Mailboxes to the Office 365 domain in the destination. Use the tool procedure, as mentioned in Phase 1 to migrate mailboxes from the temporary mailboxes to the domain.
With that, you can easily migrate O365 Old domain to new domain in the destination tenant.
Wrap Up
Organizations planning mergers, acquisitions, or divestitures require you to move from one Office 365 account to new Office 365 account. Microsoft does not provide any direct or manual methods to perform the migration. With the help of a professional Microsoft 365 migration solution, migrate Office 365 to Office 365 effortlessly.
Follow the process mentioned in this write-up to move domains with the user data, mailboxes, groups, and access permissions.