Read time 8 minutes
HCL Notes (formerly IBM Notes) application is losing its popularity day-by-day in the era of advanced Exchange Server versions. Most of the HCL Notes users are migrating to other email Servers such as Exchange Server, Office 365, etc. Have a look at the differences between Notes and Exchange Server, which are the strong reasons for the migration.
- Cost factor: Installation and running expenses of HCL Notes are higher than those for Exchange Server
- Performance factor: Features like caching & load balancing in Exchange Server made it a better option for handling significant email traffic than HCL Notes.
- Accessibility: Many users support the fact that Microsoft provides a better and more user-friendly tool interface.
- End of support: HCL has ended support for old versions of Notes. Such versions are prone to virus attacks and frequent errors, resulting in interrupted workflow. To avoid all such issues, migrating emails from IBM Notes (now HCL Notes) to Exchange is a sound choice.
Methods to migrate HCL Notes to Exchange
Now that you have a basic understanding of why a user will want to switch email client, let us see the available methods to do so. We have two options to perform HCL Notes to Exchange migration. The first one is to utilize a Microsoft utility, Microsoft Transport Suite, and second, we have a professional Notes to Outlook Converter tool.
Method 1. Using Microsoft Transporter Suite
There is a manual solution for migrating the HCL Notes NSF file to the Exchange – the inbuilt utility provided by Microsoft namely Microsoft Transport Suite. This utility is a set of tools for migrating Notes Domino Servers to Exchange Server (2007) location.
Users can download Microsoft Transport Suite for HCL Domino online and perform these given instructions after the installation.
Note: Download transporter32. msi for 32-bit systems, while transporter.msi is for installation on 64-bit systems.
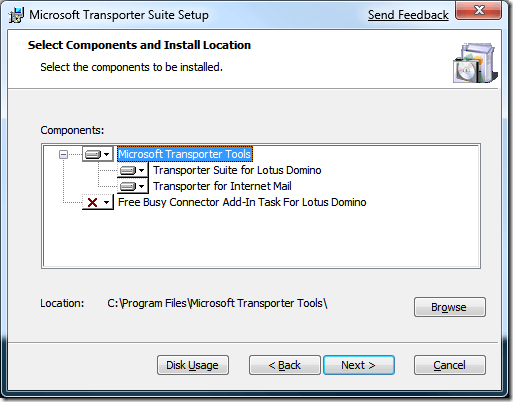
- While installing the application, select Transporter for Internet Mail under Microsoft Transport Tools section on the Select Components and Installation page and click on Next.

- Create a CSV file with the following information on your system location.
SourceIdentity User email ID SourceServer IP address or name of the POP Server SourceLoginID Account username (used for connection to the server) SourcePassword Source user password TargetIdentity Target Email ID - Click on Add mailboxes in continuation with the procedure, then browse and add this CSV file. Click on Import.
- On the next page, click All mailboxes from the left panel and then go to the right panel and select Migrate selected mailbox option.
- The Internet E-mail Mailbox Migration Wizard will get opened. Under Select Mailbox type section, select POP option. Browse and add the Client Access Server and click on Next.
- Next either you can add a date range or select All email option. Then click on Next.
- Check the summary and finally click on Migrate option to start the migration.
- Once the migration is completed, click on Finish.
The process is feasible, but it is a time-consuming method that requires good technical skills to make it work. Also, it can be used with earlier versions of Exchange (2007 and older) only.
Note: Another Microsoft that can help with email migration is Microsoft Online Notes Inspector (MONTI) application. The tool analyzes and provides information regarding the amount of data to be migrated from Lotus Notes (HCL Notes) to Microsoft 365.
Limitations of Microsoft Transporter Suite
The following points clearly suggest why users should not follow this manual solution to migrate HCL Notes to Exchange.
- Lengthy, complex, and time-consuming method.
- Large mailboxes are not migrated (larger than 1GB).
- The number of emails in mailbox folders should be less than 1500.
- Involves risk of data loss during and after migration.
- More complex when a user requires bulk data migration.
- Can migrate older versions of Exchange only (Exchange 2000, 2003 & 2007).
With so many complexities and drawbacks in the manual solution, it is advised to look for a more proficient and result-driven migrator software for HCL Notes or Lotus Notes to Exchange migration.
Method 2. Migrate HCL Notes to Exchange Server with a reliable tool
Considering the several drawbacks of the previous methods, we recommend you try a professional tool to migrate Lotus Notes (now HCL Notes) to Exchange. Kernel Lotus Notes to Outlook Converter tool is developed with highly skilled developers and domain experts.
It is a reliable third-party tool that delivers the desired data migration from Notes NSF file or Domino Server mailboxes to Exchange. It can migrate specific data with intelligent filters and folder options. Users can migrate NSF files from any Notes version to Exchange Server (Exchange server 2019, 2016, 2013, 2010, and previous versions) easily.
The Notes to Outlook migrator tool can migrate mailbox data from any HCL Notes version to any Exchange Server version. The tool ensures complete data integrity and maintains original file/folder hierarchy & structure.
- Direct migration of local NSF files, Domino Server, and SmartCloud Notes mailboxes to Exchange Server destination.
- Quick and automated search for Domino Server and SmartCloud Notes in network.
- Easily Convert NSF to PST file format without data loss.
- Preview facility of local NSF files content on a selection & scanning.
- Secure login of Exchange Server as the destination with login credentials.
- Automated source and destination mailbox mapping through CSV file.
- Allow users to mark emails status as read/unread.
- Flexibility in data migration with – date range, categories, and folder filters options.
- Full compatibility with all Exchange Server, Notes, Windows, and Outlook versions.
Bottom lines
Exchange Server covers a large market share of email servers and offers several unique benefits compared to its competitors like HCL Notes. The article provides complete and detailed information about how you can achieve a simple HCL Notes to Exchange migration without compromising your data. After a deep analysis of both the methods discussed above, we highly recommend performing the migration with Kernel advanced tool. The software can migrate an unlimited number of NSF files to an online server without data loss.


