Read time 4 minutes
User profiles in Microsoft 365 and SharePoint allow to store information regarding the users who access the cloud services. They serve as a repository containing all relevant data regarding the user, such as name, job, email, contact info, etc. A SharePoint Online account can have multiple user profiles.
SharePoint Online (Microsoft 365) admins can manage user profiles via certain settings and features available in SharePoint admin center. The admin center allows various powerful operations such as adding user to SharePoint site, managing sites, handling site access control, and more. Along with these, you can also view, create, modify, and delete these user profiles as needed. However, we recommend the admin be meticulous while managing SharePoint user profiles.
Let us learn how we can manage the user profiles in SharePoint Online.
How to manage SharePoint user profiles in admin center?
In Microsoft 365, there are certain SharePoint user profile settings that can be customized or set as per the administrator’s choice. To handle the various attributes associated with a SharePoint user profile, you must navigate to the Manage User Profile setting in the admin center. In the user profile manage setting, you can add, edit, or delete a user profile in SharePoint Online (Microsoft 365). To do so, execute the following steps in the given order.
- Login to https://admin.microsoft.com with your administrator credentials.
- In the left navigation pane, click Show all button, then under Admin centers section, select SharePoint.
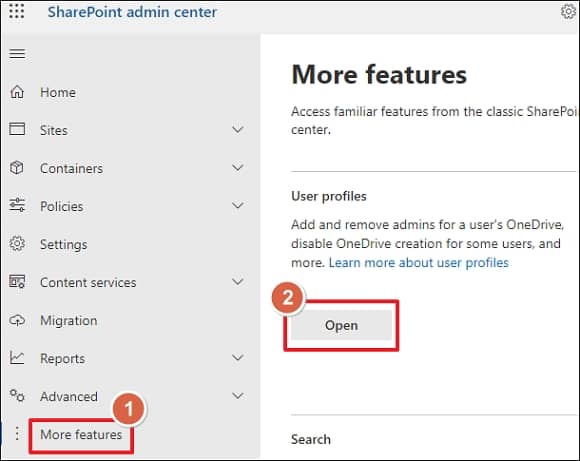
- On the left panel, select More features and click Open under User profiles option.
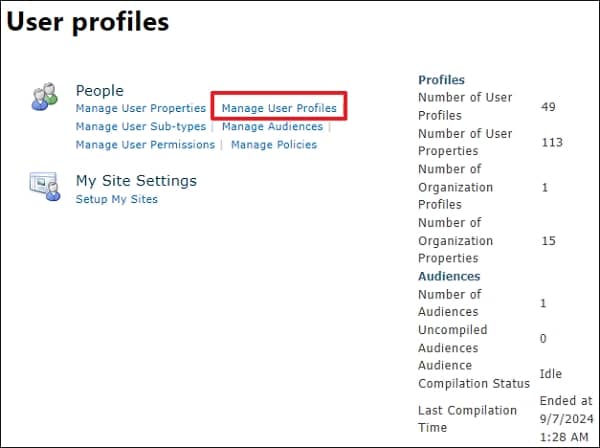
- Now, under the People section, click Manage User Profiles.
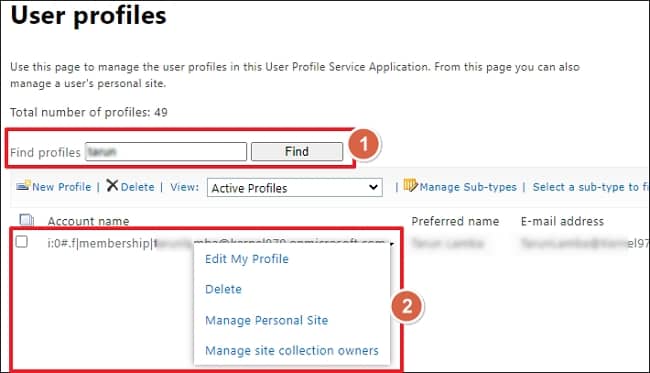
- Enter the name and search for the profile. Then click the respected profile and view various options for the profile. Choose any option as per your need. You can also create a new profile from this page. To do so, click the New Profile button right below the Find profiles field.
How to add more properties to a user profile
By default, you will be provided with several user properties in which you can define user information. However, in case you want to add a custom property according to your use case, you can do so with Manage User Properties option. The user properties are the fields you fill when creating a new user profile such as name, account, first name, etc. To add, view, manage, or delete it, follow the steps given below:
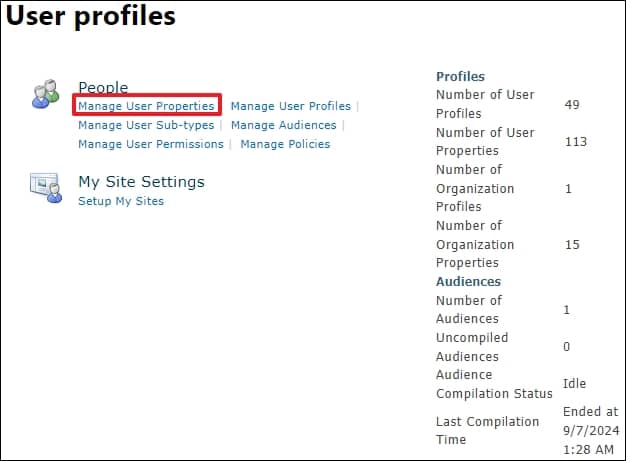
- In the user profile page, select Manage User Properties.
- Click New Property to add a new custom field.
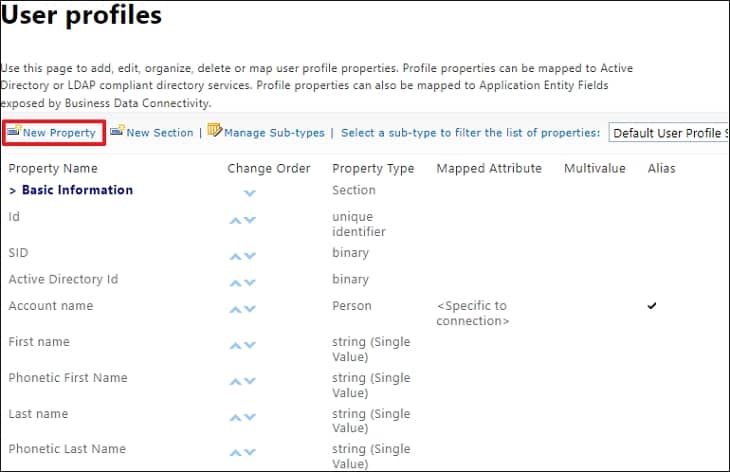
- Now, provide the entries to this new property.
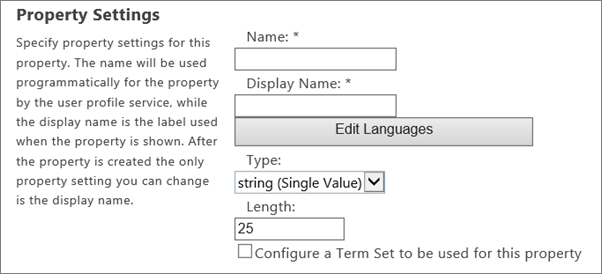
- Name – any name
- Display Name – which you want to be displayed to the users
- Type – select data type from the list
- Default User Profile Subtype – Make sure it is selected
- Description – Provide desired information about this property, which would be visible to the users
- Policy Settings – Choose the desired policy and privacy settings for this property
- Display Settings – Add desired settings letting this property display as per your choice to the users
- After providing all the details, just click on OK and the new user profile property is created now.
Note: To edit or delete any property, click on any property and select the required option.

How to do an effortless SharePoint migration
SharePoint is a document management and sharing platform. It offers unique functions and the latest security features. The advanced features of SharePoint are the reason many organizations are using it. However, often, you need to migrate or upgrade your SharePoint server. Upgrading to the immediate new version (like from 2013 to 2016 or 2016 to 2019) can be done with manual methods. But to perform operations like migrating SharePoint 2010 to 2019, you must utilize a third-party tool.
For a smooth data transfer process, we recommend making a checklist for SharePoint migration and utilizing an automated tool like Kernel Migration for SharePoint. It is equipped with robust algorithms to deliver consistent performance with any size limitations. The SharePoint migration tool can easily transfer your SharePoint Lists, Documents, Sites, etc. & can also migrate SharePoint permissions to another tenant.
Conclusion
The admin center allows you to manage SharePoint user-profiles and several other processes, such as viewing SharePoint usage data. Follow the above guide to manage your SharePoint user profile. If you need to migrate SharePoint data, we recommend employing Kernel Migration for SharePoint. The tool can easily handle any migration task and can also migrate SharePoint on-premises to SharePoint Online. No need to worry about data integrity as the tool maintains complete data integrity while preserving original file/folder hierarchy. Download the demo version to witness its powerful features.


