Read time 9 minutes
With a post published on July 12, 2018, Microsoft announced in context to the support for SQL Server 2008 & SQL Server 2008 R2. Emphasizing on end of support for SQL Server 2008 & Windows Server 2008, the post walks you on why the company is dropping the support and why you should choose the next better offered by the giant, learn more about the details from here. With the completion of the 5-year lifecycle for both regular & security updates for the mentioned tools, issues such as security risk from cyber-attacks, compliance risks, performance, efficiency, and more will be up after the support end, as briefed below.

Thus, if you’re still making use of SQL Server 2008 or SQL Server 2008 R2, you’ve still got time to plan your migration to a newer version of SQL Server available for commercial use.

Now assuming you’re aware of this situation and considering upgrade/migration to a newer/supported version of SQL Server or searching for help on how to import SQL Server database to SQL Server 2014 or another version, you’ll get to know about the same in this article via different approaches. Also, we’ll shed some light on an advanced tool that comes handy to tackle issues such as database file corruption, database marked with the suspect stamp, etc. In scenarios like these, the user search goes on for help topics like methods to recover SQL database without backup, tips to recover SQL database from suspect mode, how to recover deleted records in SQL Server, and more.
Note: Make sure that you’ve downloaded the latest, preferred, and supported build of SQL Server (SQL Server 2014) and installed it either on the same system or on a different machine, before you implement any of the methods given below.
Import SQL server 2008 database to SQL server 2014 manually
To import the SQL Server 2008 Database to SQL Server 2014, opt from any of the native & manual method listed below.
- Using Import & Export WizardThe data transformation services Import & Export wizard provides the user the ability to migrate complete database or move selective database objects to the destination database.
You’ll need Microsoft SQL Server Management Studio for implementation of this method, follow the steps below to import the SQL Server database:- Open SQL Server Management Studio on the source server,
- Select the database & right-click, select Tasks > Copy Database,
- Copy Database windows will pop on-screen,
Here, select the source & input destination database credentials, - Specify the preferred settings configuration,
- Click Next,
Note: In this step, you can also choose to schedule SQL Server 2008 database to SQL Server 2014 migration for a specific time frame. - Click on the Execute button to start the migration/transfer,
- Done.
- Using Backup & Restore
- Archive full database including all the instances,
- Specify the target location and copy the backup there,
- On the destination server, initiate database restoration by specifying the WITH NORECOVERY option,
- Overwrite the existing database using the WITH REPLACE option,
- Finish.
- Using Generate Scripts Wizard
- Open SQL Server Management Studio on the source server,
- Select the database and right-click > Tasks > Generate Scripts,
- Configure settings for migration as per the preference,
- Confirm, script data = true is selected to move data as well,
- Click on Next > Next > Finish,
- Now, connect to the database server & create a new database in it,
- Click on the New Query button on the navigation bar,
- Paste script generated by the GSW (Generate Scripts Wizard),
- Now, execute the query on the destination database, Done.
- Using Attach & Detach
- Detach the source server using sp_detach stored procedure,
- Now, copy the MDF, LDF, and NDF files to the destination PC,
- Now use the sp_Attach_db stored procedure to attach the database to the target server,
- Browse to the location where you’ve saved the copy of database files in step-2, on the new system,
- Finish.
You can create the database backup and restore it further using Transact-SQL statements, follow below-given steps:
Another method to import/migrate SQL Server 2008 database to SQL Server 2014 is to generate scripts; steps are as follows:
To use, attach & detach, go through the steps given below one after the other:
Automate SQL server 2008 database import to SQL server 2014
With the methods listed above, one can successfully migrate from SQL Server 2008 to 2014, but these manual methods aren’t fully secure because of process loops such as mistyped Transact-SQL statement, database file corruption, database file damage when transferring to another system, and more.
Additionally, to start using any of the given manual methods, it is necessary for the user to understand the process & statements used; this sometimes turns hard & confusing for many users and again results in data loss due to file corruption. Here, we’d suggest the users to use a standalone SQL recovery tool.
it is an advanced tool, made specially to fix all issues related sql server database files along with repair & recovery of corrupt or damaged files, the tool can restore mdf ndf files live server. Simplify whole process transfer migration, kernel for automates backend commands leaving only a few clicks end user, as it doesn’t require user have any prior technical knowledge in terms migration import.
Go through the steps given below sequentially to import SQL Server Database 2008 to SQL Server 2014 with ease.
- Open the software,
- Click on Browse to select the database file,
Select the Standard Recovery Mode and click Recover.
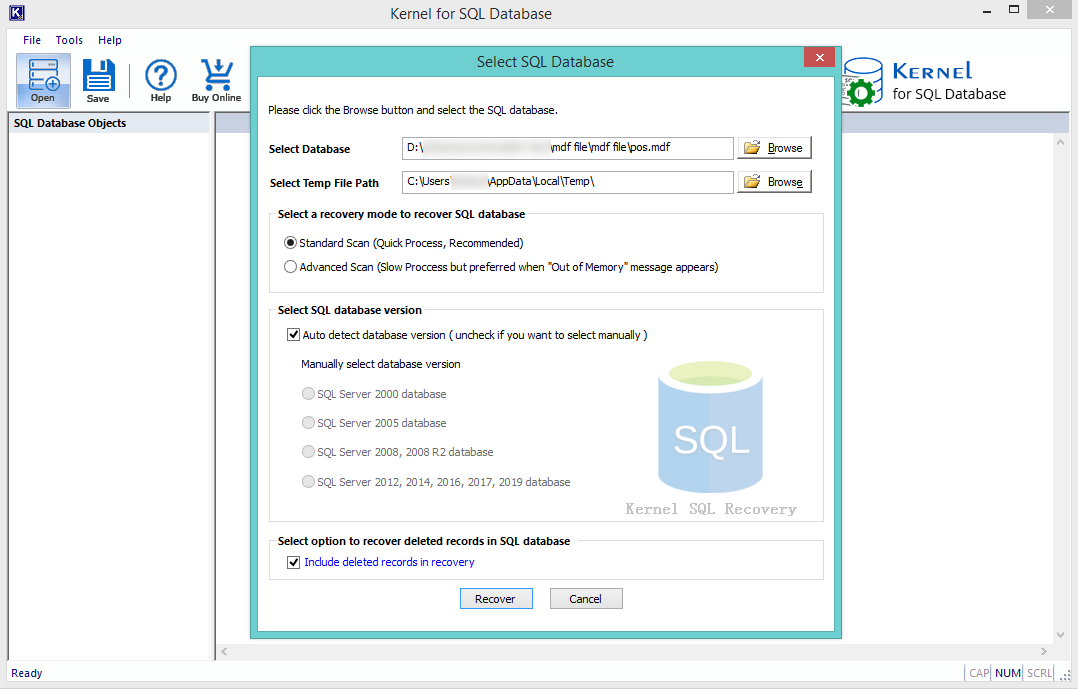
Note: You can select both healthy & corrupt or damaged database files here. In case, if the level of file corruption is high, then select Advanced Scan mode. - Wait for the scan process to complete.

Note: If you wish to choose a different database file then, click on the Stop button to immediately halt the Scan process. - Upon successful file scan, the tool’s UI – User-Interface will refresh and load all the data stored inside,
Checkmark all or select database objects to recover > click on Save button,
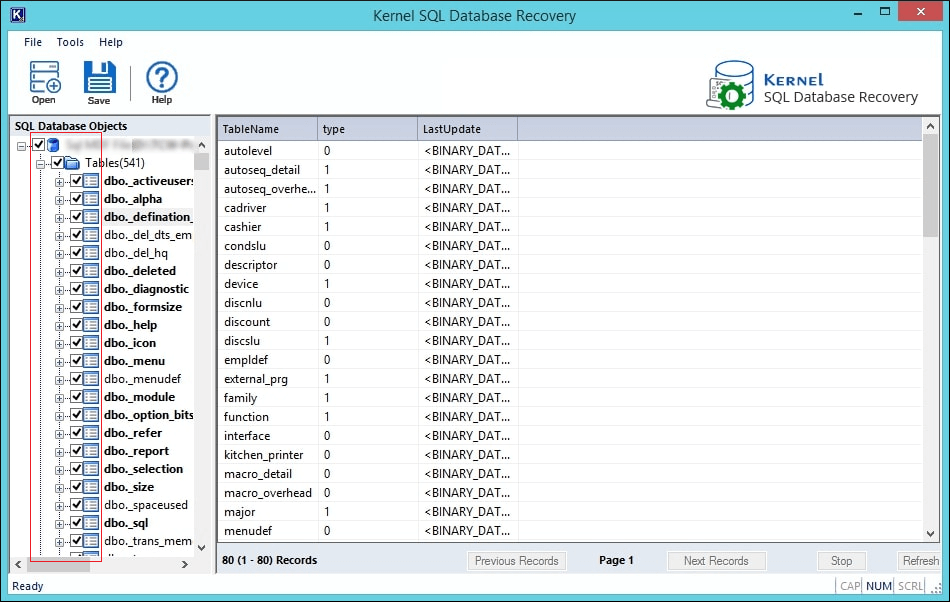
Note: Click on any object to view the item and its data. - Saving Mode window will appear on-screen,
Now, to import SQL Server 2008 database to SQL Server 2014, select SQL Server radio button,
Select the Server Authentication option > input credentials, as shown below,
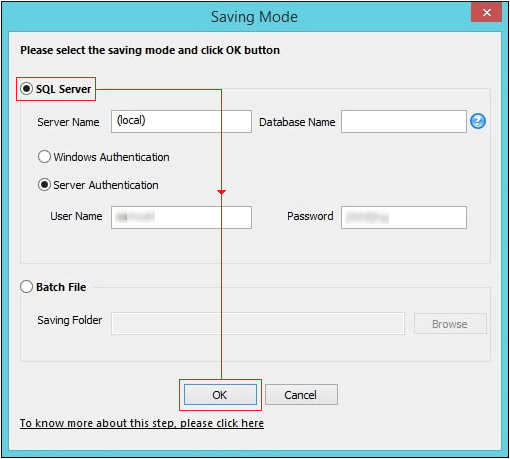
Note: To save the recovered files locally, if the files were corrupt or damaged then, select Batch File option, provide the destination path and click Ok.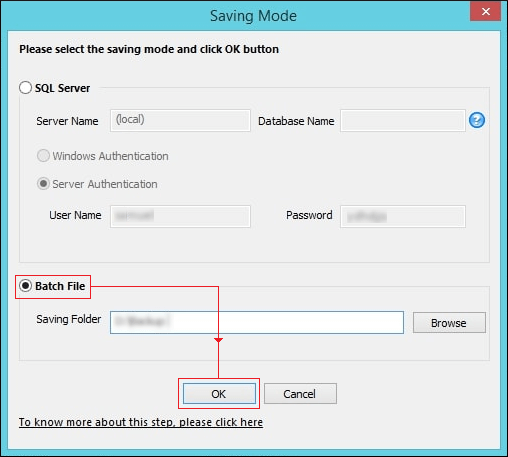
- Wait for the saving process to finish,

Note: To reselect database objects to reduce overall file size, click on the Stop button and repeat from step-4, - Click Ok.

You’ve successfully migrated the database from SQL Server 2008 to SQL Server 2014 with ease.
Read also : How to migrate SQL database 2008 to SQL 2016?
After importing the database from SQL Server 2008 to SQL Server 2014, you will be able to use the latest features in SQL Server 2014. Some of them are following;
Extending memory to SSDs
The latest SQL Server integrates with the solid-state storage drives by connecting with the SSDs for the database buffer pool and reduces the time for the query processing and database input/output.
In-Memory OLTP capabilities
There are in-memory OLTP capabilities in the SQL Server 2014 that enhances the speed of the database performance. There are no requirements for the additional hardware additions or changes in the server settings to accommodate the changes. The latest SQL Server has the ability to migrate specific database tables and stored procedures to in-memory OLTP.
Encryption
There are encryption capabilities for the data of the on-premises database as well as Azure Cloud storage.
Improved high availability
The availability groups that can contain the database replicas for the availability in case of any catastrophe, in SQL Server 2014; the user can create up to 8 database replicas that will remain available even in the network failure cases.
Hybrid scenario
When SQL Server works in the hybrid scenario, then the SQL Server 2014 gives full support in the management and automation of SQL Server backup at the Azure cloud storage.
Wrap
Native methods for database imports eliminate the need of downloading any other software but they are long, requires prior technical knowledge, and confusing for those who are not well experienced with Transact-SQL statements and SQL Server Management Studio. In the same place, It accompanies the user with easy database migration by automating the whole process, and it can assist you in help topics such as recover deleted records in SQL server, recover database file(s) after corruption and more.