Read time 5 minutes
Renaming SQL database is a technical process, administrators will have to do as a part of their job. They can do it using SQL Server Management Studio or Transact-SQL cmdlets. We will show, how you can do this.
Sometimes SQL administrators will have to rename the database for administrative or technical reasons. Renaming a SQL Server Database is not tricky. You can do it in a couple of ways, but before actually renaming the database, there are a couple of things which you should know.
In this article, we’ll guide you on how to rename a SQL Server Database the right way without messing with anything.
Prerequisites
Things to consider before renaming the SQL Server Database are Limitations & Restrictions and Security Permissions associated with the task.
For renaming a SQL Server Database, you can either use SQL Server Management Studio or Transact-SQL, and we’ve covered both methods below.
Includes Set Database to Single-User Mode:
Rename SQL Server Database
Limitations & restrictions
Below are the limitations & restrictions associated with the task of renaming a SQL Server database:
- If you’re renaming a database in Azure SQL Database, it is important to confirm that no users are connected to that database.
- Renaming a system database is not permitted.
- Database renaming is not allowed when users are accessing the SQL Server database.For closing any open connection to the database, you can set the database in single-user mode.
Security permissions
For performing specific tasks on the SQL Server database, the user should be assigned with certain permissions. And for renaming, the SQL Server database name ALTER permission is required.
Set database to single – User mode
For closing any open connections and to stop other users from connecting to the database while the process of renaming is going on, you can set the database to single-user mode.
Make sure of the prerequisites mentioned below before proceeding to set the database to single-user mode:
Confirm that AUTO_UPDATE_STATISTICS_ASYNC option is set OFF. If the option is set to ON, you can’t access the database in single-user mode (as the background thread used to update statistics establishes a connection with the database).
Using SQL server management studio
Follow the steps given below to set database in Single-User mode using Server Management Studio:
- Open Object Explorer and connect and expand an instance of SQL Server Database Engine.
- Select the database, right-click, and click on Properties.
- In Database Properties, click on the Options page.
- Select Single, from the Restrict Access option.
- If other users are connected with the database, Open Connections message will appear.For changing the property, close all other connections and click Yes.
Done, you’ve set the database to single-user mode using SQL Server Management Studio successfully.
Using transact-SQL
Follow the below steps to set the database in single-user mode using Transact-SQL:
- Establish a connection with the Database Engine.
- Select New Query on the standard bar.
- Type the code in given below syntax in the query window and click Execute.
GO
ALTER DATABASE
SET SINGLE_USER
WITH ROLLBACK IMMEDIATE;
GO
ALTER DATABASE
SET READ_ONLY;
GO
ALTER DATABASE
SET MULTI_USER;
GO
You’ve successfully set the database in single-user mode using Transact-SQL.
Rename SQL server database
Now that you’ve understood the limitations & restrictions and security permissions and have set the database in single-user mode to disconnect other users connected to the database, you can now proceed to the renaming stage.
Steps given below can help you to rename a SQL Server or Azure SQL Server using SQL Server Management Studio:
- Open Object Explorer and establish connection with a SQL instance.
- Again, confirm that no other users are connected to the database, else use the above method to set the SQL Server Database in Single-User mode.
- In Object Explorer, expand Databases.
- Select the database you wish to rename, right-click on it, and click Rename.
- Assign the database with a new name and click Ok.
You’ve renamed the SQL Server database successfully using SQL Server Management Studio.
Using Transact-SQL
This method not only will help you in renaming the SQL Server Database using T-SQL, it will also assist you to set the database in single-user mode, and after renaming, place database back in multi-user mode.
Follow below steps:
- For your instance, establish a connection with the master database.
- Launch a query window.
- Type the code (in the given syntax) in the query window and click Execute.
GO
ALTER DATABASE
GO
ALTER DATABASE
GO
ALTER DATABASE
GO
Database renaming has been done successfully, and the process included setting the database in single-user mode and upon database renaming, reverting it to multi-user mode using Transact-SQL.
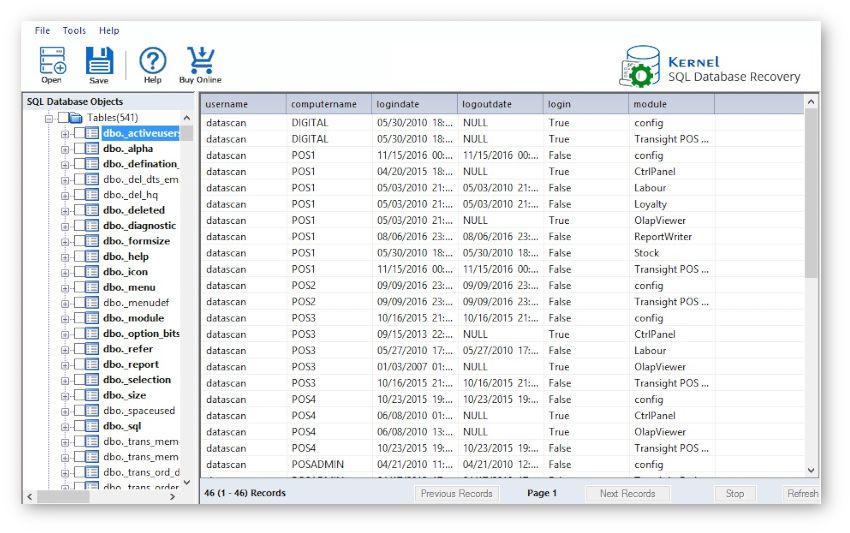
Kernel SQL Database recovery
There may be times when the SQL Database file(s) – MDF/NDF, become corrupt or inaccessible and all your crucial data would be at high risk of data loss, that data could be of your customers, and gathering all the information again would waste lots of hours. This won’t be good for business. Such situations are very critical, as finding the right solution becomes necessary.
Kernel for SQL Database Recovery is the best find you can have for this purpose. It recovers large size database file(s) – both MDF/NDF, creates the backup script of restored databases, recover multiple database file at once, etc.
The tool offers support for different versions of Microsoft SQL Server – 2019, 2016, 2014, 2012, 2008, etc. It doesn’t matter which version of SQL Server you’re using on your system, download the tool from the website, install it and jump on using the software.
Conclusion
Renaming the SQL Server Database requires proper acknowledgment of all the measures associated with it; so, without learning the process specifics, it is possible that you may mess up. And in case if something goes wrong, which we hope not to, then, this tool is your one-stop solution.