Read time: 8 minutes
User Query: “One day, I found myself in a bind. I needed to create a new PST file in MS Outlook, but I had no idea how to do it. This created chaos and disturbed my work performance. Do you know any method that can help me create a new PST file?”
Are you looking to Create New Outlook PST file? Creating a PST file is a common practice that most Outlook users need to undertake at some point. There can be several reasons behind this, such as to restore lost mailbox data from the inaccessible PST. Follow the article to learn how to create new PST file in Outlook.
With methods involving just a few clicks, you’ll be able to create your new PST file in no time. Also, we’ll share some helpful tips for managing your Outlook files after creating your PST file.
Don’t waste any more time searching for confusing tutorials – we’ve got everything you need to get started right here.
Why is There a Need to Create New PST Files?
PST files are portable. Also, they can be used to backup Exchange mailboxes or to recover user mailboxes from OST files. The archiving feature of MS Outlook also uses PST format to save the old and unused items.
You certainly need to protect your data from various threats like viruses, malware attacks, or unexpected breakdown of your computer. To curtail or combat this threat, you should create a new PST file in MS Outlook, which shall contain all that data that you believe needs protection. Thus, you can make a new PST file that’ll be very helpful in archiving emails.
How to Create a New PST File in Outlook?
In some situations, users will have to create a new PST file in MS Outlook. It is not a complicated task. To create a PST file in Outlook, you have to follow the steps:
Method 1. Using the New Items option
The first method to create new Outlook PST file uses the New Items option. Follow the given steps below:
Step 1. Open MS Outlook, click New Items, point to More Items ,and then click Outlook Data Files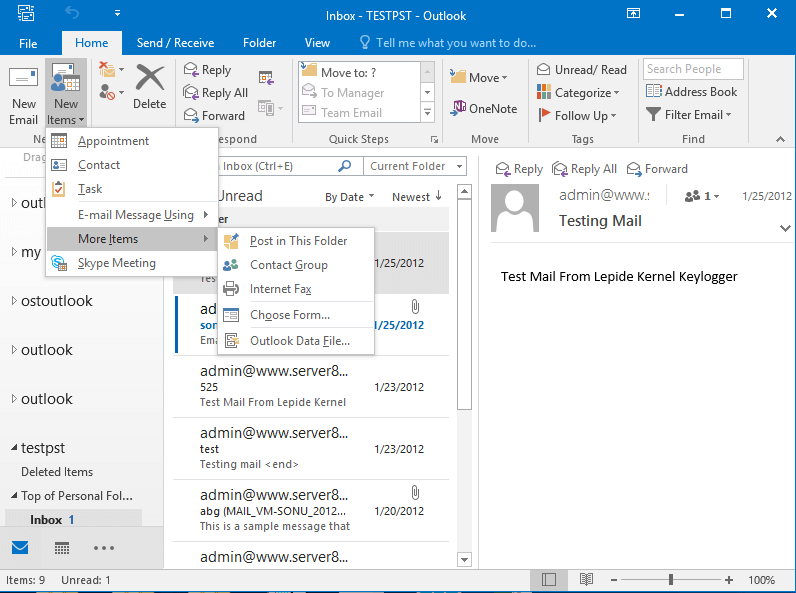
Step 2. Give a name for the new PST file (click Add Optional Password if you want to create a password-protected PST file) and then click OK.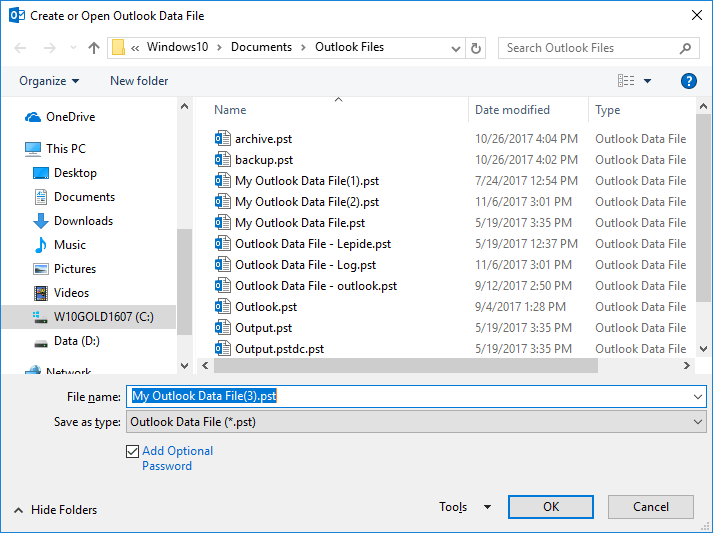
Note: If prompted by Outlook, enter a password for the new PST file, verify it, and then click on OK.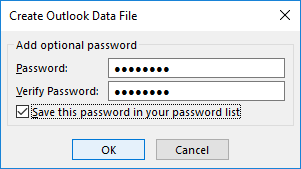
Method 2. Using Account Settings
In this method, you can adjust the account settings within the Outlook application and create new PST File in Outlook:
Step 1. Open Microsoft Outlook.
Step 2. Click File, select Info, and click Account Settings>Account Settings.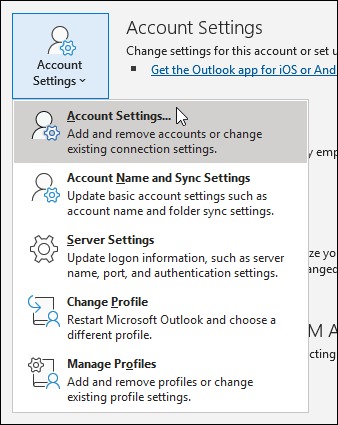
Step 3. Select Data Files. Click the Add button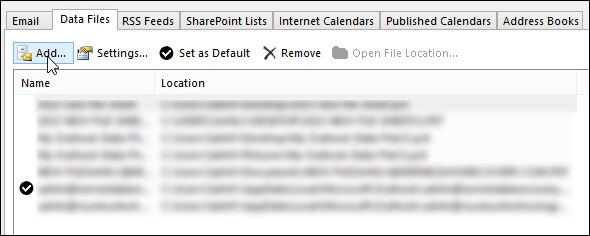
Step 4. Give the File name as per your choice.
Step 5. Select the file type as Outlook Data File (.pst).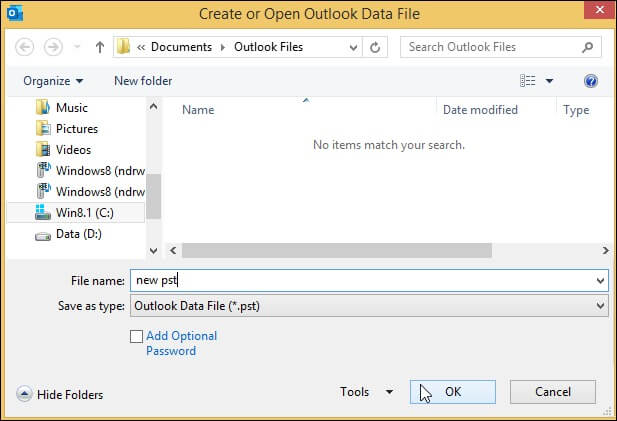
Step 6. Click OK.
Method 3. Using the Import & Export Wizard
If you already have emails, contacts, or other data stored in another file or program, you can use the Import/Export Wizard to import that data into a new Outlook PST file. To start the wizard and create Outlook Data File (PST) in Outlook, follow the below steps:
Step 1. Go to the File tab and click on Open & Export > Import/Export.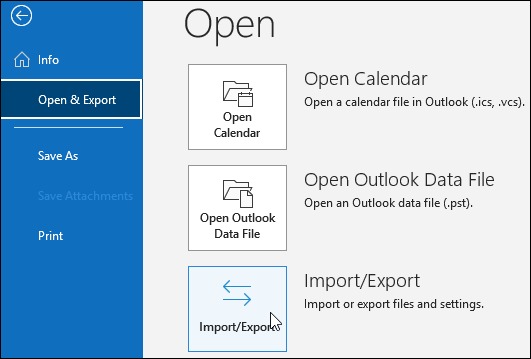
Step 2. In the Import & Export Wizard window, choose Import from another program or file and hit Next.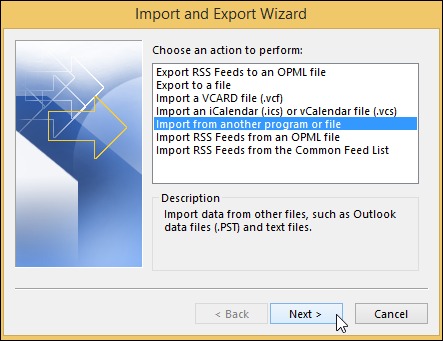
Step 3. On the next page of the wizard, select your desired worksheet and click Next.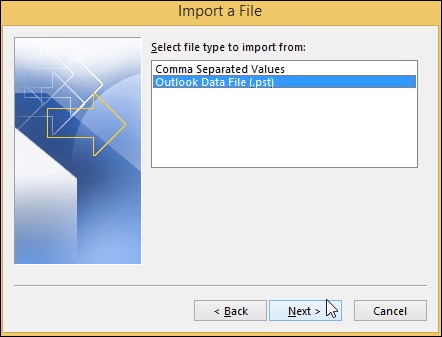
Step 4. Now you will need to choose the file that you want to import into your new PST file. Click Browse to locate the file, then click Next.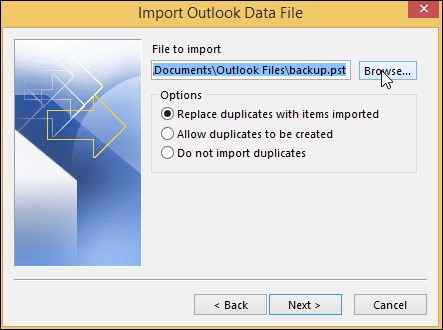
Step 5. On the next page of the wizard, select the option to Include subfolders and click Next.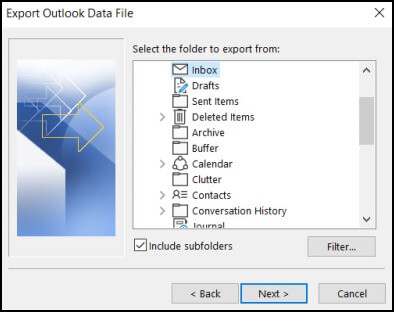
Step 6. Finally, on the last page of the wizard, choose a name and location for your new PST file, then tap Finish. Your data will now be imported into the new PST file.
Method 4. Using Auto-Archiving in Outlook
Auto-Archiving is a useful feature to create new Outlook PST file. It saves all items from the OST file into a separate PST file. Archiving helps to store old messages and emails, freeing up space in your email account. To enable Auto-Archiving, follow these easy steps:
Step 1. Open Outlook, go to File and click Options.
Step 2. Select Advanced and then tap on AutoArchive Settings.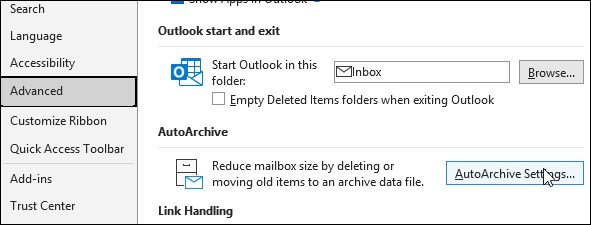
Step 3. Set the number of days for running Auto-Archiving and specify the folder location for the PST files.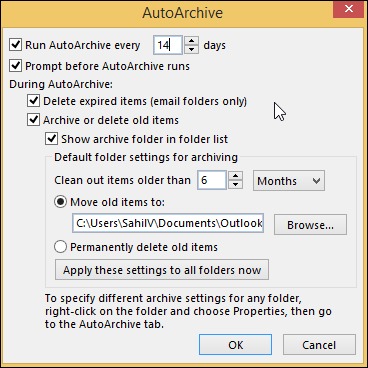
Step 4. Click OK to finish. You will automatically create and save your PST file to the default location on your computer.
Inaccessible PST File? Use an Automated PST Repair Tool
The methods described in the article help you Create New Outlook PST file. But what to do if our PST files are damaged? In such a scenario, Kernel for Outlook PST Repair is a software to rely on. It is a powerful tool that can efficiently scan and repair corrupt PST files in just a few clicks. This Outlook PST Repair Tool can repair severely corrupt PST files and recover all mailbox items such as emails, contacts, calendar entries, tasks, notes, etc.
Some of the other features of this tool are:
- Exports PST data to MS Exchange, Office 365, and more.
- Saves PST emails in webmails like Google apps, Yahoo, Gmail, etc.
- Saves emails in MSG, EML, PDF, and more.
- Allows to split large sized PST files into smaller PSTs.
- Performs selective email recovery using its inbuilt filters (From, To, etc.)
- Recover deleted emails & attachments and displays them in red
Conclusion
Outlook PST files can be a lifesaver when it comes to the organization and storage of mailbox data, but they can also be tricky to create. We have outlined the top ways to create new PST file in Outlook so you can get started on your email communication. Moreover, Outlook PSTs can get corrupted or damaged resulting in the loss of valuable information.
We recommend Kernel for Outlook PST Repair as an excellent tool to repair corrupt PST files. It is easy to use and recovers data quickly and efficiently. So, if you ever encounter any problems with your PST files, do not hesitate to give it a try.


