Read time 6 minutes
Microsoft provides a default domain name when you create an account with the Office 365 tenant. The platform allows you to customize the domain name if required to make it more relevant to your organization. These domain names have a major contribution in strengthening the trust in your business organization.
Let’s learn in detail to get understanding on how to add new domain to Office 365 through this article.
Why add a new domain to Office 365?
Here are a few reasons that explains why you might need to add a domain to Microsoft 365:
- Improves the reputation of your brand among other users with whom you interact online.
- Establish higher trust through the enhanced email appearance with the authentic brand name mentioned.
- Helps you to deliver a harmonious business experience to your users throughout the Microsoft 365 applications.
- With your domain ownership, you can easily switch service providers without any need to change the identity.
What do you need to set up a M365 domain?
Below are a few requisites that you must arrange before starting with the domain setup:
- Make sure you have the ownership of the domain you want to add.
- Access to the DNS management portal is necessary.
- Get global administrator permissions to make the changes through the Office 365 admin center.
- Proper DNS setup to create or modify DNS records.
- Preserve the entire business data if changing the domain.
How to add domain to Office 365?
Let’s scroll down to learn how you can execute a simplified Office 365 domain setup:
Step 1: Add a domain
To begin with the process, first you need to add a domain in Office 365 admin center:
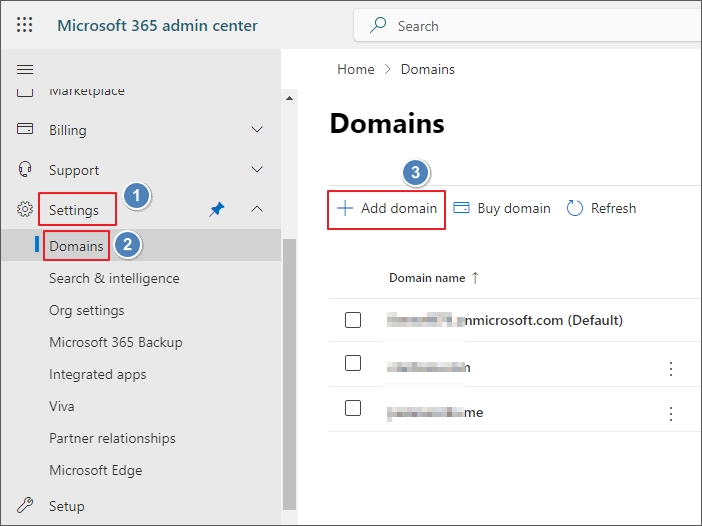
- Open the Microsoft 365 admin center and log in using admin credentials.
- Go to Settings and select Domains.
- Click on the +Add Domain button.
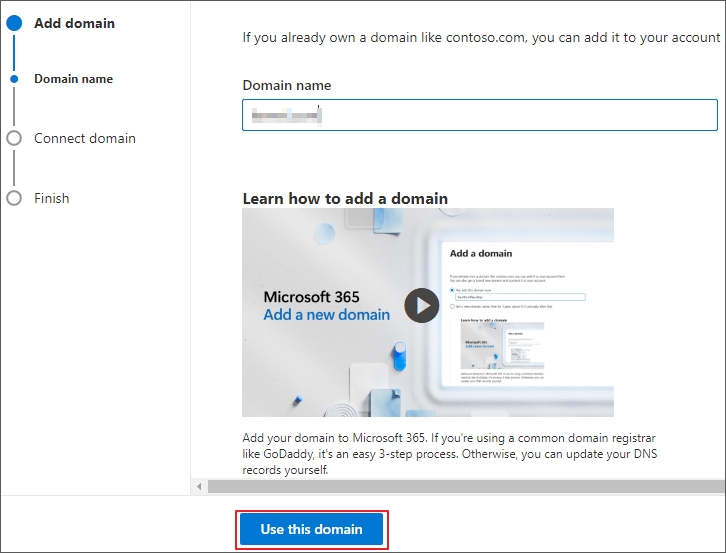
- Provide a domain name and click Use this domain to verify the domain ownership.
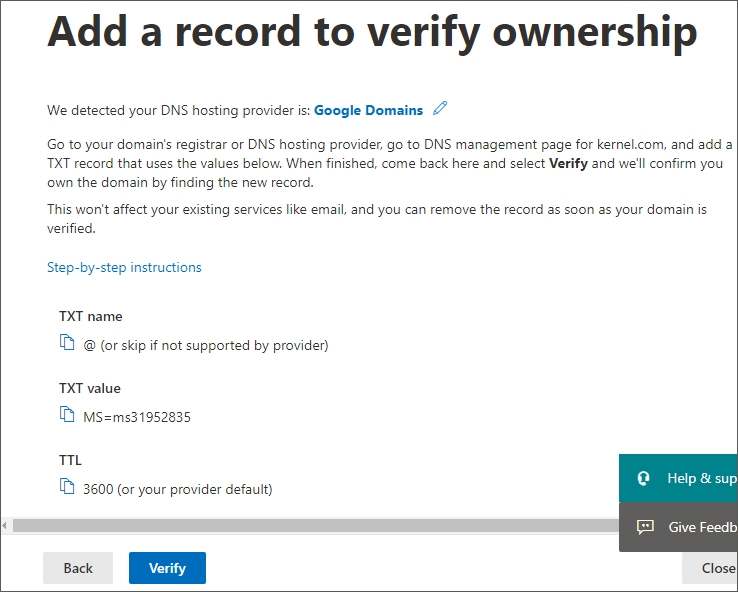
Step 2: Verify the domain ownership
Once the domain is created, we need to verify it and the steps to do it are mentioned below:
- Choose the way you want to verify
- Add a TXT record to the domain’s DNS records
- If you can’t add a TXT record, add an MX record to the domain’s DNS record
- Add a text file to the domain’s website
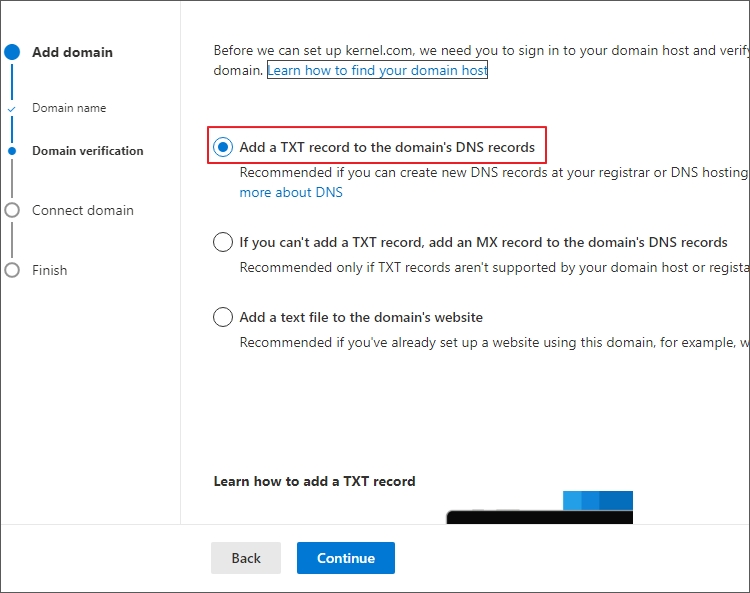
- Click Verify to proceed.
- After verifying the domain name, make changes in the DNS to use it effortlessly.
- Choose “Add the DNS records for me” if your domain registrar supports Domain Connect, and Microsoft will set up records automatically.
- If you’re going to attach Microsoft 365 specific services to want to do it later, then choose the second option, “I’ll add the DNS record myself.”
- Complete the process and select Finish once you are done.
Note: Verification by TXT record can often take 24-48 hours.
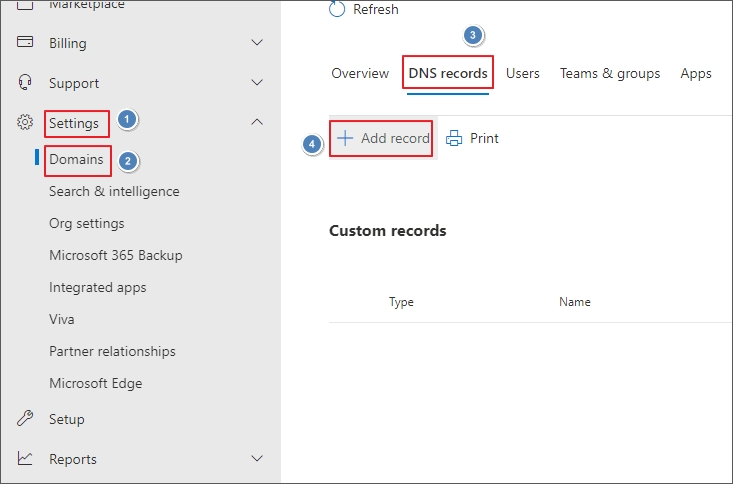
Step 3: Add custom DNS Records
Follow the given steps to add or edit the custom record:
- Go to the Settings, select Domains and then click on the added domain.
- Under DNS records, select Add record.
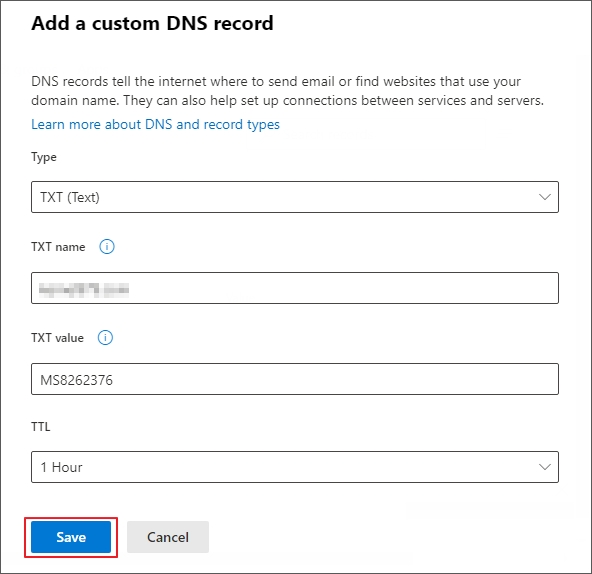
- Select the type, name, value and TTL for the record.
- Records Type: TXT
- Alias or Hostname: Type your domain name or leave the field empty.
- Value: MS= msXXXXXXXX.
- TTL: Set the value to one hour
- Click Save.
This summarizes the process to add a new domain to Microsoft 365.
Why should you save the data before adding domain to Office 365?
In the prerequisites section, we shared that you should save the data before starting the process to add domain to Office 365. New Office 365 users do not need to save their data, but businesses that have been operating M365 for a long time now should consider saving the backup. If you are wondering why, this section will explain it in detail.
Whenever a new domain is created, the primary email address of all the users is also changed. Improper handling can often lead to loss of the mailbox data. There is also a high risk of downtime when you configure DNS records.
To avoid losing data to Azure AD conflicts and mailbox corruptions, it is important that you save a detailed backup of your Office 365 tenant. Use a professional Microsoft 365 backup tool like Kernel Office 365 backup and restore to download the backup with consistency.
Exclusive features of Kernel Office 365 backup & restore tool
- Export selective Office 365 mailboxes to PST, MSG, and other file formats.
- Download a thorough backup from primary, shared, and archive mailboxes.
- Save the incremental backup of emails and avoid data redundancy.
- Run a bulk backup of mailboxes to save your time and resources.
- Save data from single or multiple Office 365 Groups within a few minutes.
- Split PST feature to help you manage large-sized mailboxes.
Conclusion
We hope you are all through with “how to add new domain to Office 365”. Once you add a custom domain to Office 365, your Office 365 tenant will be ready for use. Make sure to inform the users that there has been a change in the domain name and help them access their mailboxes.
However, you will need data to restore the Office 365 data and to do this, you can use the backup you saved using Kernel Office 365 backup and restore tool. It will help you store a consistent and structured backup that supports easy restoration as and when required.
Frequently Asked Questions
To add a domain, open Microsoft 365, go to Settings and click Domains. Select Add domain and follow the on-screen instructions to verify the domain. At last, configure the DNS records, and you’re done.
Yes, each Microsoft tenant within an organization can create up to five custom domains.