Read time: 16 minutes
Automatic system reboot with a blue screen showing the Video_Scheduler_Internal_Error stop code is a sign of critical damage to Windows. Multi functionality in Microsoft Windows sometimes includes things that break the flow of work or any activity and become irritating. These include regular pop-ups, system notifications, slow system speed, and application failure, but the blue screen of death (BSOD) error is probably the worst. BSOD video scheduler internal error can show up any time, while playing a video, booting up the system, working with graphics, and even while doing normal everyday tasks like surfing the web.
The worst thing is that it comes with no warning and renders the complete screen useless. The only indication of your problem is the stop code Video_Scheduler_Internal_Error. Sudden occurrence of the error often leads to loss of unsaved data. Primary reasons behind the Windows video scheduler internal error have a direct link to system’s software and hardware components.
Let us get to all the relevant aspects related to video scheduler internal error.
What are the Symptoms of “Video Scheduler Internal Error”?
To be aware of any upcoming uncertainties, the most crucial thing to do is to pay proper attention to the alarming symptoms. User needs to be aware of the few signs which can be a warning for video scheduler internal error Windows 10:
- Flickering of the screen of your PC.
- Issue while operating on Google Chrome and Skype.
- Observe if your system is slowing down.
- The screen keeps freezing for a short duration.
- The system freezes while loading graphic games.
- Recurring system reboots.
Why Do You Get the “Video Scheduler Internal Error”?
Let’s look at the various factors that leads to the internal video scheduler error:
- Malware: Virus and malware attacks cause corruption, making Windows system files inaccessible. Such a critical situation can lead to video internal scheduler error.
- Hardware Issue: An issue with the recently connected or an old hardware component of the system may lead to the BSOD Video_Scheduler_Internal_Error.
- Software: Operating with software that demands higher system resources than the current system’s configuration can be another cause of this video error.
- Driver: An incompatible or outdated driver installation can interrupt normal system operations. Such interruption might display the blue screen of death Video_Scheduler_Internal_Error.
- System Overheating: Heavy graphic intensive tasks increase the load on the CPU and GPU. If the hardware fails to handle the load, it might cause the blue screen Windows 10 error.
How to Fix “Video Scheduler Internal Error”? [Easy-to-Follow Methods]
Multiple reasons can lead to the blue screen on Windows startup. Therefore, we will discuss every possible way out. From simple reboot to advanced system troubleshoots, let’s cover it all one by one.
Method 1: Reboot your System
A simple restart closes all the background apps running in the background and will clear any cluttered RAM memory. At times, the blue screen error may occur due to recurring direct shutdowns.
Reboot the system to refresh the present state of the operating system. When you restart a system, the BIOS performs various checks, such as memory checks, integrity checks, and hardware checks. These tests might remove the BSOD error.
Many users have reported experiencing the internal video scheduler error Windows 11/10 while watching a video offline/online or even when using an internet browser. If you face the same issue, then try another video player to watch your movie and use a different browser than your usual one. This trick has worked for some users to counter this video error.
Method 2: Run a Virus/Malware Scan for your Computer
If the user faces an error with a blue screen while rebooting system, use the method below, as it helps you scan and detect any virus/malware on your PC. Follow the steps given below to run a full system scan:
Step 1. Go to Start and type the command prompt in the search bar.
Step 2. Select Virus and threat protection. Under scan options, select Full scan & click Scan now. 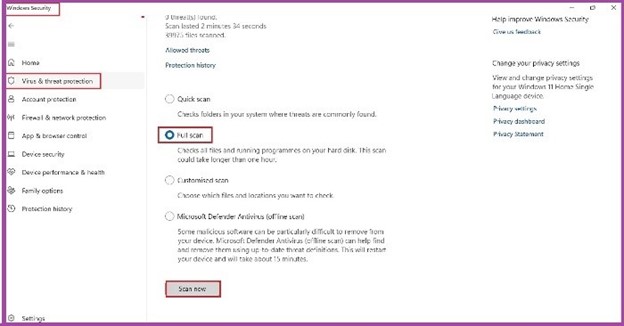
Method 3: Check Hard Disk with CHKDSK Command
Any issue with the storage unit may also give the BSOD Windows 11 error. Use CHKDSK to check the computer hard disk data and metadata. The command checks for logical and physical errors.
Steps to execute the command:
Step 1: Press Win + R, type “cmd”, and press enter.
Step 2: Type “CHKDSK” and press enter.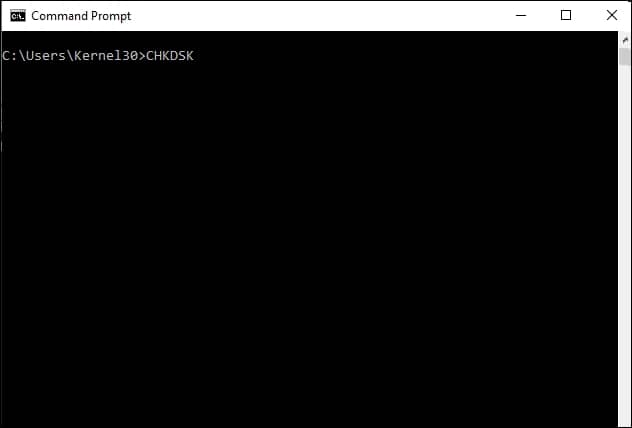
The command will check the selected volume (here, drive C) of the hard disk on various parameters and return the status. To repair the hard disk, you must run the CHKDSK command with a parameter. You can use the following parameters:
- CHKDSK /F: Checks and fixes hard disk for basic file system structure, and examines the file name linkage, and more.
- CHKDSK /R: Search for bad sectors on the hard disk and restore any recoverable data. This command also includes the functionality of CHKDSK /F.
- CHKDSK /B: Scans clusters for errors and performs the function of CHKDSK /R too.
If you are facing major issues of data loss, we advise you to use tools like Kernel for Windows Data Recovery that help the user to restore lost data instantly.
Method 4: Use System File Checker
Microsoft System File Checker tools are an in-built feature of Windows that allows you to scan & repair corrupt files and enhance system performance. We will use System File Checker (sfc/scannow) to analyze the hard disk. However, prior to the sfc/scannow command, we must run the DISM command.
To run this command, follow the steps given below:
Step 1: Go to Start and type command prompt in the search bar.
Step 2: Select Run as administrator.
Step 3: Execute the command DISM.exe /Online /Cleanup-image /Restorehealth and press Enter.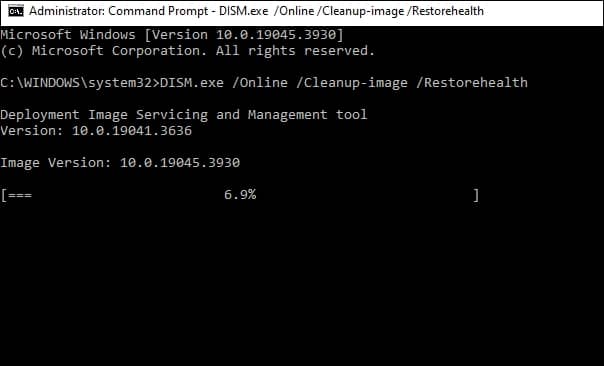
Step 4: When the above commands are executed, type sfc/scannow and press Enter.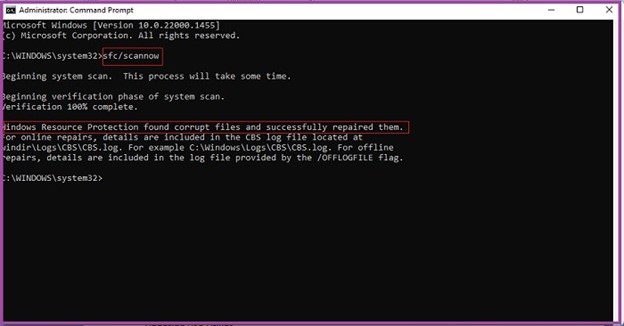
Step 5: Restart your system and check for the internal video scheduler error.
Method 5: Update Video Drivers
Drivers installed in the system bring better functionality, but pending updates can cause several repercussions, errors, and a blue screen Windows 11/10 issue.
Follow the steps given below to update the video driver:
Step 1: Go to start, type device manager in the search box. Open Device Manager.
Step 2: Expand Display adapters and right-click on your video driver.
Step 3: Select the Update driver option.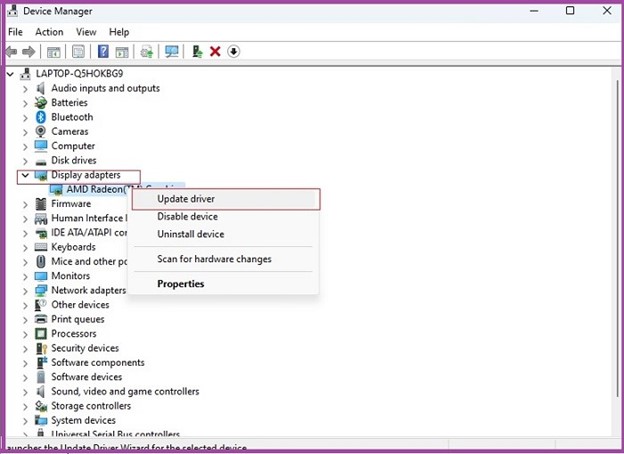
Step 4: Select Search automatically for the drivers.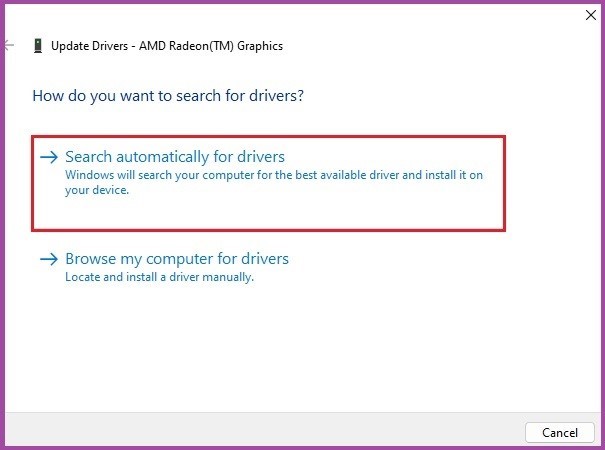
Step 5: Exit the device manager after the driver update.
You can also use the Microsoft Driver Verifier tool to check the installed drivers. This application is available by default in all Windows versions. Driver Verifier performs various checks of the drivers, such as IRQL, Spinlock, memory allocations test, driver unloading checks, and more.
Method 6: Reinstall Graphic Card Drivers
Video scheduler internal error 0x00000119 blue screen can also prevail due to an incompatible video card driver. That’s exactly what happened in my friend’s case, he had an AMD graphic card but for some reason NVidia card drivers were installed.
Due to the unsupported drivers, he faced the video scheduler internal error when playing high resolution games or doing any high graphic related tasks.
To fix the video scheduler internal error NVidia problem, he uninstalled the NVidia video drivers and installed the right one. Follow the steps given below to uninstall the video card driver:
Step 1: Go to start, type device manager in the search box. Open Device Manager.
Step 2: Expand Display adapters and then right-click on your video driver.
Step 3: Then click on Uninstall device.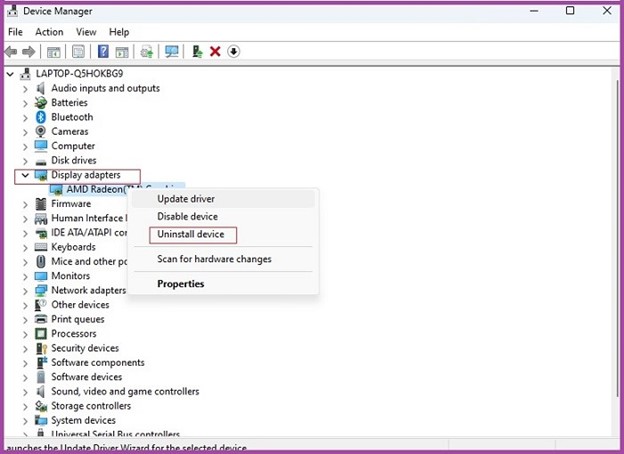
Step 4: Checkmark Delete the driver software for this device or Attempt to remove the driver for this drive and click Uninstall.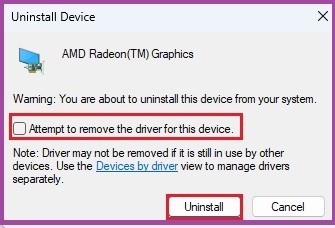
Step 5: Download the latest version of your graphic card driver from the official website. If you also have an AMD graphic card, then visit the AMD driver download page to get your drivers.
Step 6: Install the downloaded drivers and restart your system once.
With the installation of the right graphic driver, you may get away from the Video_Scheduler_Internal_Error. However, what if the problem is not the wrong drivers but the graphic card itself.
Always install a graphic card as per the specifications of your motherboard. If the motherboard is not powerful enough to properly handle the card, there will be issues. If the specifications do not match, you must replace the graphic card.
Method 7: Update Windows OS
Windows updates ensure a smooth system run with proper utilization of every software, application or file at their capability. However, issues in the Windows update can cause a blue screen error, so installing the latest update is beneficial as it carries the latest security patches and driver updates to enhance functionality.
Follow the steps given below to update your Windows Operating System:
Step 1: Press Windows + S and type settings, click Settings.
Step 2: Select Update & Security or Windows update.
Step 3: Click Check for updates under Windows Update.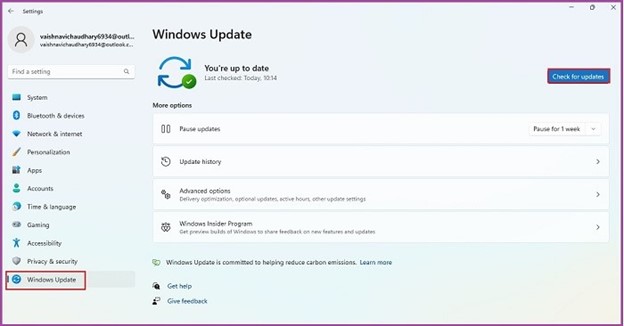
Step 4: Restart your system and verify for the prevalence of the BSOD video scheduler internal error.
Method 8: Boot in Safe Mode
Boot the system in safe mode to disable all the third-party applications and unwanted drivers. The safe mode allows only the essential Windows file to load. This creates a suitable environment to diagnose the BSOD Windows 10/11 problem.
In the safe boot mode, run the system’s diagnostic tools.
Steps to boot the Windows in Safe Mode:
Step 1: Press Win + R, type “msconfig”, and press Enter.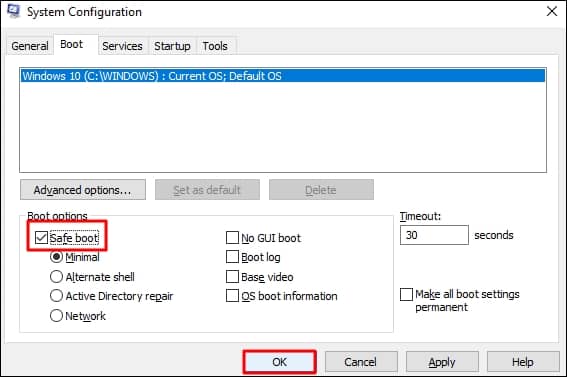
Step 2: Select the Boot tab, enable Safe Mode, and press OK.
Step 3: In the System Configuration pop-up, select Restart.
In Safe Mode, perform the following tasks:
Frequent Windows updates happen every day or two. But, sometimes, a feature update can affect the system’s normal functionality. An incompatible system update will do more harm than good. To resolve the issue, you must uninstall the latest Windows update. To do so follow the steps:
Step 1: Go to Windows Settings.
Step 2: Click on Update & Security and select View update history.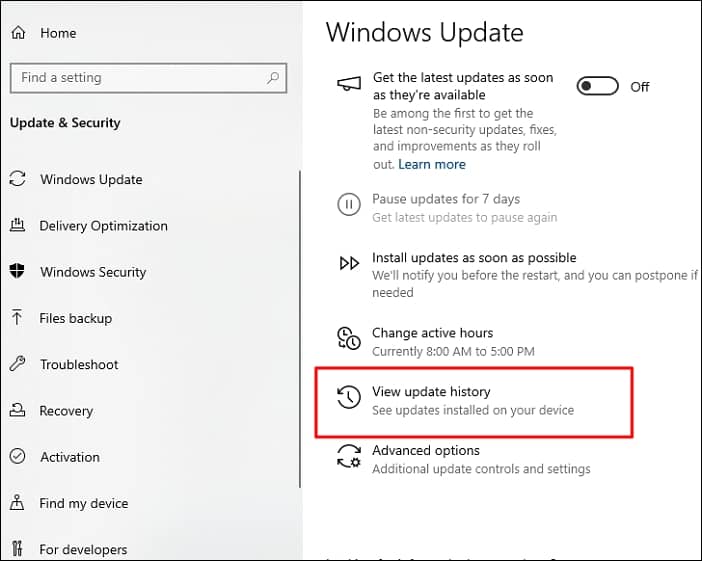
Step 3: Click the Uninstall updates option.
Step 4: Select the most recent update, right-click, and select Uninstall.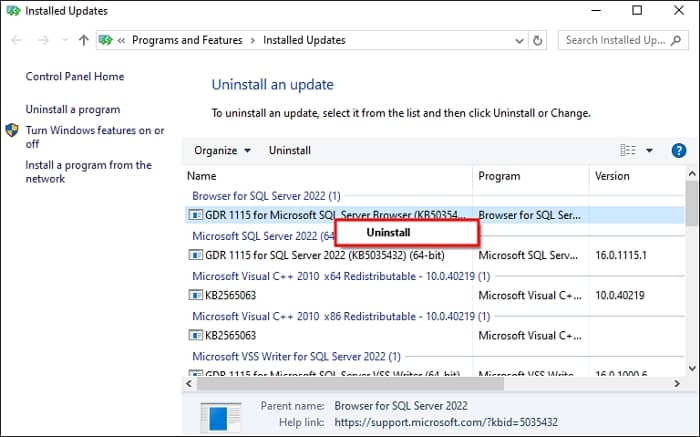
Any recent installation of software that is not optimized for your Windows can disrupt the functions of Windows OS. It can affect your operating system causing slow performance, frequent restart, and blue screen Windows error. To remove an application from Windows, do the following:
Step 1: Press Win + S, search, and open the Control Panel.
Step 2: Select Programs and Features.
Step 3: Find the application, right-click on it, and choose Uninstall.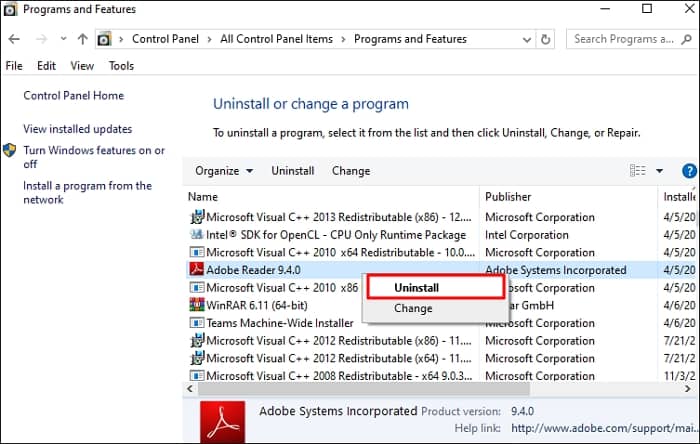
Windows default troubleshooter has the capability to find and fix minor issues related to graphics, audio, security, and more. To run the troubleshooter tool, follow the steps:
Step 1: Open Windows Settings and select Update & Security.
Step 2: Click Troubleshoot from the left pane and run it.
For the smooth functioning of Windows, adequate RAM memory is essential. To meet the memory requirements, users often buy and install new RAM.
However, some users do not understand how the RAM connects and works with the computer and end up buying RAM with the wrong specifications. The new RAM must have the same specifications as the old one.
Having a malfunctioning RAM or RAM with different specifications may cause blank or blue screen on startup error. To check the RAM for any error, run the memory diagnostic tool.
Step 1: Open the Run window with Win + R.
Step 2: Type “mdsched.exe” and press enter.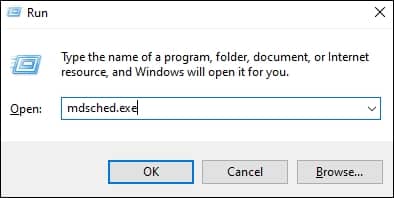
Step 3: Select Restart now to reboot the system immediately. Or choose the second option to run the test later.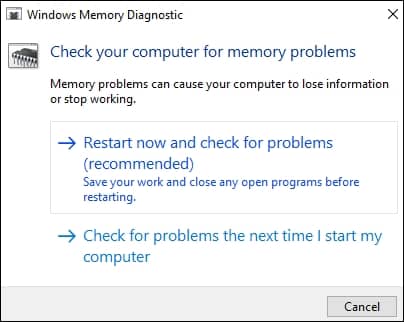
Step 4: Memory diagnostic tool will run when the system reboots. Follow the on-screen instructions to scan the RAM.
If the issue is due to missing or corruption of some core Windows files, then you must restore the files. System restoration to an earlier point, when it was working well, can solve the BSOD issue. However, this action cannot be reverted and will delete user data so, keep this in mind before carrying out the steps.
Steps for system restore:
Step 1: Open Control Panel and select Recovery option.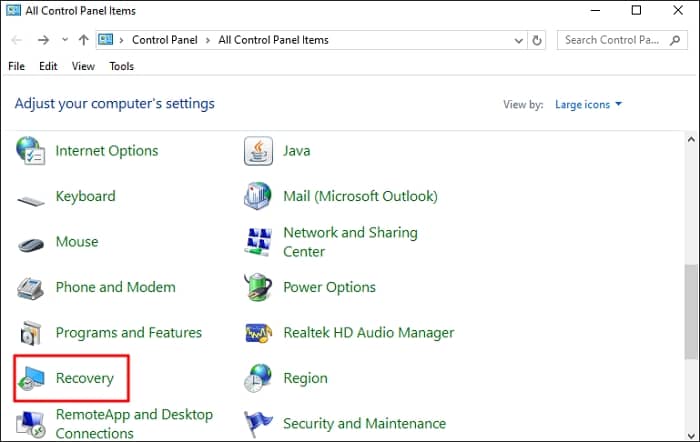
Step 2: Choose Open System Restore.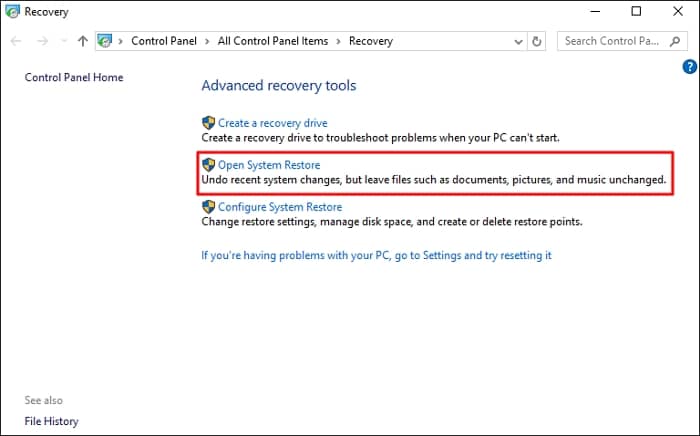
Step 3: Click Next, choose a restoration point, and click Next.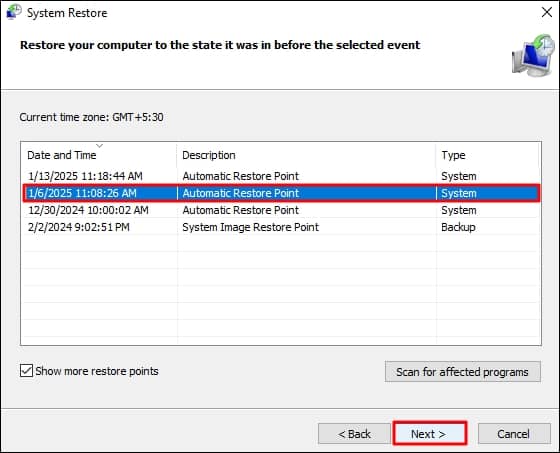
Step 4: Click Finish to start the restoration process.
To get more power from the system, users enable hardware acceleration. However, this overheats the CPU or GPU and forces the system to restart. To disable it follow the below steps:
Step 1: Press Window + S, type Graphic Settings and open it.
Step 2: Under Hardware-accelerated GPU Scheduling, toggle the button to turn it Off.
Step 3: Restart the system.
Method 9: Reset PC
Last resort if no solution works for you is to reset Windows PC. This will remove any changes, settings, installed application, and Windows updates from the system. The end result will be a clean and new error-free Windows. However, any data saved in the disk drive C will be gone forever. Therefore, only use it if you can afford to lose data.
We recommend seeking help from professional Windows repair experts before you reset the PC. Use the Windows Event Log Manager to download the log file and share it with an expert to speed up the repair.
If you wish to proceed with the Windows reset yourself, follow the steps:
Step 1: Open Windows Settings and select Update & Security.
Step 2: Click on Recovery, then click Get Started.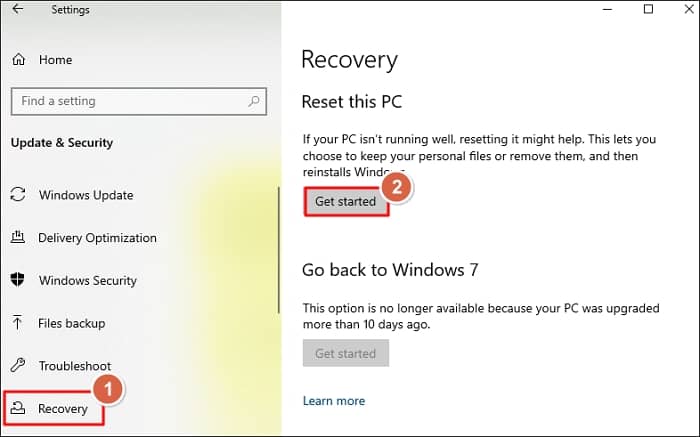
Step 3: Select the option as per your convenience. First option will only remove data from the drive where the Windows files are installed. The second option will remove data from every drive or volume of the hard disk (complete data deletion).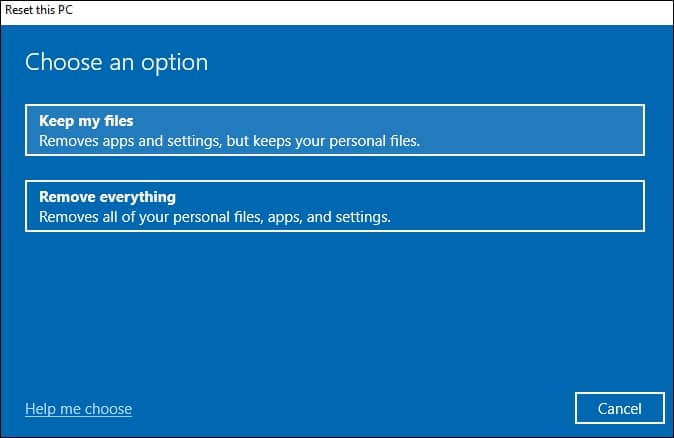
Step 4: Select Cloud download or Local install. You will need an internet connection for the Cloud download.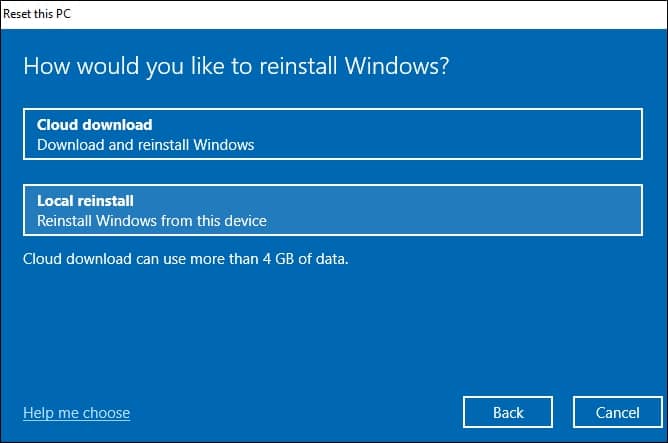
Step 5: Click Next to proceed.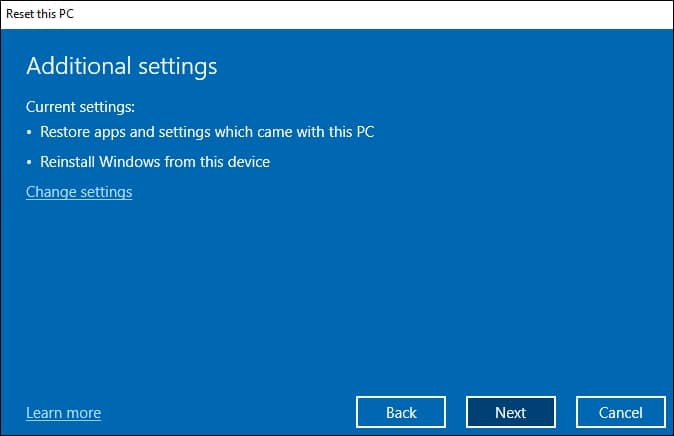
Step 6: Click Reset to begin Windows reset process.
Blue Screen and White Screen Windows Error
The blue screen Video Scheduler Internal Error is often compared to the white screen of death Windows 10/11 error. These errors halt the complete workflow. But you can differentiate them on two factors:
- Screen Color: You can guess from the error name itself, the BSOD makes the computer screen blue while the white screen of death (WSOD) turns the monitor white.
- Stop Code: The Stop code video scheduler internal error helps to identify the root cause of the problem. However, the white screen of death doesn’t show any information or text that can help to diagnose the situation.
How to Avoid Video Scheduler Internal Error?
Users must apply the following measures to prevent the blue screen error:
- Clean your system every few weeks or months to ensure proper air supply to the GPU.
- Use Windows troubleshooter and diagnose utility to detect and solve errors periodically.
- Only install or connect supported hardware to your computer.
- Keep Windows up to date.
- Protect system from virus attacks.
Conclusion
Intrusion of a blue screen Video Scheduler Internal Error leaves the user in complete disarray. In the article, we discussed how to identify, solve, and prevent blue screen errors. However, what if the user loses data due to a BSOD error, virus attack, or from system restoration? In that case, it is recommended that they get assistance from quality tools like Kernel for Windows Data Recovery Software to retrieve important data files with ease.


