Read time 5 minutes
When you install the new Exchange Server 2016 on your Windows Server and want to configure the Exchange account in Outlook, there is a useful feature called Autodiscover. The Autodiscover feature allows the user to input only the user ID and password, and the account gets configured automatically. Autodiscover finds the EWS (Exchange Web Services) endpoint in the URL for the clients. When the user tries to establish a connection with the Exchange account in the Outlook, the Autodiscover functions automate the configuration by performing the following operations:
- Exchange creates a new virtual directory (Autodiscover) in the default website under IIS.
- The Active Directory provides and stores the URLs of computers in the domain.
- The Client Access Service on the Mailbox Server performs authentication and provides proxy services for the client connections, both internal as well as external.
- Outlook takes care of configuration using the username and password only.
However, sometimes Autodiscover fails to activate, which prevents accounts from being set up in Outlook. Under such circumstances the user may face the following error:
“Your account was redirected to this website for settings. You should only allow settings from sources you know and trust.”
Causes of Exchange Autodiscover not working in Outlook
The primary cause behind the error is that IIS Services are not active by default in the server manager. The Autodiscover feature is the sub-service of the IIS Server, and it will be activated only when the IIS Server is in the activated state. The Outlook 2016 Autodiscover not working issue can arise due to:
- No Autodiscover record for the domain: Outlook 2016 can connect to Exchange only with a valid Autodiscover record. You can create this by contacting your DNS service provider.
- Incorrect Autodiscover configuration: With incorrect Autodiscover configuration, Outlook may fail to find the server. You can edit the registry settings as a workaround to fix the Outlook Autodiscover not working issue. However, this is a user-end solution.
- Missing critical attributes: Some attributes are a must for on-premises Active Directory. It includes Proxy Address, Display Name, Mail Nickname, and Mail. If these aren’t available, Autodiscover might show an error.
Apart from the troubleshoots mentioned above, check the points mentioned below to ensure the error is not occurring due to them:
- Check all the Exchange services are working perfectly well.
- In the IIS Manager, all the Application Pools are in ‘Started’ status, and the .Net framework is more significant than 4.0.
- Go to Sites, select the Default Web Site, and right-click it. Here, check that the SSL Certificate is correct (443 or 444).
Methods to fix Exchange 2016 Autodiscover not working in Outlook issue
Let us now go through all the reliable and tested methods to turn on the Exchange Autodiscover feature and automate the Outlook account configuring settings.
Method 1: Activate the IIS Service
The Autodiscover service will only work when the IIS Services is active. So, you need to turn on the IIS for it. Follow the below procedure:
Step 1. In the Exchange Server 2016, open the Server Manager and then select Local Server. Now select Manage > Add Roles and Features.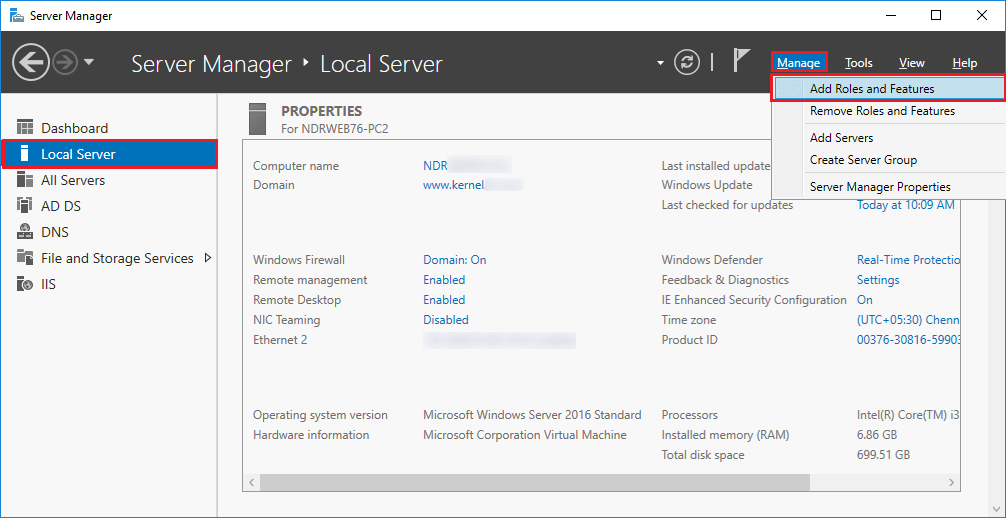
Step 2. The ‘Add Roles and Features’ wizard will open. It will brief you about the installation of roles, role services, and features. Click Next.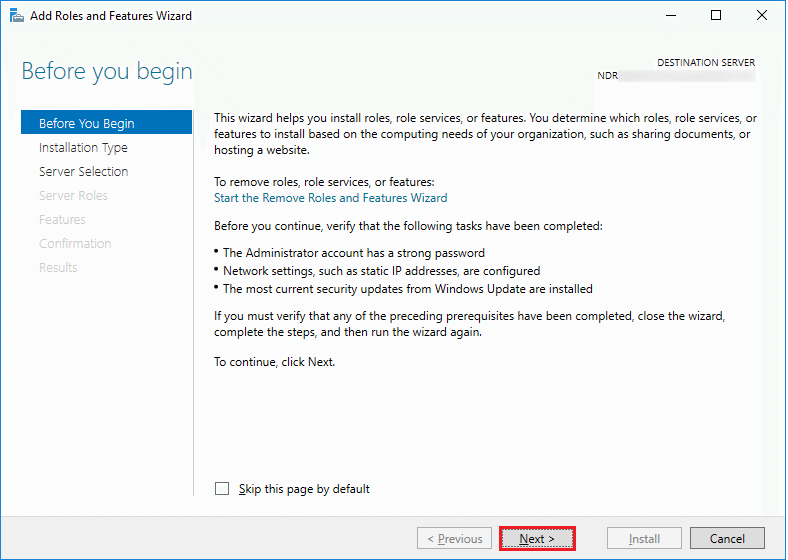
Step 3. Select the first option of ‘Role-based or feature-based installation.’ Then click Next.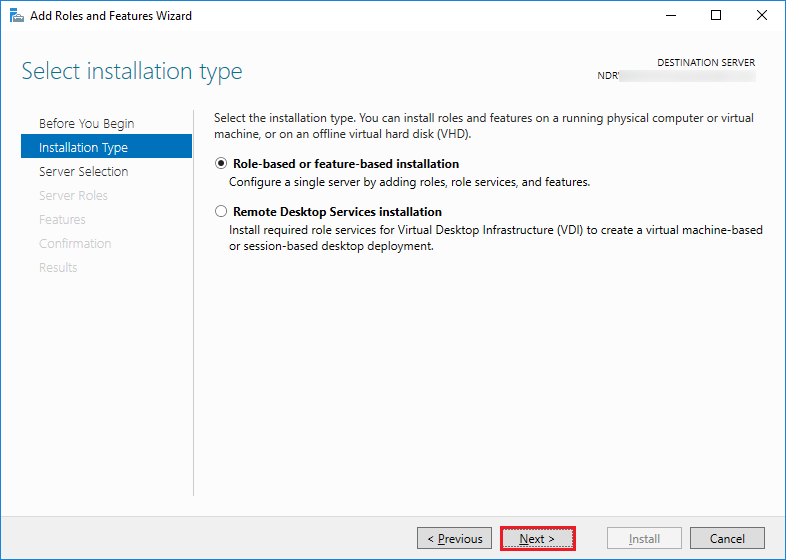
Step 4. Select your server from the Server pool and click Next.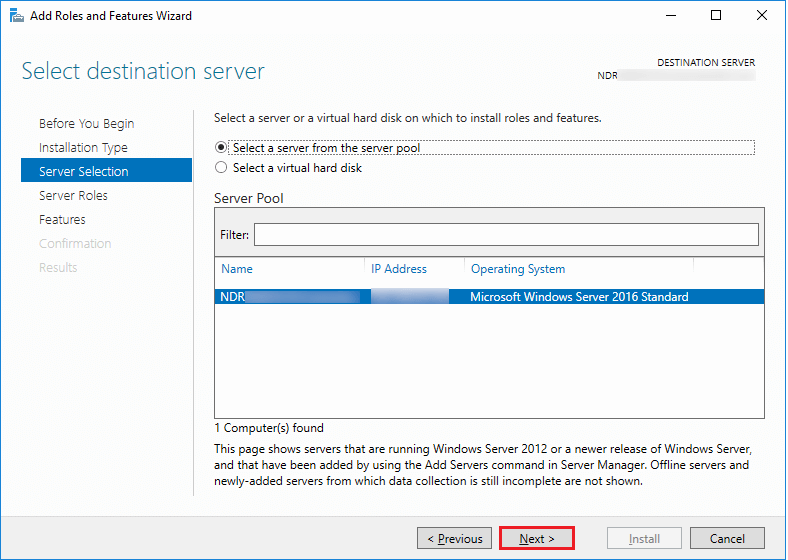
Step 5. Under the Server Roles option, select Web Server (IIS) and select it; click Next.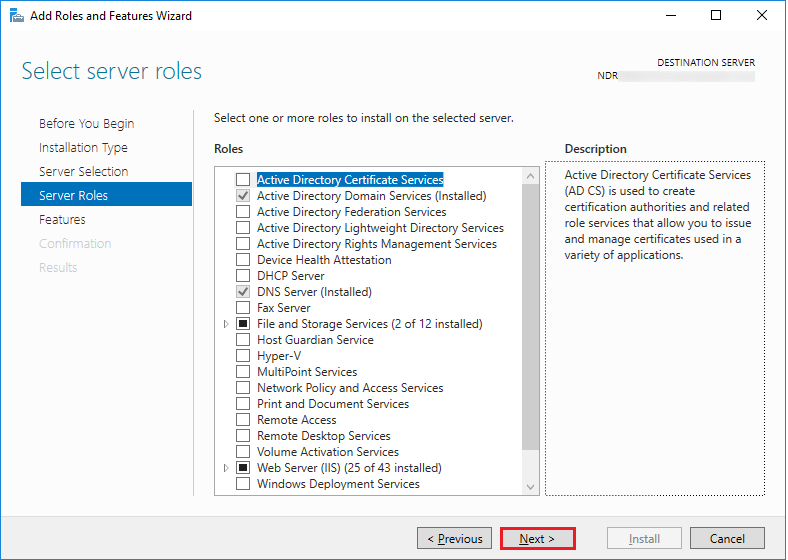
Step 6. The final confirmation option will brief you about your selection. Click the Install button.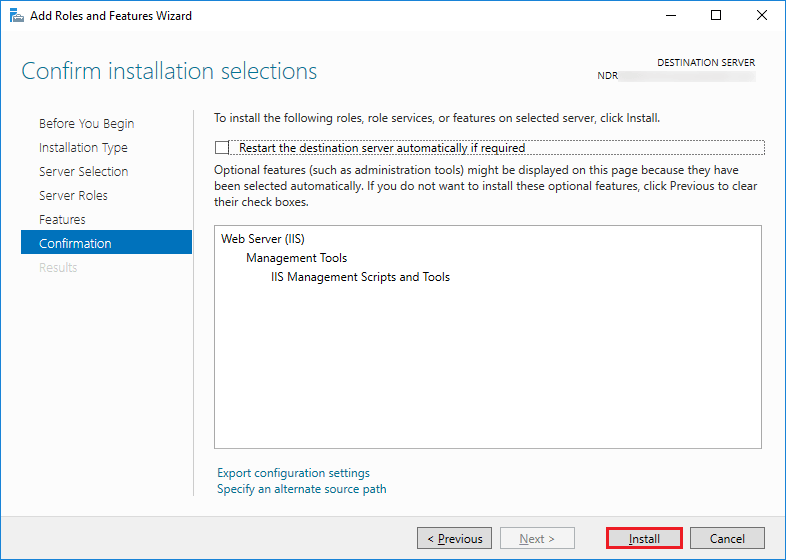
Step 7. The pop-up window will ask your permission to start the installation. Click Install, and the tools will start to install.
Step 8. When the tools have been installed, you can go to the IIS Server in the Server Manager and check if these tools are present in the list.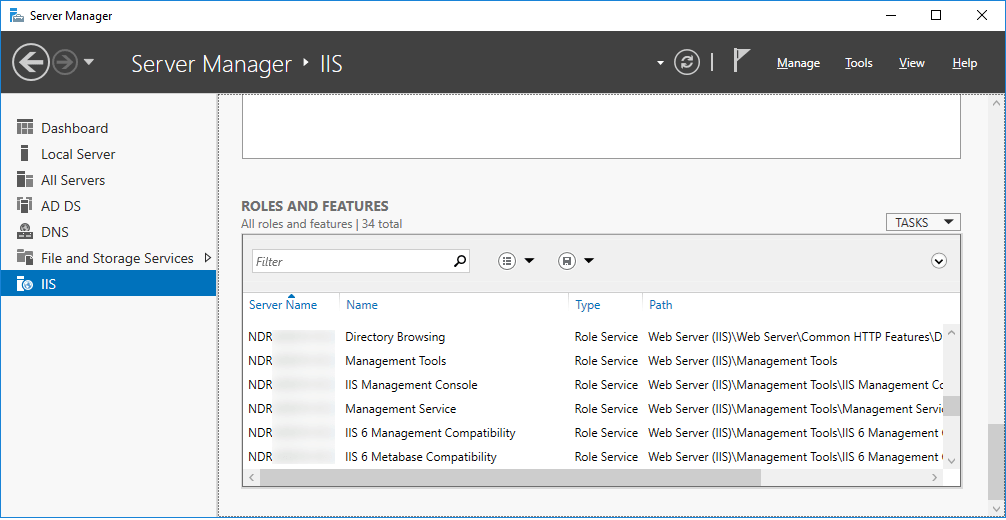
Step 9. Now, restart the IIS Server, and the Autodiscover feature should work properly, and there will be no error.
Method 2: End-user-level solutions for Autodiscover issues
There are some end-user-level solutions to fix the ‘Exchange Server 2016 Autodiscover Not Working’ error. However, these are mainly considered as workarounds only as the real solution needs to be on the server-level. So, we are just mentioning them only.
- Verify the default Autodiscover URL: There is a ‘ClientAccessServer’ PowerShell cmdlet in Exchange that you can run in Exchange Management Shell and check the default Autodiscover URL for your network. Here is the basic example of running the ClientAccessServer command.
Get-ClientAccessServer | Select, AutoDiscoverServiceInternalUri, AutoDiscoverSiteScope, Name | Format-List
The result will inform the default URL of the Autodiscover service, its scope, and the name of the Exchange Server.
- Edit the registry settings for Autodiscover: The Exchange Autodiscover not working issue can be a result of incorrect registry configurations. If your registry settings for Autodiscover are not setup in the right order, you need to edit them to provide correct values. If there are no settings, you need to create them.
Method 3: Disable Add-ins in Outlook
A faulty Add-in of Outlook can also lead to Outlook Autodiscover not working issue. To check which add-in is causing the issue, follow the steps:
Step 1. Press the Windows key + R to open the Run dialog box.
Step 2. Type outlook.exe /safe and then tap on the OK button.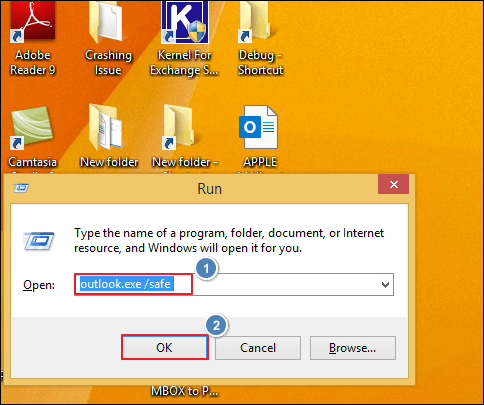
Step 3. This will turn off all the add-ins of Outlook and open the email client in safe mode. Now try to configure the Exchange account again in Outlook. If the Exchange Autodiscover function works this time, then the problem was with the Add-ins.
Step 4. After confirming that the issue is due to one of the Outlook Add-ins, we must disable it. To do so, Open Outlook and click File from the menu bar.
Step 5. Select Options from the left pane.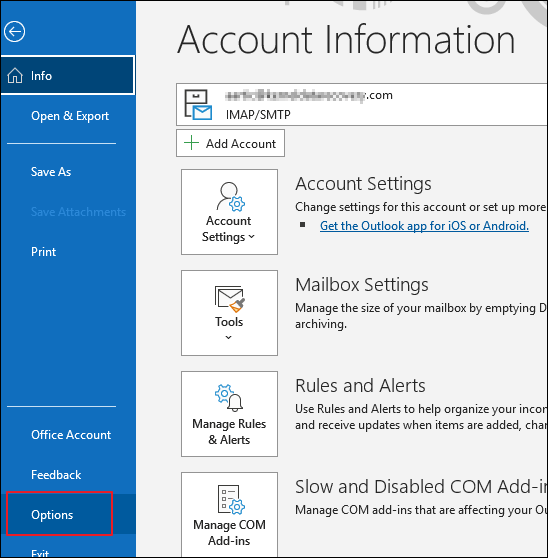
Step 6. Click on Add-ins, from the right-hand side of the pane, go to Manage and then select COM Add-ins>Go.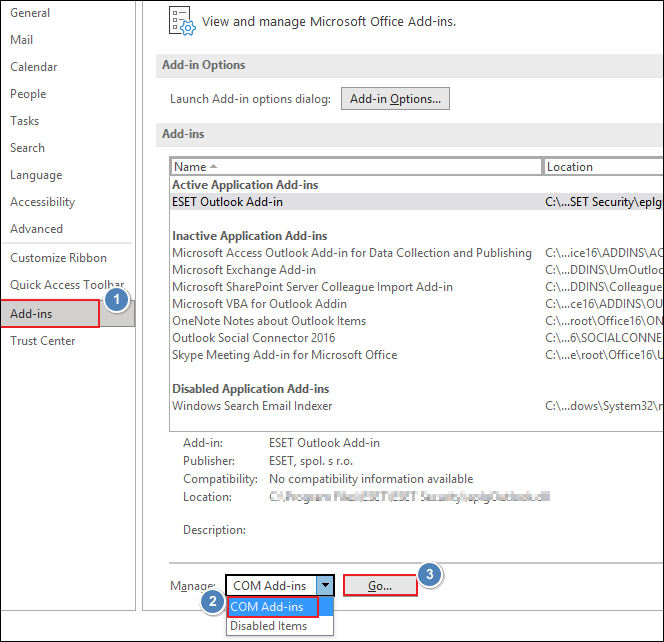
Step 7. Disable all add-ins available in the options and click OK.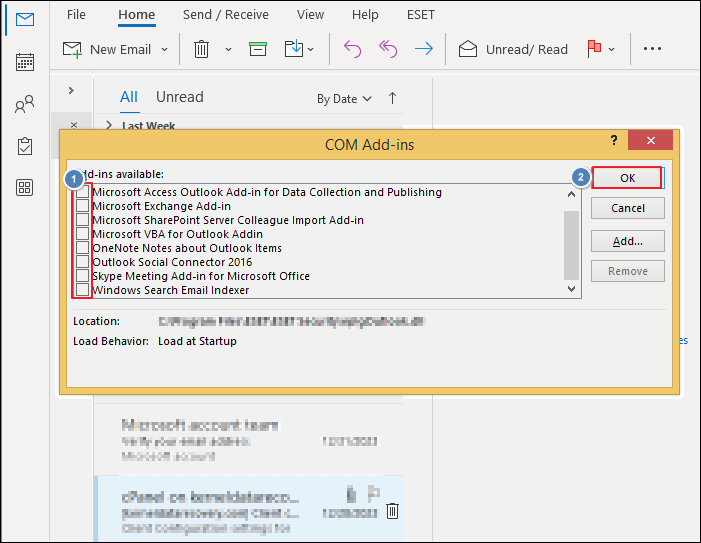
Step 8. Enable one Add-in at a time and try setting up Exchange account again. This way you check which Add-in is causing the Outlook 2016 Autodiscover not working issue. Check all the add-ins in turns similarly to find the root element.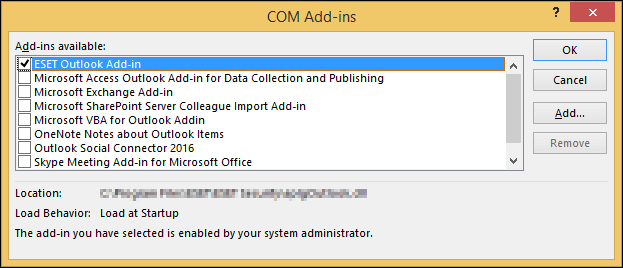
Step 9. Once you know which add-in is faulty, take appropriate action to fix it.
Method 4: Check for EDB file corruption
If the account is still not configuring automatically, the problem may be different, and you need to run other diagnostics tools to check corruption in the database. You can try the ESEUTIL tool to repair the database. However, the ESEUTIL tool can further damage the situation by deleting the corrupted data and creating blank spaces.
You would also need to possess technical knowledge to run the utility in Exchange Server. That’s why you should use a trustworthy professional tool like Kernel for Exchange Server to safely remove corruption and solve Exchange 2016 Autodiscover not working issue. The tool can easily scan and recover complete data from the EDB file.
Third party proficient Exchange Recovery software
Exchange Recovery tool is an effective tool that scans the Exchange EDB database file of any version of the Exchange Server and repairs it using a suitable scan mode based on the level of corruption. It repairs corrupt Exchange Database and retrieves the mailboxes as they were in the database. Using this you can convert EDB to PST file or migrate it to a Live Exchange Server or Microsoft 365 cloud platform.
Final Words
The above set of methods will help you fix the Exchange Server 2016 Autodiscover Not Working error, recover your Outlook account, and resume email communication again. If you feel the methods are highly tech-related, we suggest you use our utility, Kernel for Exchange Server, which helps to convert your EDB files to PST files just with a few clicks on your mouse. Once you migrate your files, you can set up your Outlook account again and use the PST file to recover your emails.

