Read time 10 minutes
Windows Live Mail (WLM) served as a popular freeware email client from Microsoft, succeeding Windows Mail and Outlook Express in previous Windows versions. Despite Microsoft introducing Windows Mail in Windows 10, many users remain loyal to WLM. However, as WLM lacks support since its discontinuation in 2012, transitioning to Microsoft Outlook is imperative to safeguard your data.
Here, we examine how to export Windows Live Mail emails to Outlook on another computer for a smooth transition. Let us help you understand the process of switching from Windows Live Mail to Outlook. Here are the steps and strategies to migrate Windows Live Mail to Outlook.
What are the benefits of using Microsoft Outlook over Windows Live Mail?
Windows Live Mail doesn’t offer the same features and benefits as Outlook. If you want a more feature-rich and powerful email experience, Microsoft Outlook is the best Windows Live Mail alternative. Here are some of the key advantages that Outlook has over Windows Live Mail:
- Better organization: With Outlook, you can easily organize your emails into different folders and subfolders. This makes finding old emails much more manageable and makes it easier to keep track of important conversations.
- More powerful search: Outlook’s search function is much more powerful than Windows Live Mail, making finding exactly what you want easier.
- More customization options: With Outlook, you can customize nearly every aspect of the program to suit your needs. For example, you can change how emails are displayed, add or remove buttons from the toolbar, and much more.
- Better support for external accounts: If you have email accounts with other providers (such as Gmail), Outlook makes adding and managing them easy. On the other hand, Windows Live Mail only supports a limited number of external accounts.
- Better security: Outlook includes many robust security features that help protect your email from malware and phishing attacks. Windows Live Mail lacks some of these important security features.
Download an automated email migration tool Kernel for EML to PST to export emails from Windows Live Mail to Outlook on another computer, without any risk of data loss.
Methods to move Windows Live Mail to Outlook
Moving from Windows Live Mail to Outlook on another computer is an excellent choice for users. Here are some methods listed that you can try to transfer Windows Live Mail to Outlook:
Method 1. Export Windows Live Mail
Windows Live Mail has the export functionality to directly export WLM mail items either to Microsoft Exchange or in Microsoft WLM format on the same computer. But, if you need to export the emails to the Outlook application on a different system, you will have to work around the process a little bit. And ensure there are no running instances of Outlook application during the process. The detailed steps to export items to Outlook are given below.
Step 1. Launch the Windows Live Mail email client and click on File > Export email > Email messages.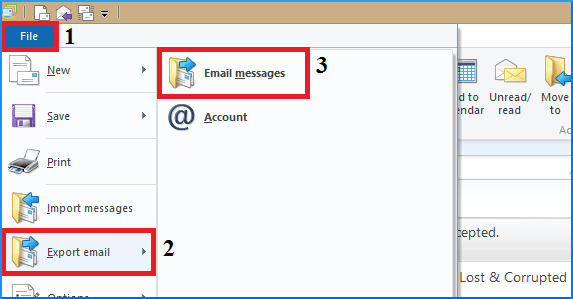
Step 2.Choose the Microsoft Exchange option and hit Next.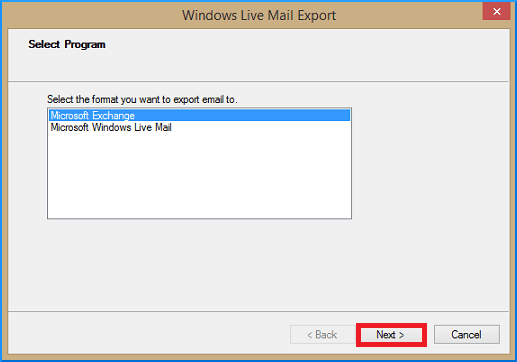
Step 3.Next, you will see a confirmation message. Click OK to proceed.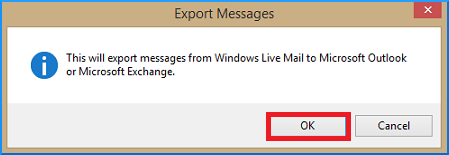
Step 4.Choose Outlook from the Profile Name drop-down menu and hit OK.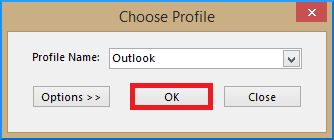
Step 5.From the Export Messages dialog, either select All folders or Selected folders options and click OK to proceed.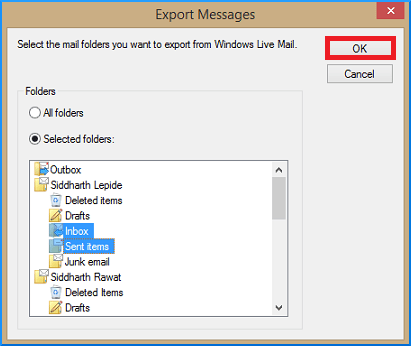
Step 6.A new dialog displays the status of the export process.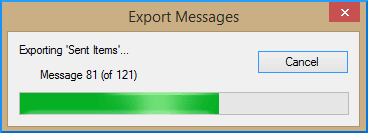
Step 7.In the end, you will receive a new message confirming the successful completion of the export process.
Step 8.Open Outlook to verify the export.
As you now have all your WLM mail items exported to Outlook, these emails can be easily downloaded using the Import/Export feature as a PST file on a storage device of your choice.
Note: It is advised that while exporting Windows Live Mail to Outlook, make sure that no active Outlook instances are running. It is found that running WLM simultaneously with Outlook hinders WLM’s functionality to export emails to Outlook.
Method 2. From the Windows Live Mail file location
Transferring the WLM files stored on your system in EML format is possible using a storage device. If you are planning to move your WLM EML files to a new PC, then after configuring the Outlook desktop client on your new system, you can drag and drop your EML files to the newly created folder inside Outlook client. To do so, follow the steps mentioned below:
Step 1. Usually, the WLM files are located in the following location on your system:
C:\Users\[Username]\AppData\Local\Microsoft\Windows Live Mail
Step 2. The location will contain several folders containing mailbox information. Copy these files to a storage device.
Step 3. Now Plugin your storage device into the new system.
Step 4. Launch the Outlook client and add a new folder.
Step 5. Just drag and drop all the files to this folder.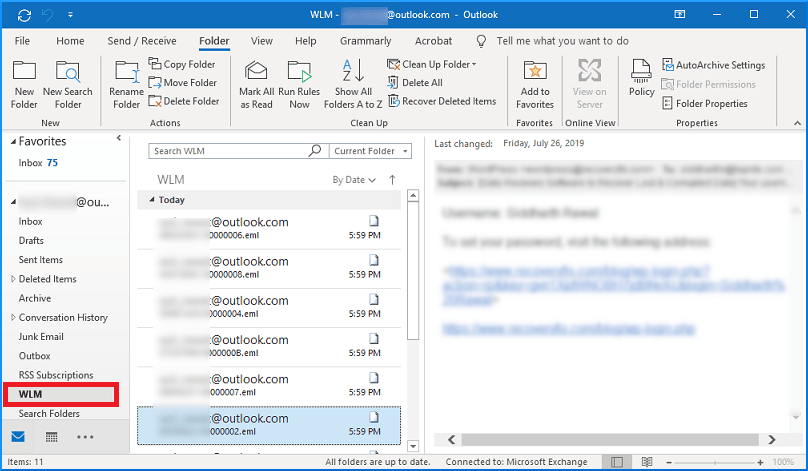
Drawbacks of the manual methods
Generally, users use several manual methods to export Windows Live Mail emails to Outlook on another computer. However, these methods cannot always be effective, and they have several drawbacks, including-
- All of them are time-consuming processes. If you have many emails to export, it can take a long time which is counter-productive.
- They are prone to errors and mistakes. If you make even a tiny mistake while following the instructions, it can result in your emails being exported incorrectly or not at all. Or worse, losing your precious data.
- Finally, the manual methods may not work if your email account settings have been changed. If your email account has been switched to a different provider or you have changed any settings, these methods might fail.
- Data can be exported, however, but not its hierarchy. Manual methods fail to export emails along with their structure.
- It requires the user to have in-depth knowledge about the platforms they are dealing with.
Automated approach to migrate Windows Live Mail to Outlook
All the manual methods are time-consuming and involve a high risk of data loss. It is hence recommended to use a professional third-party tool to export Windows Live Mail to Outlook. One such efficient tool is Kernel for EML to PST Converter. The tool automatically displays all the EML files of the PC and saves them in a single PST file. This EML to PST Converter tool offers a wide range of features, such as
- The software saves the EML file directly to new or existing PST files.
- The tool saves all the data in its original structure, format, and properties.
- It can convert UNICODE characters also.
- It shows the preview of mailbox content before starting the conversion.
- The software works on all versions of Outlook and Windows Operating System.
Steps to export Windows Live Mail to Outlook using the software:
Step 1. Download and install Kernel for EML to PST tool from its official website.
Step 2. Launch the software. The left panel shows the hierarchical structure of directories on your system. You can either locate the folder containing the EML files manually or use the Find option to scan your local drives for the EML files.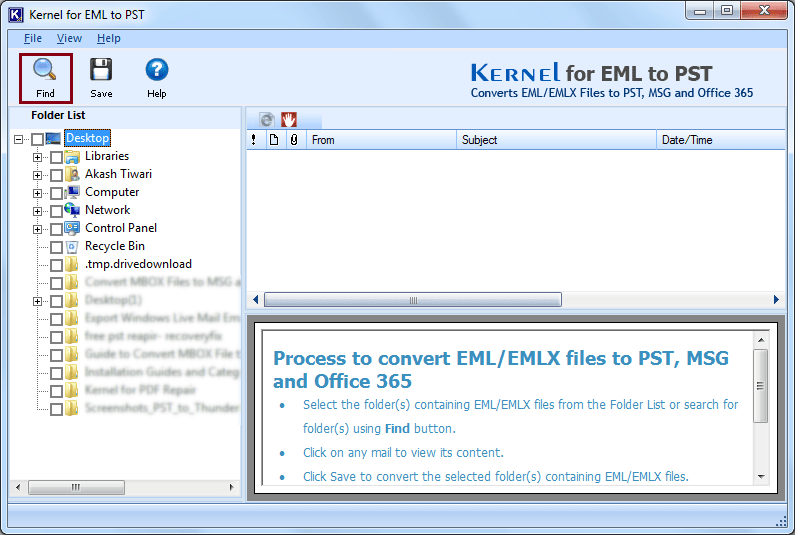
Step 3. Browse to specify the source drive to search for EML folders.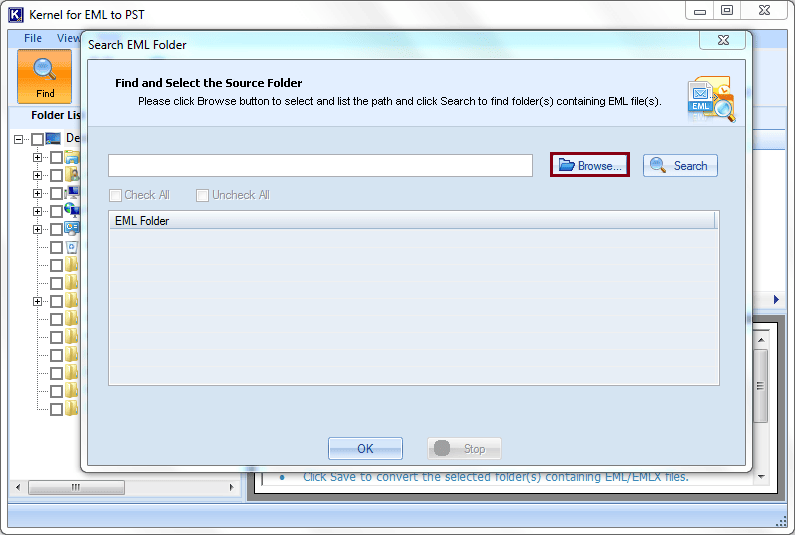
Step 4. Select the source folder/drive and click OK then again click OK.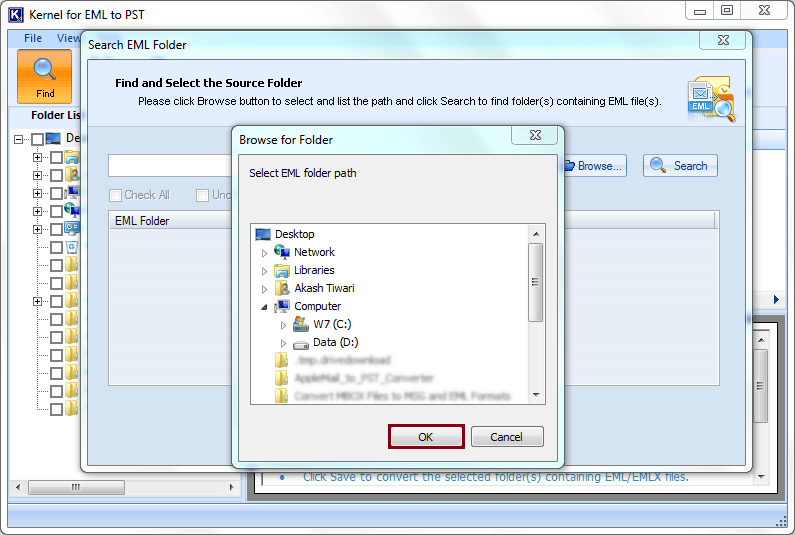
Step 5. The EML contents are shown on the right-hand side panel. Click on the Save button.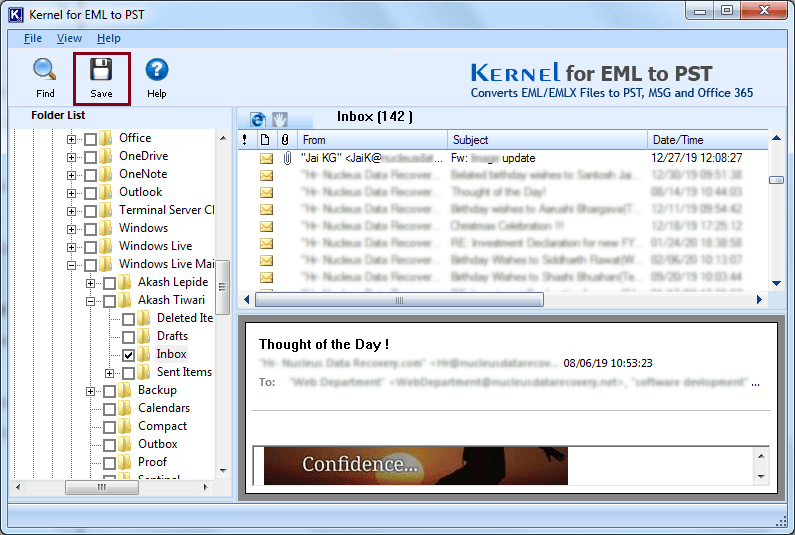
Step 6.The next window lets you Define Conversion rule to save specific data from your selected folder. Click Next.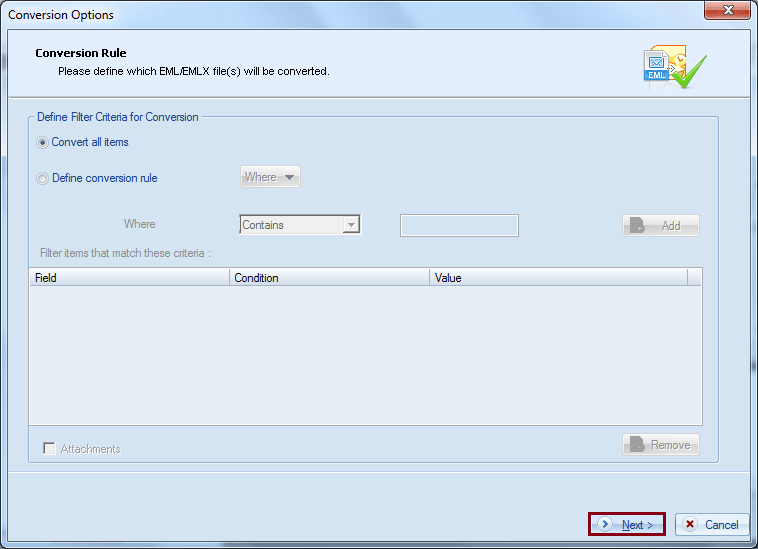
Step 7.The Select Destination window allows you to provide a destination path to save the converted PST. You can choose between various options to save the data:
- If you want to create a new PST, click the Create New PST button.
- If you save the converted data in some existing PST files, click on the Save in Existing PST File button.
Select the appropriate saving options per your requirement, provide a destination path, and click the Save button.
Note: You can opt to Save in the folder hierarchy if required.
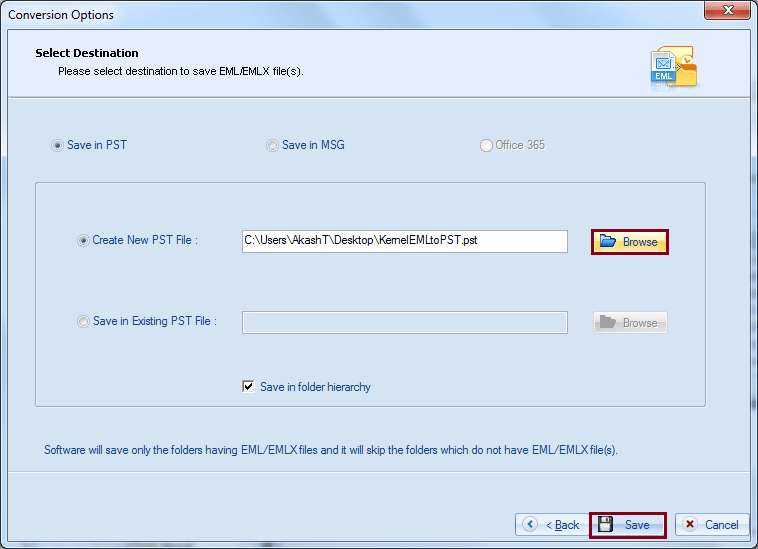
Step 8.The converted PST file gets successfully saved to the specified location. Click OK to finish the conversion process.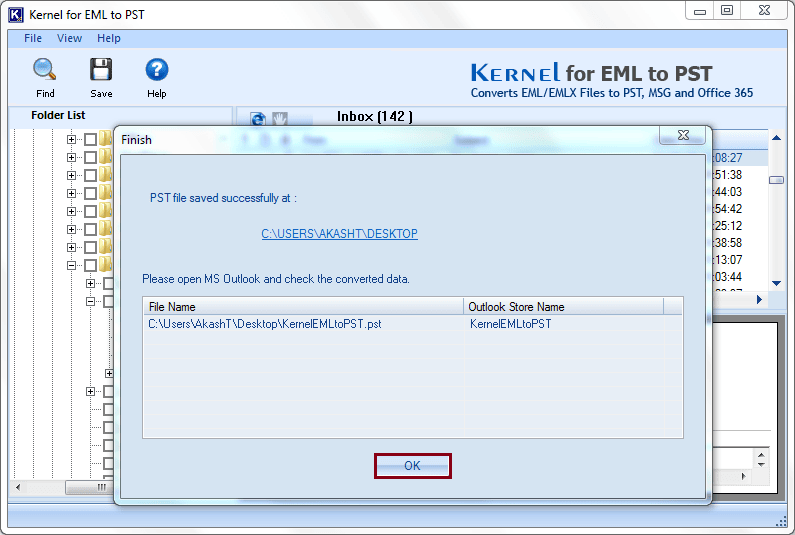
Conclusion
If you’re in search of the easiest solution to import from Windows Live Mail to Outlook on a different computer, we’ve laid out the steps for you in this post. While the process is straightforward, it’s crucial to follow each step to counter any errors. However, as an efficient and user-friendly method, we highly recommend trying the recommended tool designed to simplify this transition. You can even convert EML to MSG file format by using this software.
FAQs
A. There are a few potential problems that could be causing this issue. First, ensure you are using the correct version of Outlook on the other computer. Second, check that both computers’ email account settings are the same. Lastly, ensure that the file format you are exporting your emails in is compatible with Outlook.
A. Yes, it is possible to export only selected emails from Windows Live Mail. To do this, you must first select the emails you want to export and then go to the File menu. From there, you will need to select the Export option and choose the format in which you would like to export your emails. After that, you must select a location on your computer where you would like to save the exported file and then click on the Save button.
A. Yes, Windows Live Mail is still supported in Windows 10. However, Microsoft no longer supports it and recommends that users switch to the built-in Mail app included with Windows 10 or move Windows Live Mail to Outlook.


