Read time 6 minutes
Digital cameras have now become a ubiquitous tool to capture images and audio-visual content. Nowadays cellphones are equipped with camera sensors, which allow the end-user to capture their beautiful moments in multiple formats. The most common format used to save the media files is JPEG and JPG file format. However, these files aren’t immune to corruption and can become inaccessible for various reasons. Unfortunate incidents like this can be overwhelmingly frustrating, as nobody wants to lose their precious data. There can be a myriad of reasons for digital media corruption, including malicious attacks, corrupt storage device, or merely an error during the data transfer process from the image capturing device to the storage device.
Probable reasons behind corruption of JPEG and JPG files
Before trying fixes to recover corrupted JPEG and JPG files, we need to understand what causes the corruption in JPEG and JPG files so that this situation can be avoided in the future. Some of the most common reasons are:
- Software or hardware issues: Software crashing, hardware malfunctions, or sudden power outages can interrupt the transfer or editing process which gives rise to corruption.
- Incompatible file format: Using incompatible file formats or using incompatible software can result in incorrect file format conversion or the file being incorrectly edited.
- Compression errors: Any errors that arise while compressing or decompressing the JPEG file can lead to corruption in these files.
- File system errors: Corrupt file system tables or bad sectors can damage the JPEG files leading to file corruption.
- Overwriting or accidental deletion: Accidentally overwriting or deleting the file while the file was being edited gives rise to corruption.
- Virus or malware attacks: Virus or malwares attacks can severely damage your system and overwrite your file’s structure which can lead to severe corruption in the JPEG photos.
Methods to recover corrupted JPEG and JPG files
Corruption in JPEG and JPG files can create distressing scenarios for the users, considering that these photos store our valuable information and memories. Discussed below are some methods to help you recover your corrupt JPEG and JPG files easily.
Method 1: Recover corrupt JPEG files from backup
This is the easiest of all options. All the professional photographers and photography enthusiasts are advised to backup their photos on regularly to safeguard their data, in case of any unfortunate situation. Backing up your data and saving it at multiple locations can help you escape serious trouble in the future. Users can back up their data on several storage devices like SD cards, USB drives, pen drives, external hard drives, etc. Another good choice is to take backup of your data on the cloud. Two of the most favored platforms for cloud backup are Google Drive and OneDrive. The process of taking data to these two cloud-based storage platforms is very simple. You can simply drag-and-drop your files there or directly upload there.
Method 2: Convert corrupt JPEG/JPG files to other formats
If you don’t have a backup of your JPEG and JPG files, you can try changing their format to see if it resolves the issue. Most commonly, corrupted JPEG and JPG files when opened in other formats, often become accessible. Follow the steps below to open the files in another format:
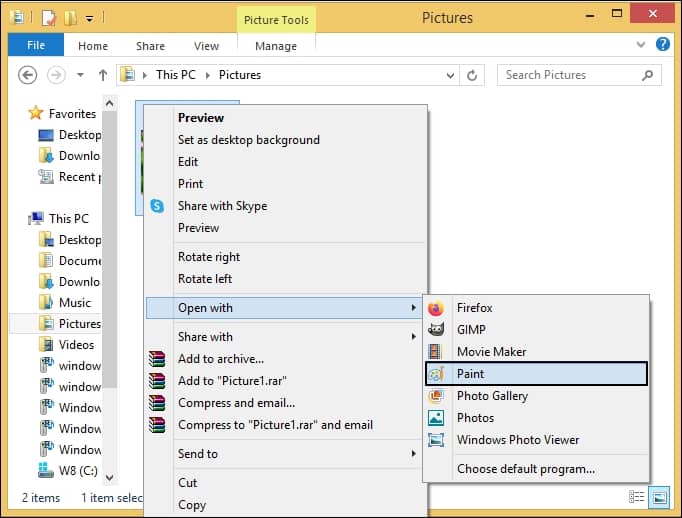
- Navigate to where the corrupt JPEG and JPG files are saved and right-click on them to open these files with Microsoft Paint.
- Click on the File tab in the top left corner of the screen and select Save As from the list of options.
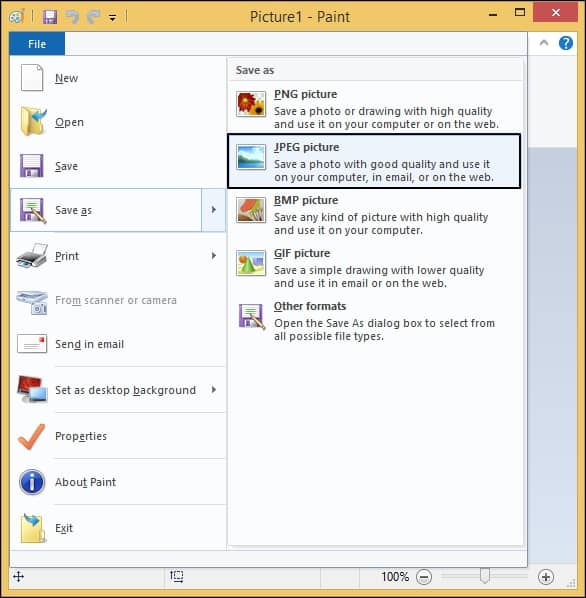
- Save files to a different format than the current one and check if this resolves the issue.
Method 3: Re-download the corrupt file
Sometimes interruption while downloading the files from their source can become the cause of corruption. Try downloading the JPEG/JPG files again to see if it resolves the issue while making sure you’re connected to a stable network.
Method 4: Use Command prompt to repair corrupt files
Running specific commands to repair corrupt files can help you resolve corruption in your JPG files. One can try fixing the corrupt files, as explained in the following steps:
- Press Windows + X and select Command Prompt (Admin) from the list
- Next, type in ‘sfc/scannow’ in the command prompt and hit enter. This will initiate a scan and will try to fix the corrupt files.

- If still, the problem persists, try moving on to the next method.
Method 5: Perform CHKDSK
Performing CHKDSK on the drives containing your damaged files might fix corruption issues. Follow the steps given below to perform CHKDSK on the needed drives:
- Connect the device where your images are saved in the system
- Press Windows+R and type CMD in the Run window.
- Right-click on the Command Prompt, choose Run as administrator and click on Enter.
- Type ‘chkdsk in the Command Prompt. The ‘X’ in the command signifies the drive you wish to repair.
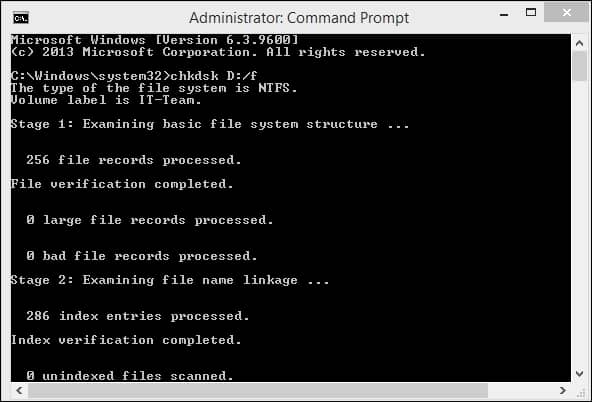
Once the process finishes, restart your computer and try to access the JPEG files again. If this too doesn’t solve your problem, then there’s a chance that your JPEG files are severely corrupted.
Method 6: Use a professional photo recovery tool
If the corruption still persists in your JPEG files then using a professional photo recovery software might be your best bet. Try using Kernel Photo Recovery for a hassle-free restoration of your damaged JPEG/JPG files. It also allows users to set the picture size after recovery. This tool runs a deep scan of the drives to recover images. Besides, it also supports recovery from various storage devices such as USB drives, pen drives, flash cards, memory cards, micro drive, SD cards.
Conclusion
To conclude, in this tutorial, we have discussed some of the most common reasons behind corruption in JPG files and ways to manually repair them.. It is not guaranteed that the manual repair/recovery methods will work properly for all users. Kernel Photo Recovery tool not only saves time but also recovers all of your corrupt image files efficiently.