Read time: 4 minutes
Microsoft Office 365 Group provides a platform for collaboration that allows teams to work together by creating a single identity and a single set of permissions across MS 365 apps. These apps include Outlook, SharePoint, OneNote, Skype for Business, Power BI, and Dynamics CRM.
You can create Office 365 Groups via Microsoft 365 admin center as an admin.
- Login to the Office 365 Admin Center site (https://admin.microsoft.com)
- To enlarge groups, click on the “Groups” tab on the left side.
- Click Add a Group and then select Office 365.
- Enter a group name and a unique email address for the privacy of the Group.
- Click on the “Select Owner” tab for your group management
- Click on “Add” to start making the Microsoft 365 group.
After creating a Group, all related resources, including Shared mailbox, Calendar, and SharePoint Sites, get provisioned automatically. If Office 365 shared mailbox is not showing in Outlook, then you can reconfigure newly created group again.
Simple ways to create an Office 365 group via PowerShell
This article will mention PowerShell commands to create Office 365 Groups and add members and owners to an Office 365 Group.
Making an Office 365 Group using PowerShell gives you the power to control the Group properties. However, you first need to build a remote connection to Exchange Online. Then, it would help if you used the New-UnifiedGroup cmdlet for creating an office 365 Group with PowerShell.
Before going ahead, connect the Exchange Online PowerShell session via the following commands:
$Session = New-KSSession -ConfigurationName Microsoft.Exchange -ConnectionUri https://outlook.office365.com/powershell-liveid/ -Credential $365Logon -Authentication Basic –AllowRedirection
Import-KSSession $Session
The PowerShell cmdlet New-UnifiedGroup includes the following key parameters:
- DisplayName – Display name of the new Group
- Alias – Email Group’s nickname. If you omit the parameter, it will produce a handle through the display name.
- AccessType – Group’s privacy type (whether Public or Private)
- AutoSubscribeNewMembers – Add this parameter to auto-subscribe group’s new members
You can follow the below command to generate a new group with minimal parameters.
Create a group with critical limitations.
After creating the Group, you can use the Get-UnifiedGroup cmdlet to get all the available groups.
Adding members and owners to Office 365 group
If you want to add members and owners to the Group, you can use the Add-UnifiedGroupLinks cmdlet. It includes the following key parameters:
- Identity – Alias, Display name, Email address of the group, etc. You can find the Office 365 tenant ID with all these parameters and apply them in the cmdlets.
- Links – Hyperlinks, Display name, Email address of the user being added, etc.
- LinkType – Members, Owners, or Subscribers
Add a user as an owner: To add a user as a leader to the group, first, make the user a member of the defined group. To do so, you can follow the below commands:
Add member:
Add subscriber:
Subscribers who get updates via email can be added by changing the LinkType to “Subscribers.”
The parameter Links accept multiple values, using the following syntax: value1,value2. If the values include spaces or otherwise need quotation marks, use the following syntax: “value1?,” value2″,
Add members to multiple office 365 groups
$Groups | ForEach-Object {
Add-UnifiedGroupLinks –Identity $_ –LinkType Members –Links “Kernel” }
Import Microsoft 365 Group members from a CSV File
You can also add members to a Microsoft 365 Group by importing users from a CSV file. For that, you need to use the below PowerShell commands:
For example, consider the CSV file members.csv, which contains the column member that gathers the member identity in each CSV file row.
Add-UnifiedGroupLinks –Identity “TestO365Group2” –LinkType Members –Links $_.member
}
Find members and owners of a Group
After adding the members and owners, we can use the Get-UnifiedGroupLinks cmdlet to get members or owners of a specific group. For example, the below command lists all members of the given group.
List owners of a Group.
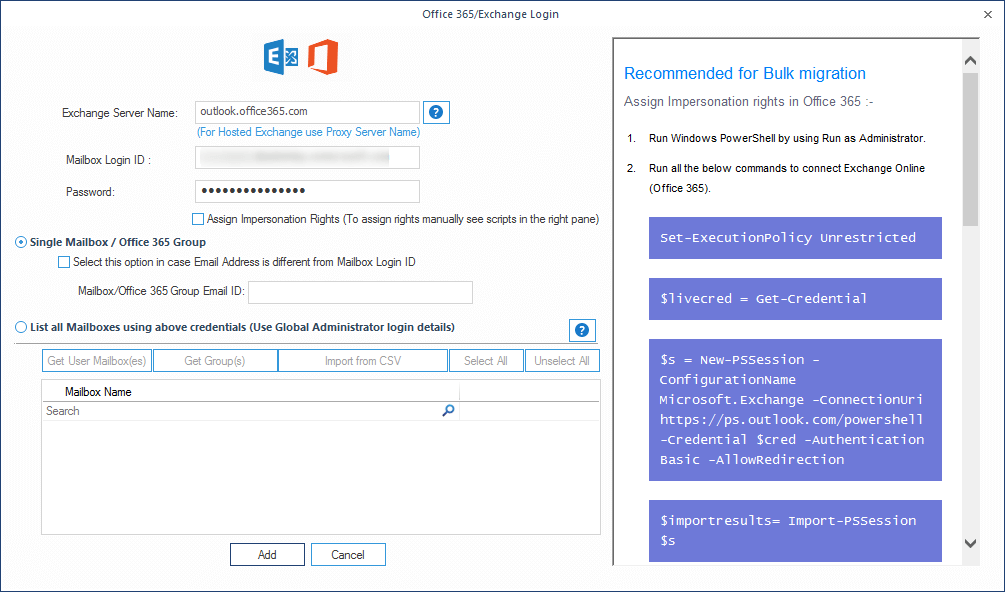
The above commands can help you create Office 365 Groups easily. However, if you want to migrate existing Office 365 Groups to another tenant, you need an automated solution like Kernel Office 365 Migration. This tool is specifically designed for Office 365 tenant to tenant migration. It is included with advanced filters that enable you to migrate specific data, including Office 365 Groups, based on your requirements.
The Final Thought!
Creating an Office 365 Group is not a challenging task, but it can be very difficult if you don’t know the right path. This article discussed how you could create an Office 365 Group using PowerShell commands. By using these commands, you can create an Office 365 Group without any hassle.