Read time: 4 minutes
If your organization uses the Exchange Server for email communication, it is quite important to implement DMARC to prevent phishing attacks, domain spoofing, or any other email threats. Nowadays, millions of companies have adopted Microsoft 365 for their professional uses, like sending or receiving business emails. But they don’t have a reliable option that offers high-level security while sending outbound emails via Office 365 or your own custom domain. Hence, it is quite important to setup this protocol to strengthen security levels and email deliverability. This blog provides you with a comprehensive guide to configuring DMARC records in Microsoft 365. Before configuring this protocol, you must have knowledge about this protocol.
DMARC (Domain-Based Message Authentication, Reporting & Conformance)
The DMARC is an authentication protocol that checks whether the mail sent from a specific domain is legitimate. It includes a record that contains policies for Internet Service Providers (ISPs) such as Gmail, Yahoo, and Microsoft. You can consider this record as the rules for the DMARC implementation published on your DNS as a plain text file. DMARC Analyzer is a mechanism where you can also generate your own custom record. By analyzing these records, the domain administrator instructs receiving servers about what they should do with the specific emails that didn’t pass authentication tests.
Based on the record, the domain administrator can transfer emails to your spam folder if sent emails from a specific domain fail in the authentication test. It extends the security level from SPF (Sender Policy Framework) for authenticating emails and requires SPF or DKIM (DomainKeys Identified Mail) authentication to pass the DMARC check.
Setup DMARC for Microsoft 365
Suppose you want to setup this protocol for Microsoft 365. In that case, you must pass various stages, including creating a DMARC record, publishing this record to DNS, and taking appropriate actions after analyzing the reports.
Creating a DMARC record
It is the first step of implementing the DMARC in your Microsoft 365. To create a record, you must follow the below steps:
- First, identify the email domain from which you send business emails.
- Sign in to your DMARCLY dashboard, go to DNS records -> Publish DMARC record. You will see that the default record has already been created. You can create your own record from there.
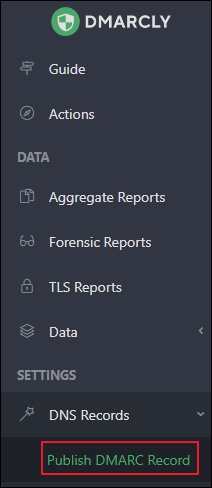
Publish DMARC record
You can publish the default record or your own record, but it can only be checked after 1 hour. On this page, you can also implement policies under customize your settings section to instruct receiving server for handling specific emails that have failed the DMARC authentication test.
Publishing records is quite important to convert them into the appropriate actions. Actually, receiving server extracts the domain from the email address if any email arrives. The records included in the DNS also get verified to perform an action based on these record.
To publish the DMARC record, you must follow the below steps:
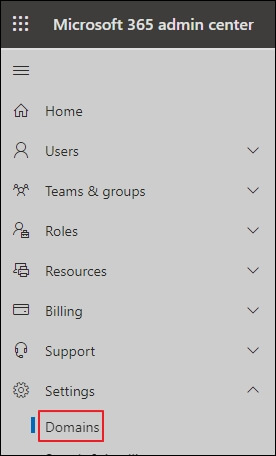
- Log in to the admin center of Microsoft 365 using the global administrator credentials.
- After that, select Domains from the settings menu.
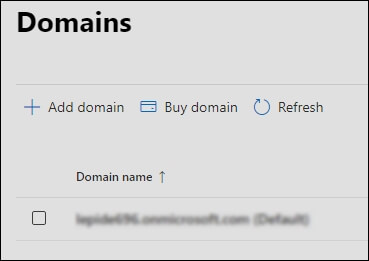
- Next, select desired Microsoft 365 domain by searching the specific domain in the menu. After selecting the desired domain for DMARC implementation, you will be redirected to a page where you will be instructed on how DNS settings must setup to run Microsoft 365 services effectively.
- Finally, you must wait for sometimes to publish your record into your Microsoft 365 DNS. It should be noted that the specific process may take upto 72 hours.
Conclusion
If you use Microsoft 365 services, it is quite important to be prevented from various email-based threats such as phishing attacks, domain spoofing, etc. For this, you must configure DMARC authentication in Microsoft 365 for authenticating emails and block the sender domain if required. It can be considered a reliable option to secure Office 365 mailboxes. This protocol implement policies to help domain administrators for verifying legitimate domains.
If you are planning to setup this protocol for your Microsoft 365, it is recommended to keep a backup of Microsoft 365 mailbox data. One such innovative Office 365 Backup tool, Kernel Office 365 Backup & Restore, can provide a backup of your private mailboxes, archive mailboxes, shared mailboxes, public folders, and Microsoft 365 groups. It also allows users to save backup data into multiple output formats such as PST, DOCX, DOC, HTML, etc. This tool automates the backup process using an inbuilt CSV file. In addition, it includes smart filters to choose only the required data for backup.