Read time 12 minutes
OST files are binary copies of Exchange Server mailbox folders that store messages, calendar items, contacts, tasks, etc. They allow users to manage mailbox items offline, and changes made are automatically synced with the Exchange mailbox once connectivity is restored.
However, what if you need to access your Exchange mailbox remotely or don’t have an active internet connection? In such cases, you have to convert OST file to PST without Outlook, which can be accessed offline since OST files are not directly accessible like PST. Therefore, in the blog, we will learn different methods to convert OST files with ease and provide step-by-step instructions on how to use these methods.
Benefits of converting OST files in PST format
As OST files are the data files of Exchange accounts connected in Outlook, they are helpful in multiple situations like the following:
- When users’ mailboxes get deleted from the Exchange Server.
- Want to back up a few Exchange mailboxes (before the deletion of mailboxes).
- An Exchange user wants to rebuild its corrupt OST file, but the user has some unsaved data in the OST file.
- The Exchange accounts are inaccessible due to corruption, but users want their emails urgently.
- To re-establish email communication during Exchange downtime or unavailability.
- If you’re switching from one email client to another and your new email client doesn’t support OST files, you’ll need to convert OST file to PST without Outlook in order to access your old emails.
- If your email account has been corrupted and you can no longer access it, the tool will allow you to access your old emails and potentially recover any lost data.
Methods to convert OST files
Now, let’s discuss multiple methods described below to convert OST file in various formats, provided you can log in to Outlook with the same Exchange profile.
Method 1. Export the mailbox as a PST file
Login to Outlook with the Exchange account that was used to create the OST files and follow the given steps to export the OST mailboxes in PST format.
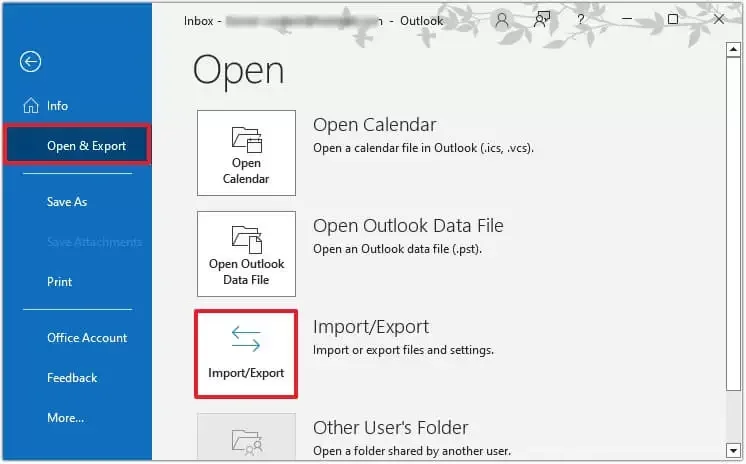
- Go to Files >Open & Export and click Import & Export.
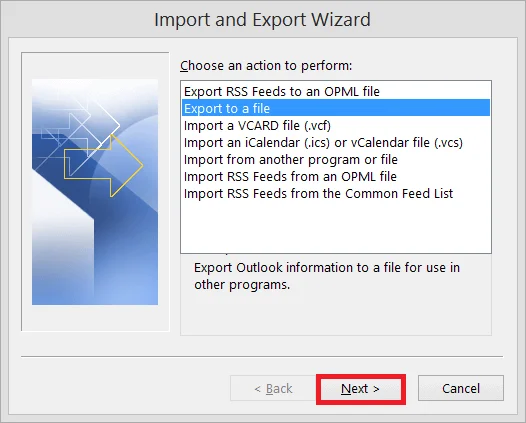
- Select Export to a file, then click Next.
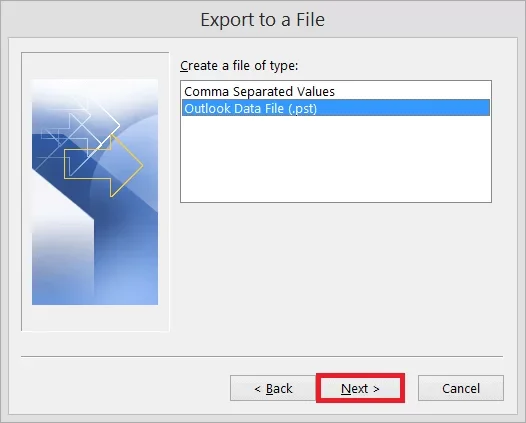
- Select the Outlook Data File (.pst) option, then proceed to Next.
- Select the folder(s) you want to export and click Next.
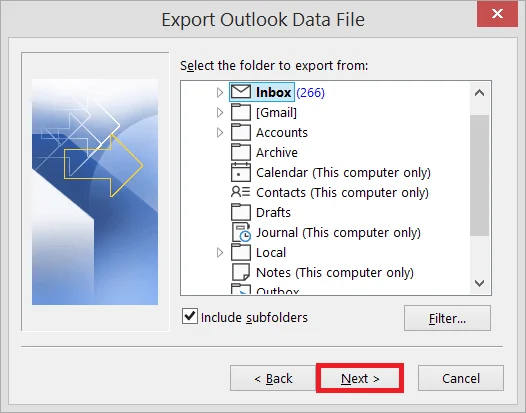 Note: You have the option to include subfolders as well.
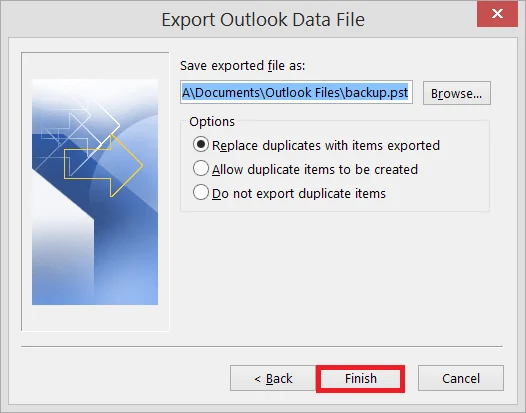
 - Browse the location where you want to save the new PST files and select Replace duplicates with items exported. Click on Finish.
 Note: Providing a password to the PST file is optional, but you can easily move ahead without choosing it.
Method 2. Use archiving to save OST emails in PST
Enabling the Auto Archive method in Outlook allows you to save the OST file items in a separate PST file. This method will allow users to put older messages in the archive folder, which helps you manage your mailbox size. So, follow the simple steps to enable auto archiving in Outlook.
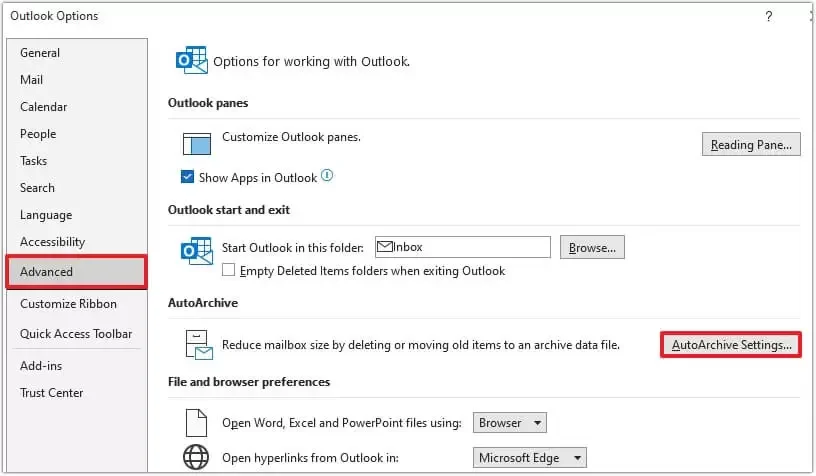
- Launch the Outlook application, go to File and click Options.
- Go to Advanced and click Auto Archive Settings.
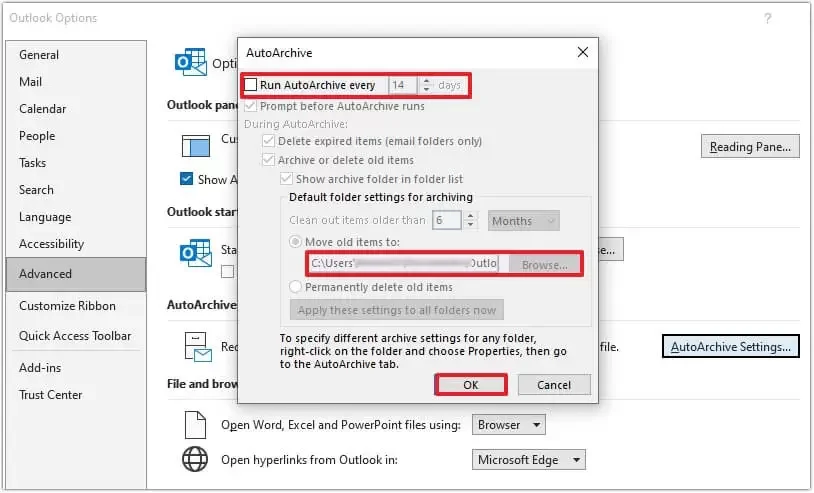
- Now select the number of days in which you want to run auto archiving. Select the folder to save the archived file; provide the archiving options and click OK.
 It will save your mailbox items from your OST file as per your archiving settings.
Method 3. Use drag and drop method to move limited data
If you want to move only selected data from your Outlook account, you can create another data file in Outlook and then use the drag-and-drop option to move your files from other accounts. It also helps users to reduce the data file size.
- To create a new data file in Outlook, Click New Email expand More Items and choose Outlook Data File.
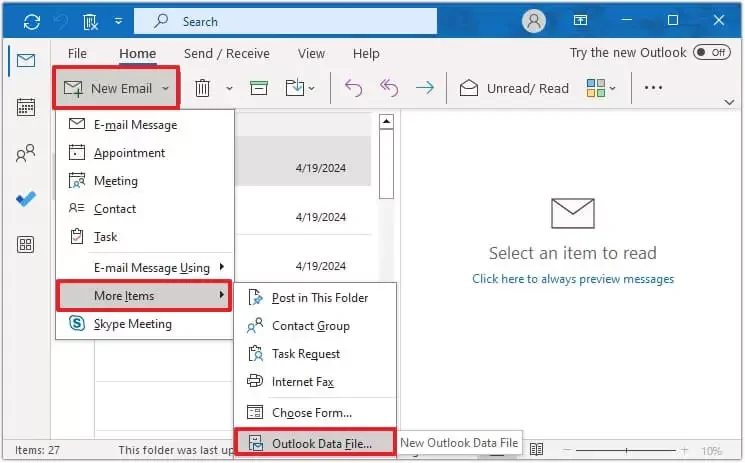
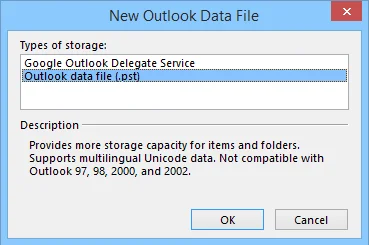
- Choose Outlook data file (.pst) and click OK.
- Save the PST file in an accessible folder, and a new data file is created. Then, you can select some data from the older account and try to drop in into the new account. It will ask if you want to move the folder inside the new account. Click Yes.
 The data will be moved quickly, and you can access new content there.
Convert OST files without an Exchange profile or server connectivity
Generally, manual practices require Outlook with original Exchange account while converting OST files in various formats but using Kernel OST converter software makes your OST files accessible along with converting in PST format without the original Exchange profile and Exchange Server connectivity. This automated tool stands out as the best one for converting offline OST files with many advanced filtering and saving options.
It can also convert orphaned OST file to PST created by webmail (IMAP) accounts. Also, it provides It can also convert multiple OST files at a time.
Now, let’s see some more significant features of the tool that make it handy or user-friendly for the user.
Advanced features of the utility
Some of the other key features of the Convert OST file tool include the following:
- Supports all versions of Microsoft Outlook, including 2019, 2016, and earlier versions.
- Converts encrypted and password-protected OST files.
- It allows you to split large PST files into smaller parts.
- During conversion, preserves the integrity of all data, including emails, contacts, tasks, notes, etc.
- Provides a preview of all converted data before saving it.
Let’s see the working process of the tool to convert OST files easily:
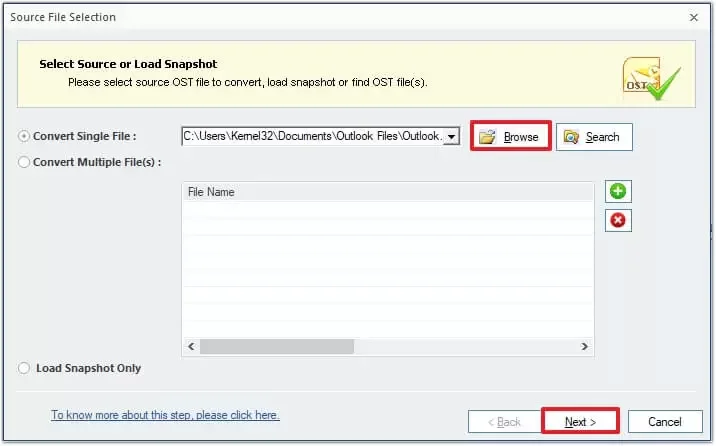
- Open the OST conversion tool. Browse to select single or multiple OST files, then tap on Next.
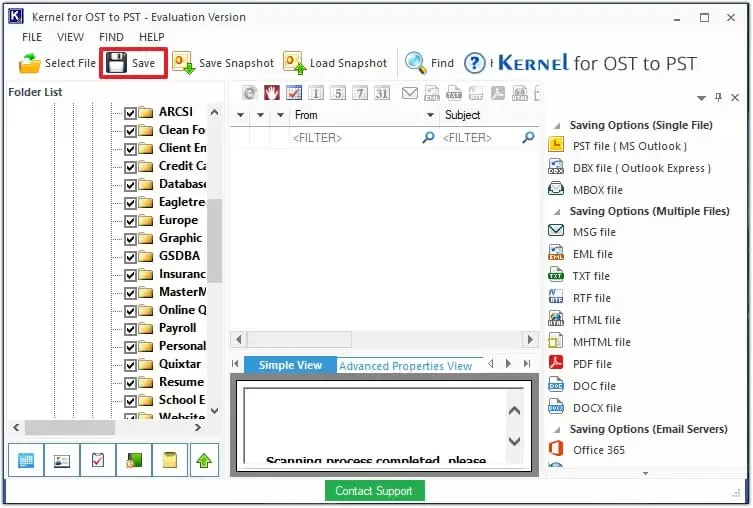
- When the tool displays the OST file content, you can choose a folder and view its content in the preview pane. To convert OST file, click the Save option on the toolbar.
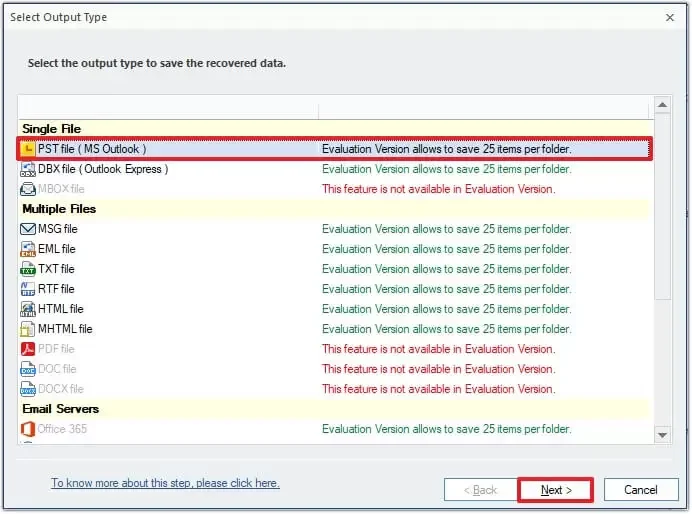
- To save in PST, select PST file (MS Outlook) as the Output type and proceed to Next.
Note: The tool allows users to convert orphaned OST file to PST file into their desired format.
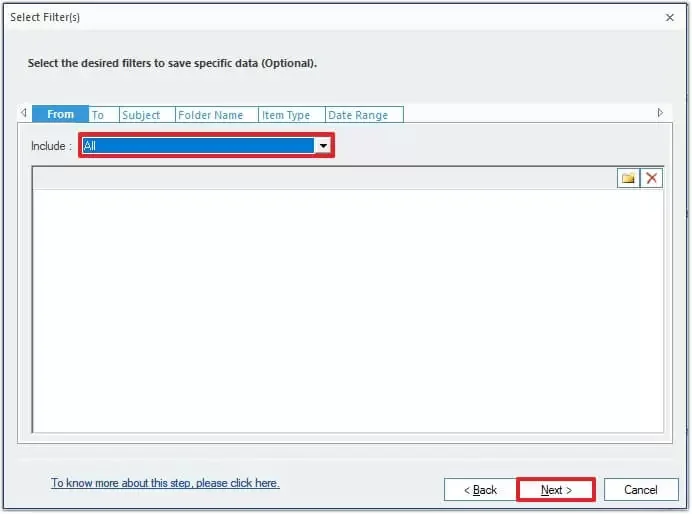
- Select and apply the required filters – From, To, Subject, Folder Name, Item Type, and Date range, and hit on Next.
- You can split the PST file after a certain size. Provide the required details, then proceed to Next.

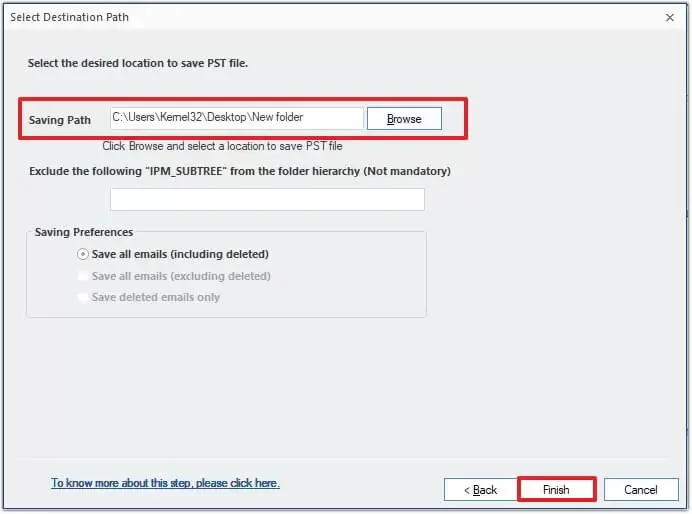
- Browse the destination, provide the required details, and click Finish.
- Once the conversion is complete, the tool will show a message with the PST file name and its location.
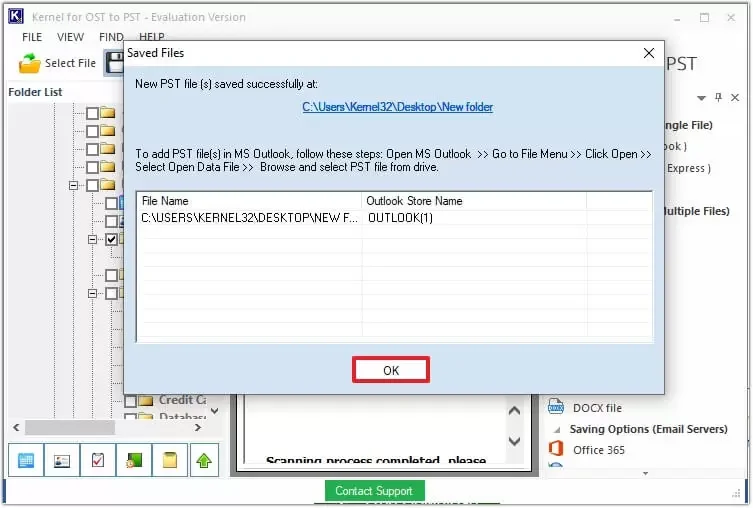
The corrupted OST file is recovered and saved in PST format on desired location.
Conclusion
Converting OST files to PST is a crucial process which can be accomplished using the free methods mentioned above. But in case of severe corruption of OST files, these methods are not helpful. Therefore, we suggest you use the recommended convert OST file tool that is fast, easy to use, and ensures OST file to PST convert smoothly. Download now to explore the features in real-time.
If you have any questions about these methods or need help converting your file, please reach out to us, and we would be happy to assist you.