Read time 4 minutes
iCloud is a very popular cloud platform mostly used by Mac users and many people use this cloud platform worldwide on a regular basis. Sometimes, due to various reasons, many Mac users may want to configure iCloud on Outlook (Windows version), just like the user above. In this case, the user needs to add iCloud account to Outlook to sync all the data. In this blog, we are going to provide a way to do so; let’s get started.
Adding an iCloud account to Outlook
To add iCloud account to Outlook, you need to follow the below-mentioned steps. And before you start adding your account to Outlook, you need to perform a few pre-addition formalities, like generating an app password from the website of iCloud. This is necessary as it is the password that you will enter while being asked for password to login iCloud for safety reasons. To generate this password, go to the iCloud’s website and then go to the Security tab, there click on the Generate Password and proceed with further steps. Once you generate this password, copy and save it. Now, let’s get started with adding iCloud account to Outlook.
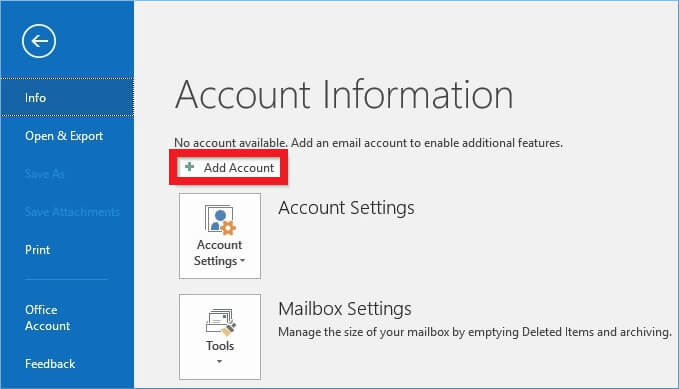
- Start with opening Outlook on your system, and click on the File menu. Select Add Account from the Info section of File menu.
- Select Manual setup or additional server types from the Add Account dialogue box. Click on Next to proceed.

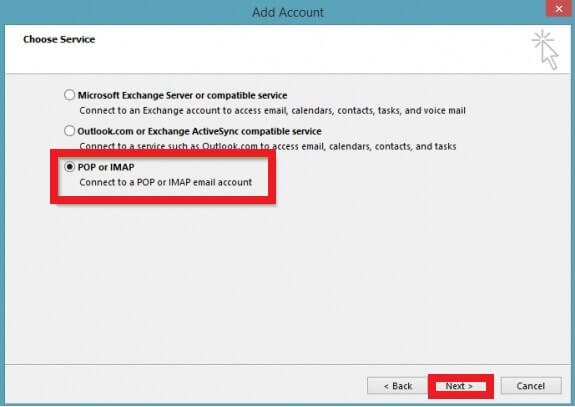
- In the next step, choose service from the given options, go for POP or IMAP and click on Next to proceed.
Now you will see the Account Settings option; there enter all your details asked, like name and email address. In Account Type, select IMAP from the drop-down, in Incoming mail server, enter imap.mail.me.com, and in Outgoing mail server, enter smtp.mail.me.com. Similarly, in Logon Information enter the iCloud username and password. Don’t forget to check the box “Remember password” and “Require logon using Secure Password Authentication (SPA).”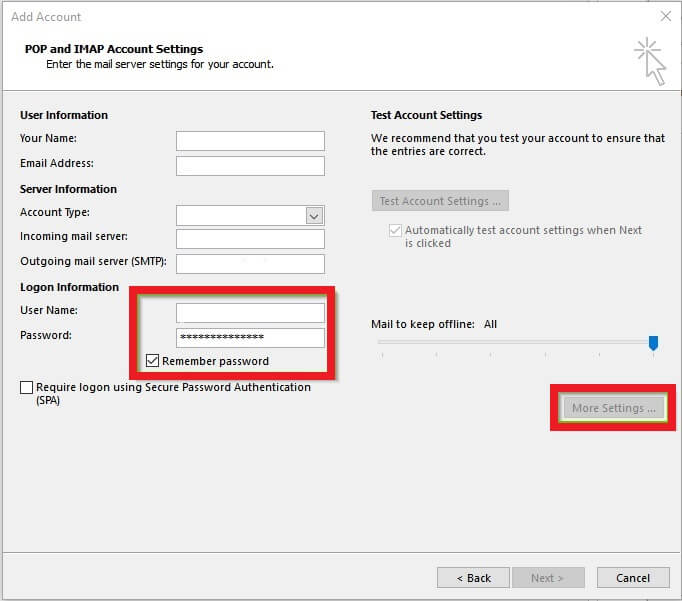
- Click on More Settings option, and in the settings window, in the General section, input the name of your account (any desired name).
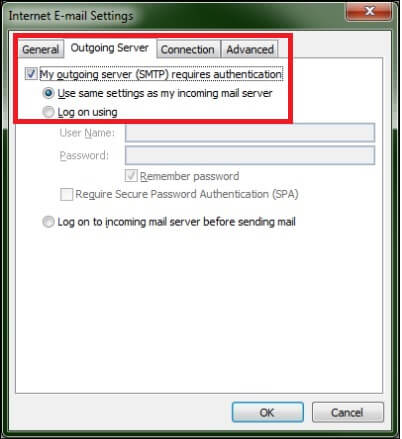
- Now, click on the Outgoing Server tab, and check the box against My outgoing server (SMTP) requires authentication and Use same settings as my incoming mail server.
- In the Advanced tab look for Server Port Numbers – in Incoming server (IMAP) enter 993, and enter 587 in Outgoing server (SMTP). The type of Encrypted connection for IMAP will be SSL and for SMTP will be TLS.
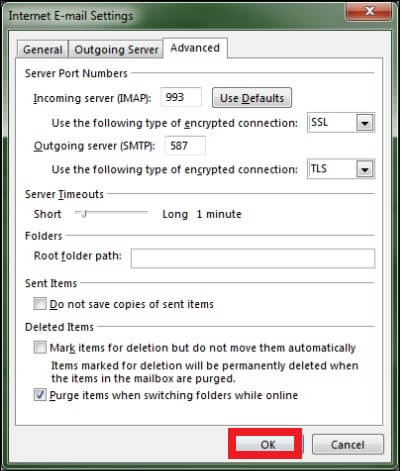
- Click on OK once you are done with filling all these details.
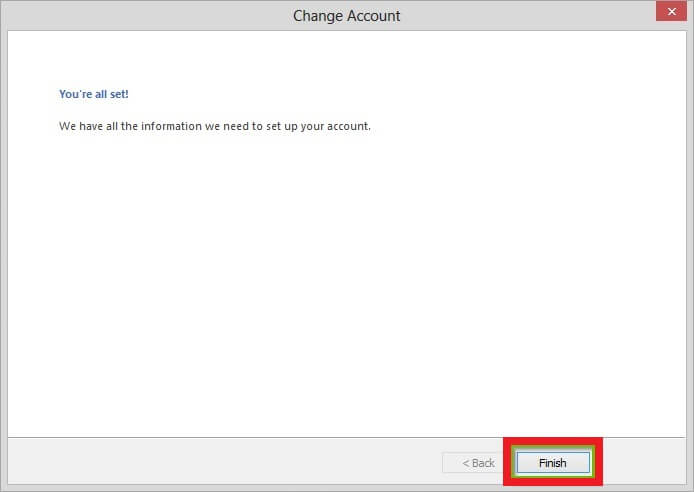
- Now, click on the Next button.
- If you are able to log in to the account properly, click Close and finally click on Finish.
By following all these steps successfully, you will be able to add your iCloud account to Outlook easily.
How to backup iCloud emails to Outlook?
There are many users who want to back up their iCloud emails to Outlook Windows systems. Here we introduce Kernel IMAP Backup for them. This is an IMAP backup tool that ensures a smooth backup of all sorts of IMAP data and all its items to Outlook PST. The additional benefit of this IMAP email backup software is that it also saves data to EML, MSG, MHT, HTML, DOC, DOCX & PDF formats. This tool is flexible with all versions of Windows OS and MS Outlook.
Conclusion
In this blog, we have discussed how iCloud users can add their accounts on Outlook by following some manual steps. We also have introduced an iCloud backup tool, Kernel IMAP Backup. It is a backup tool that can easily backup IMAP data to PST to open it in Outlook. We recommend you to use its trial version to have a precise knowledge of the tool. This free version of the tool can backup 10 items per folder into a PST file in no time. If you are satisfied with this trial version of the tool, purchase the full version for the best results.