Read time 8 minutes
MS Word, for sure, is the most used application out of the whole MS Office suite. It is merely a word processor developed by Microsoft but has been the most sought-after application among all professionals. Just like other components of the MS Office suite, it has minor bugs and glitches that need to be treated immediately. One such common error associated with MS Word is- A file error has occurred. Some people have reported getting this error message while saving a Word file. Irrespective of the file location (as the file(s) can be located locally on your system or remotely on a file hosting service like OneDrive), this equally affects the locally and remotely stored files.
A file error has occurred
When MS Word can not save the changes in the file or when the entire Word document is corrupted, then Word comes up with the message “A file error has occurred.” It usually happens when you try to save a particular Word file.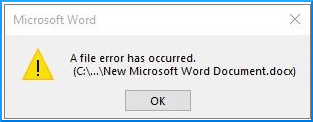
We will find some of the primary causes and some convenient methods to resolve this issue.
Reasons behind Word file error
Knowing the causes of the Word file issues is always good, which can later be used to address the problem more efficiently. Some of the most reported causes behind the Word File error are listed below:
- The Word File is on a shared network, and two or more users are trying to access it simultaneously.
- The file that you are trying to access is password-protected.
- The Always Create Backup Copy option is enabled.
- Word file corruption
- Failing to get updates for Windows.
- Compatibility issues exist between the Windows operating system and the Antivirus program installed.
Methods to fix the Word file error
As previously mentioned, this error is quite common while saving Word documents and occurs due to a Permission issue. The best way to deal with this issue is by creating a new Word file and copying all the data from the old Word file to this new one. While saving the file new file, make sure there is no space in the file name.
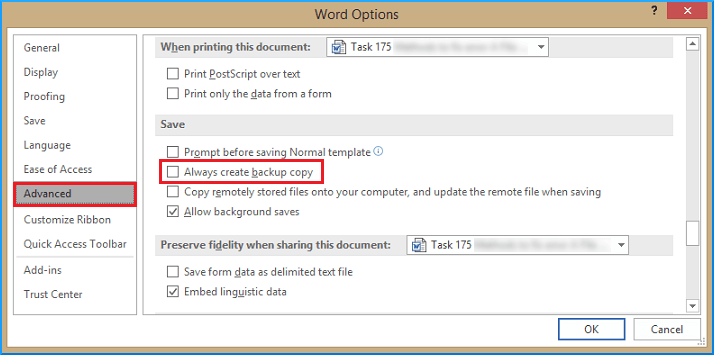
Note: While editing or modifying the Word file, always create a backup copy option should be disabled. You can re-enable it after the editing is done.
- To Enable/Disable Always create a backup copy option, go to File > Options > Advanced, and scroll down to the Save section. Then, Enable/ Disable the backup copy option
- If the Word document is shared on a network, then it is advised to keep a copy of the file on your hard drive before making any changes to the original file (over the network).
Method #1 Deleting ~$Normal.dot file.
Normal.dot file is a kind of malware that attacks images and stops opening them in your system. To fix image issues, you must look for Normal.dot files.One needs to unhide the file and folders before locating the ~$Normal.dot file. The steps are outlined below:
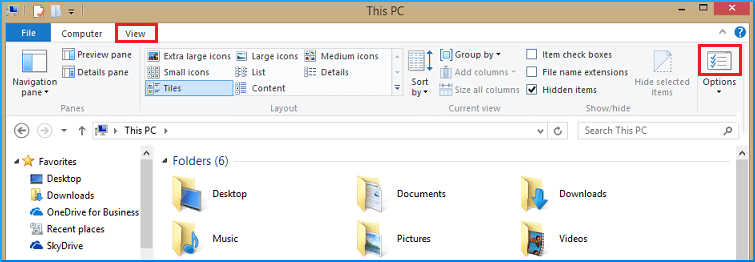
- Go to the File Explorer, click on the Options button in the View, tab.
- It will open Folder Options. Select Show hidden files, folders, and drives from the Folder Options.
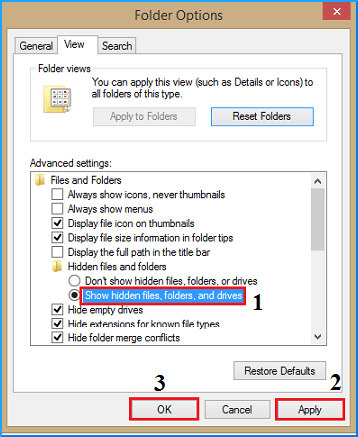
- Next, click Apply, then hit OK.
- Open File Explorer and search for the following path
C:\Users\[username]\AppData\Roaming\Microsoft\Templates
Note: In the above file path, replace [username] with your username.
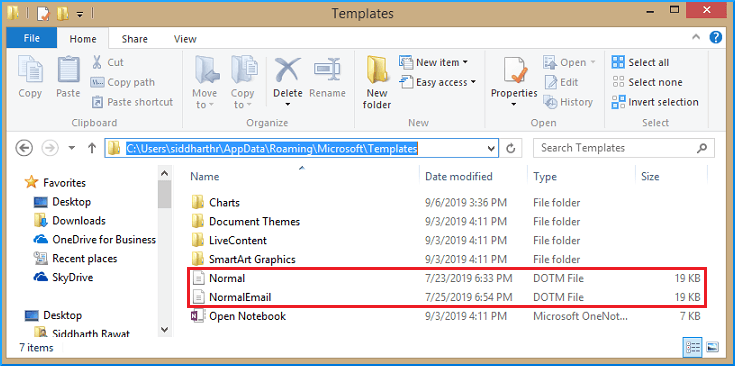
- In the Template folder, look for the file containing normal in the file name, such as ~$Normal.dot. Delete such files, but make sure you don’t delete the whole Template folder
Method #2 Open the Word document in safe mode.
As we have seen in other applications, problems in the interfering plugins can sometimes lead to such errors. Safe mode will help you stop unnecessary plugins and open your Word file seamlessly. Therefore, while using Word, try to launch in safe mode.
Step 1: Press the Windows + R keys to open the Run dialog box.
Note- Before starting the procedure, please check that all Word files and applications are closed.
Step 2: In the Run dialog box, type WINWORD /SAFE. Click the OK button to open Word in safe mode.
Step 3: Microsoft Word has now been launched in Safe Mode.
The Window title displays “Microsoft Word (Safe Mode).” Press Accept in the new pop-up box.
Step 4: Copy the content from the previous corrupt document to this new one. And save it.
Method #3 Copy-paste the changes to a new document
- Recreate a new document in Word using the same outlet as the older document.
- Now, turn off the track changes in both documents.
- Copy all the content from the older document and paste it into the new file.
- And turn on the track changes in the new document.
- Lastly, save the new document with a new name.
Method #4 End task Winword.exe
Such a temporary error can easily be fixed with just a simple force quitting the application. But before you jump onto end task your app, make sure to keep the AutoSave option turned on to prevent any kind of data loss. Follow these steps now.
- Access Task Manager with Alt + Shift + Delete.\
- Look for Microsoft Word. Select it and tap on End Task.
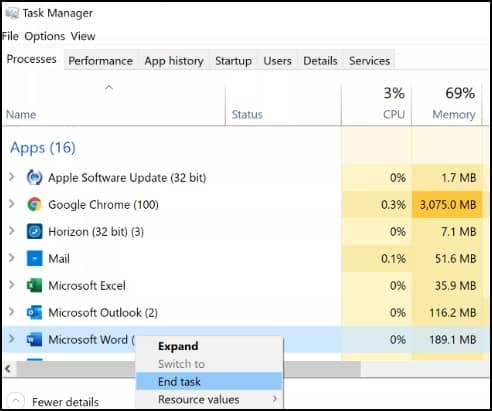
- Re-open Word and check if your document is free of the error or not.
Method #5 Check for file protection
We’ll check the document to see if it contains any read- or write-protections. Here is how to do so:
- Tap on the File menu and click on Info.
- Choose Protect Document.
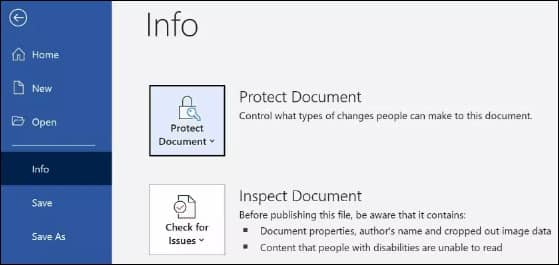
- Here, you can check to see if the document is protected with a password or if it is read-only. To save the document as a new one, use Save As or turn off read-only.
For password-protected documents, you will need to get the password from the creator. This person can be found in the “Related People” section.
Method #6 Kernel for Word Repair
In most cases, it has been found that the Word file error is caused due to file corruption. If you are looking for a precise tool to get past the Word file error, then Kernel for Word Repair might be the right option. This tool has many features to offer. It can quickly repair any Word file, irrespective of the version. It helps you open corrupt Word .doc and .docx files. The preview feature of the tools lets the user view the repaired file before saving it.
Now, let’s have a look at the tool process in detail.
- After installation, launch the tool.
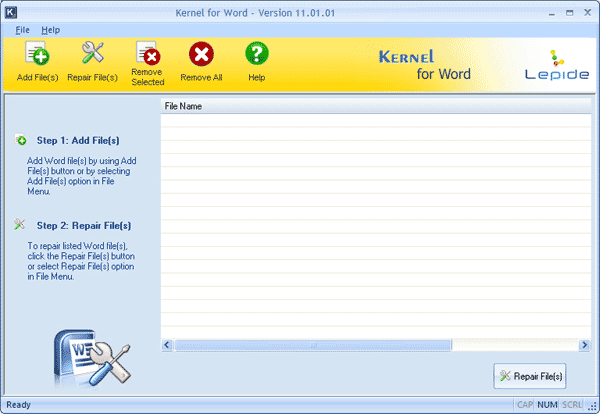
- Click the Add File(s) button to add the affected files(s).
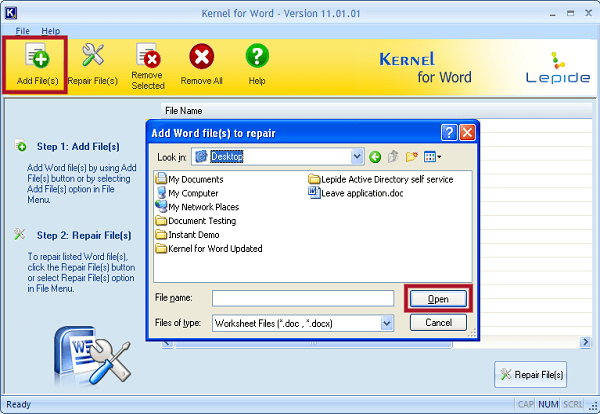
- Click on the Repair File(s) button to repair the previously selected files.
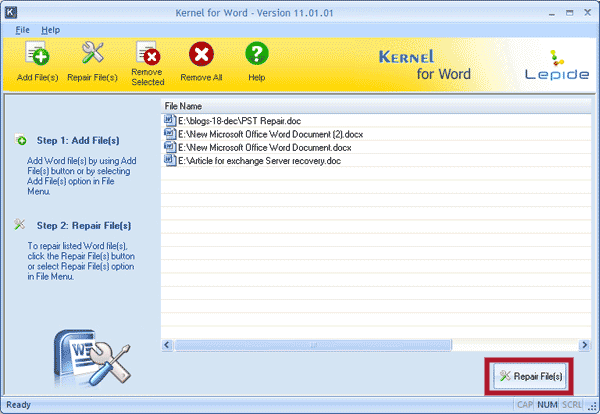
- You will be asked to provide the location for saving the repaired file(s).
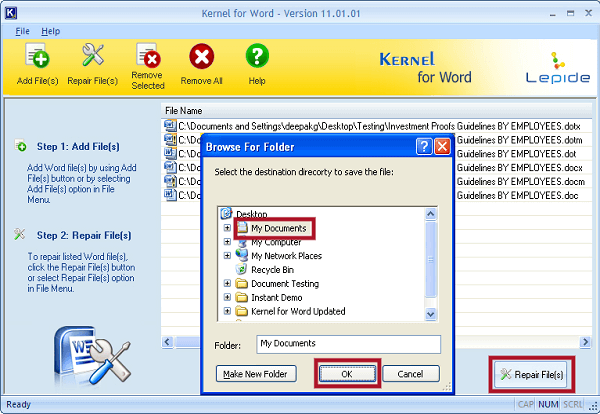
- Depending on the file sizes, the tool will attempt to repair the affected files.
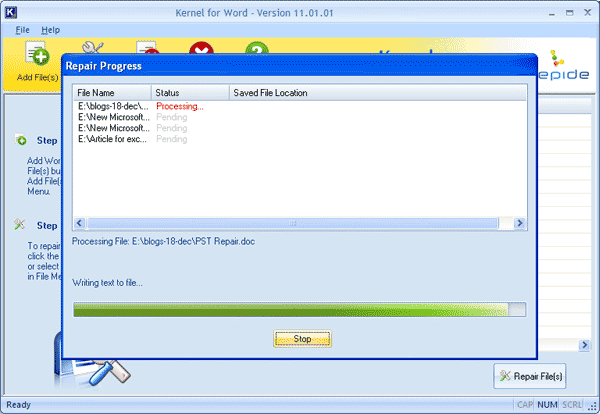
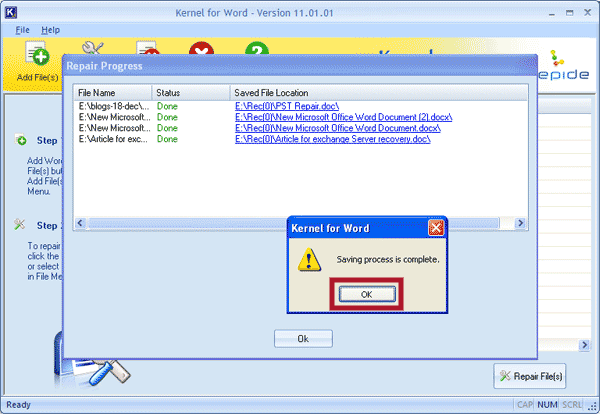
- If the process ends successfully, you will be prompted with a successful completion message. The location of the repaired files will be shown alongside the file names. Click OK to finish the process,
Conclusion
With detailed guidance and easy to carry out solutions, we aim to make your issues sorted out in no time. When struggling with the “A file error has occurred” issue, follow the above solutions as per your convenience and expertise. For non-tech users, our recommendation would be to go for the automated utility. Kernel for Word Repair needs no expertise, and its interface helps with easy-to-follow instructions to recover MS Word documents quickly. For more added features, you must try out the tool today.

