Read time 7 minutes
Different techniques for secure backup
Users can take backup of their valuable photos in various ways. It is recommended to take an offsite backup (other than on your PC) rather than onsite backup so that any damage to the system would not affect the backup alongside. We’ve given a few tips to backup your valuable photos safely:
Backup features by Microsoft
Microsoft provides its users with some in-built features, (different for different Windows versions) to take a backup copy of the data stored on the system. Let’s learn about these features in detail below:
For Windows 7
Backup your photos in Windows 7 system by executing the given steps:
- On your computer’s Start menu, search for Backup keyword in the search box. Select Backup and Restore to open it.
- It will open the Backup or restore your files page on the system. Here, click Set up backup option to start the backup process.
- Select the destination to save your back up data. (external storage media devices are preferred).
- Next, you have two options to choose from, either choose Let Windows choose or Let me choose. Select Let Windows choose to let the system options decide which data needs to be saved and if you want to select the data yourself, select Let me choose and click Next.
- Select the images which you want to back up from the system and click Next. Then, run backup.
- The backup process will start and be complete after a few minutes.
- Run your PC as an administrator and go to Settings by searching it in the search box.
- Here, click Update and recovery option. Then click File History option to open it.
- Connect the external drive and turn ON the File History option under Save copies of your file automatically to copy the system data to that drive.
- Click Backup Now. The backup process will start immediately.
- Once installed, launch the application and sign up with your Google account credentials.
- Next, it will show the folders to choose for backup, or you can select any folder from the system by clicking on CHOOSE FOLDER option. Change the backup options by clicking Change on the rightmost pane.
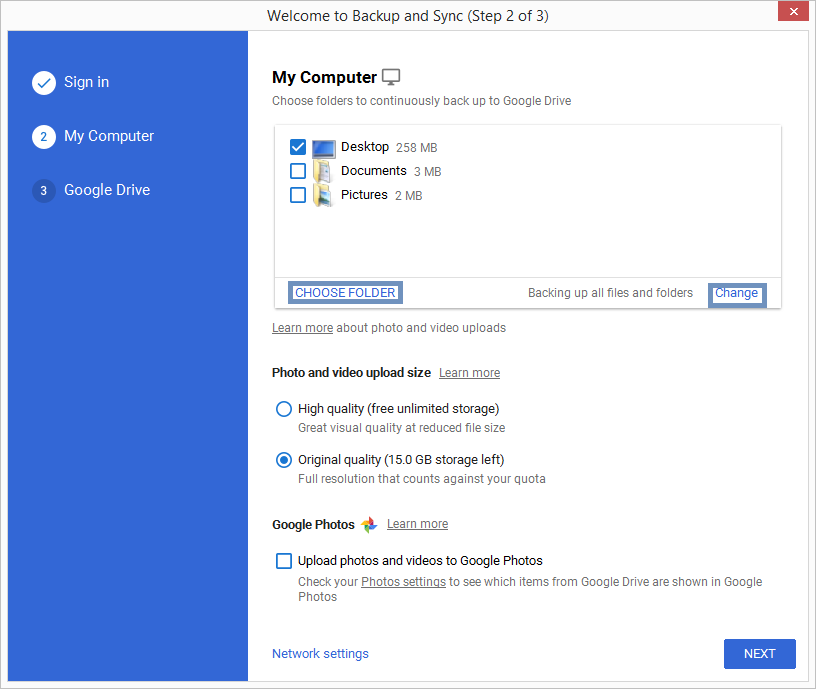
- Now, select the option Backup photos and videos and select the checkboxes as per your requirement.
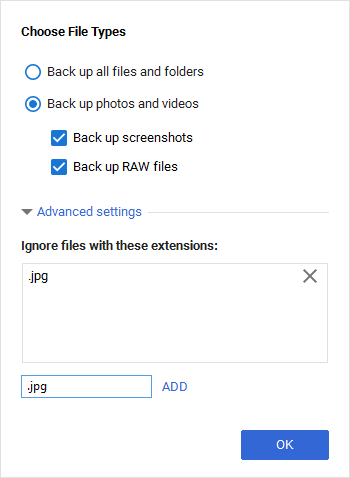
- Under the Advanced Settings option, you can select the image extensions which you want to exclude during the backup process. Enter the extension and click Add to add it as a filter. Then click OK.
- You can choose desired option under Photos and video upload size section, select the checkbox saying Upload photos and videos to Google Photos and click Next.
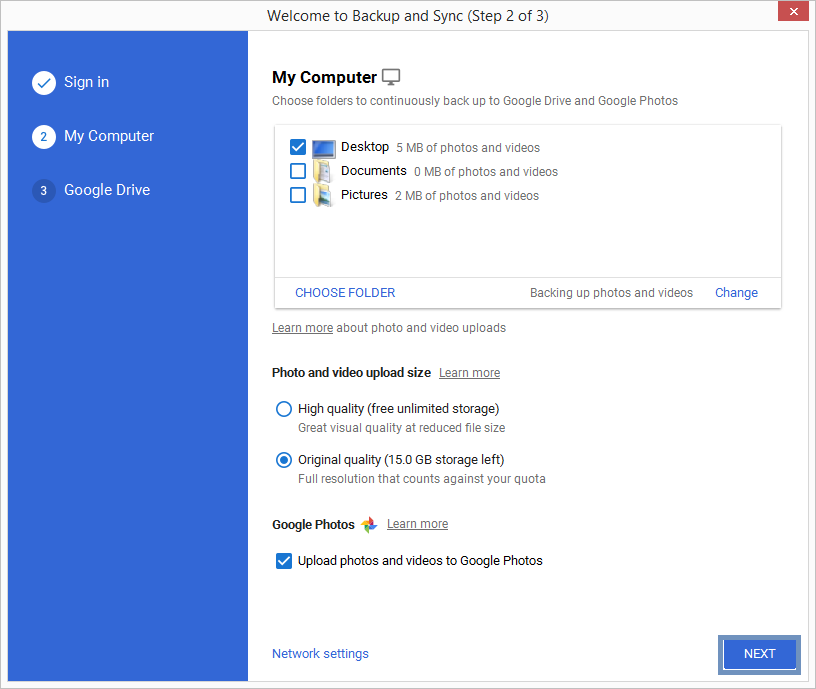
- Next, you can click on Change to change the default saving location for the selected data backup from the system. Finally, click on START.
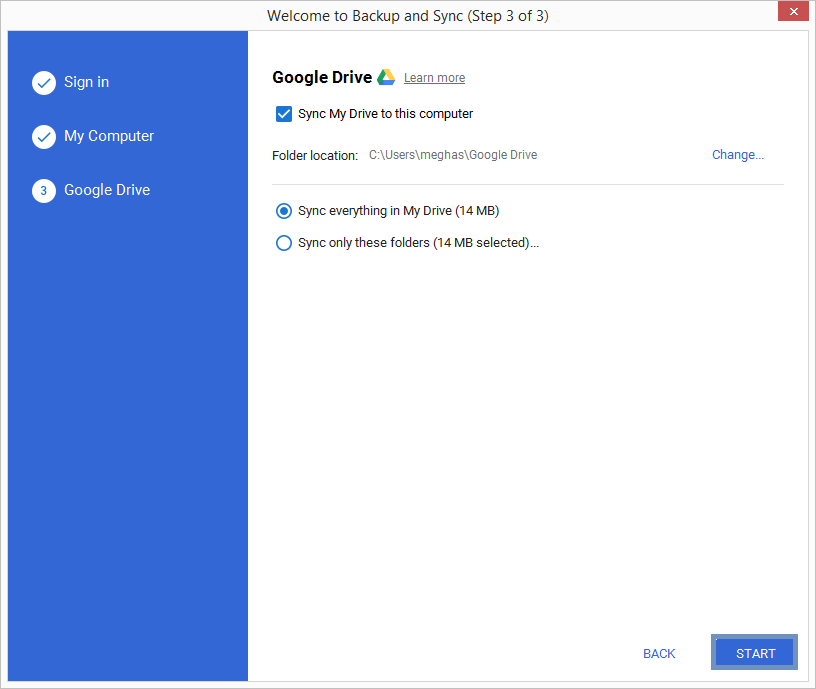
- The backup of photos from the system will get started immediately. Wait for a few minutes for the backup to complete.
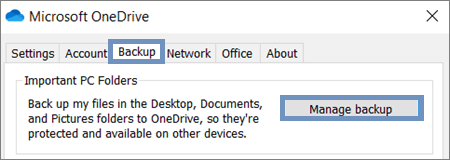
- Launch Onedrive and click on More option. Then select Settings and go to Backup>Manage Backup.
- The Back up your folders page will open. Here, select the folders from which you want to back up your data. Click on the Start backup button.
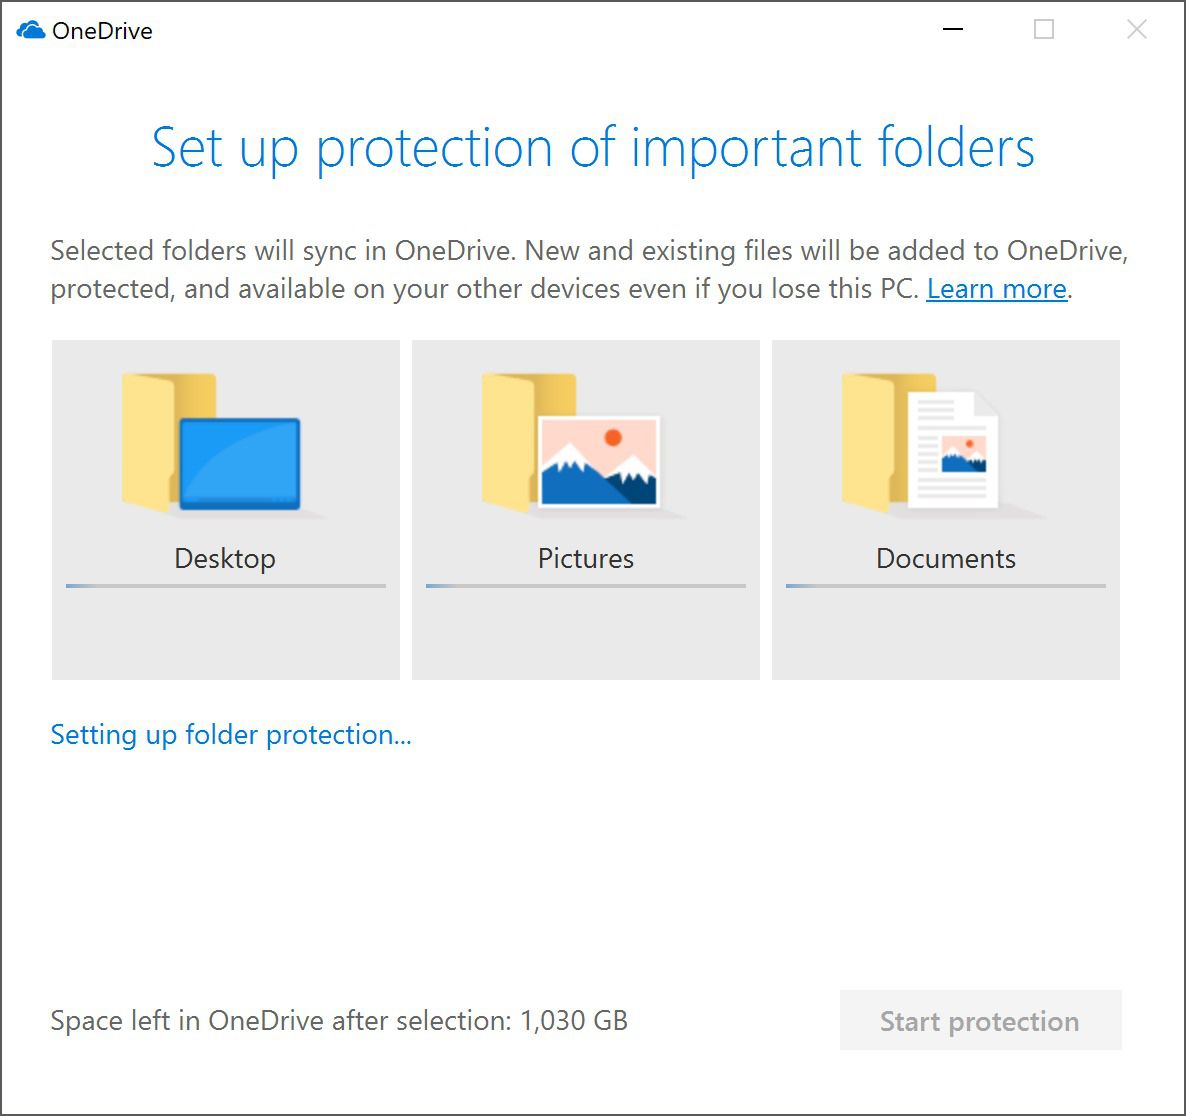
- You can view the backup progress. The backup will be completed in some time as per the size of the files.. The backup will get completed in some time as per the size of the files.
- Once the backup gets completed, the user can access selected folders data including pictures using OneDrive.
For Windows 8/8.1
It uses the File History feature to backup file copies from the system and saves it to the desired external drive or other network location. Let’s know how to perform a backup with this option.
The 3-2-1 Backup strategy
The 3-2-1 backup method is one of the easiest backup strategies which involves taking multiple backups of your photos and storing them on different storage devices and locations and saving one copy of the files offsite. In this method, you create three copies of your data including the original one. You save them on two different types of storage devices like USB drives, external hard drives, etc. and keep one copy offsite in case there’s an issue with your PC or other on-site locations.
External Drive backup
Users can backup their photos to an external drive by connecting it to their system and copying all their media files to the storage device. Some of the most popular choices for external drives amongst users are USB drives, pen drives, external hard drives etc.
Cloud backup
The backup could be safer and more accessible if taken to the cloud. The safety of data is a prime concern for the users. If stored online, there will be no risk of loss or deletion of data. Moreover, it can be accessed on any system and from anywhere you want just by logging into the cloud account. Most popular choice amongst users for cloud backup are Google Drive and OneDrive.
Google Drive for backup
Google recently introduced a new software, Backup n sync with the help of which users can easily take a backup of all your data and save them at your chosen location for free up to 15GB of storage space. Let us know the process for backup with this utility.
OneDrive for backup
You can easily synchronize the system data automatically to OneDrive. The automatic synchronization generates a backup copy of the system folders – Desktop, Documents, and Pictures to the safe cloud (OneDrive) location, which can be accessed when system data is unavailable due to any reason. Users can back up about 5GB of data for free using this OneDrive application. Follow these steps to take a backup of your photos.
Conclusion
Users can follow these tips to backup their important pictures on the system. By following the techniques discussed in this blog, you can be reassured that your valuable photos are safe and secure. However, if your photos have become inaccessible because of corruption or accidental deletion, we suggest you take help of a professional recovery tool. Kernel Photo Recovery tool can recover permanently lost images or photos from your PC, memory card, camera, USB, etc.