Read time 4 minutes
Exchange servers streamline the workflow within the organization as it stores crucial data within itself. The issue of corruption is obvious in Exchange server, that ignites the need of regularly migrating the EDB file to different destinations. When you conduct a migration of Exchange Server to another version of Exchange Server or Exchange Online, you need to run the move request to complete the migration.
The Move Request uses many parameters and switches, and each parameter has a dedicated task to complete. One of these parameters is Bad Item List, which sets a limit for bad items during the migration. You can consider a mailbox item as bad when the Move Request shows inability to migrate it.
What is a BadItemLimit?
A BadItemLimit defines the maximum limit of corrupt/damaged mailbox items that can be skipped during a mailbox migration. The larger or older the mailbox, the higher the chances of corruption or bad items. This will hamper the processing of mailbox transfers. If the number of bad items exceeds the limit, the mailbox migration or move request will fail. The larger or older the mailbox, higher are the chances of corruption or bad items. This will hamper the processing of mailbox transfer.
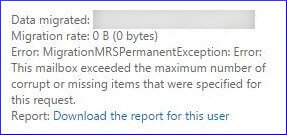
When you have defined a bad item limit, but it still exceeds the maximum number, then you’ll face the following errors:
Error 1: This mailbox exceeded the maximum number of corrupted items that were specified for this move request.”
Error 2: A corrupted item was encountered during the move operation. The item wasn’t copied to the destination mailbox.
The error denotes that the number of corrupt items has more than permitted so you need to update the limit for a smooth migration.
Reason behind receiving the move request error
The primary reason behind the error is the corrupt items in the Exchange Database. The move request will not migrate the bad items and skip them. But as soon as it reaches the bad items limit, it will show the error instantly. It will also pause the migration process midway, and you’ll need to resolve the error by making the appropriate changes.
Define the Bad Item Limit
Run the cmdlet given below to change the bad item limit for the move request if following:
Set-MoveRequest -Identity “MoveRequestID” -BadItemLimit “10”
When the request is executed, it will allow skipping up to 10 corrupt items from the migration. But when the number of items exceeds, it will give the above error. No default value is set for this parameter, and you can input any number as a bad item limit. Microsoft advises putting a reasonable value less than 10.
Methods to fix bad item limit error
Here are some manual methods which you can use to remove the error:
Method 1. Update the move request
When receiving this error, update the move request which you had created earlier. The initial step is to increase the bad item limit in Exchange to a higher acceptable limit. If you increase the limit to more than 50, then you’ll need to use the AcceptLargeDataLoss switch.
Set-MoveRequest -Identity “MoveRequestID” -BadItemLimit “75”
Now, you will not have to face the error up to 75 corrupt database items.
Method 2. Use the ESEUTIL tool
ESEUTIL is a free utility available within the Exchange Server. You can use ESEUTIL tool to determine the corruption and repair it using various switches. You can find the ESEUTIL tool at the following location:
C:\Program Files\Microsoft\Exchange Server\V15\Bin
When you start the ESEUTIL tool, there is a list of switches which can be useful for different jobs:
/D It will defragment the database.
/K It will verify the checksum of the database.
/P It will repair the database.
/R It will restore the database.
/C It will hard recover the database.
/G It will check the integrity of the database.
/M It will show the information of header in files & metadata.
/Y It will allow to quicky copy large mailbox database file.
Here is the process which you should follow with the help of ESEUTIL tool:
- Run the command
- Run the command in ESEUTIL:
- After recovering the database, run the command:
Mount-MailboxDatabase -Identity “DatabaseName”
It will mount the database back to the Exchange Server.
Dismount-Database -Identity “DatabaseName”
It will dismount the database from Exchange Server.
ESEUTIL /P “DatabasePath”
It will repair the database and remove all the errors.
When you have repaired the database, initiate the move request again and now try to migrate the database to a higher version of Exchange or Exchange Online.
Why opt for third-party tool?
Facing instances where you perform all the required steps to recover & move your corrupt EDB file, still receives error. Both the manual methods you read above are useful, but they do not provide any assurance to remove the bad item issue. If the number of corrupt items is more than the new limit, then you will have to face the error again. The ESEUTIL tool not only repair the database but also delete the corrupt item rather than restoring it. So, you should go for any professional EDB to PST converter tool.
Use automated software- Kernel for Exchange Server
A top-rated Exchange Server recovery tool, Kernel for Exchange Server can access the database file from its location and fix any corruption. It will work as a one-stop-shop for you to fix all your EDB file errors. You also don’t need to run the move request after recovering the database as the tool itself can migrate the recovered items to any desired location. It is the best option which you can apply whenever you face a bad item limit error.
Conclusion
To perform smooth migration, it is important to increase the bad item limit in Exchange. In the above article, we have mentioned two of the most effective manual methods to fix corrupt EDB files to migrate afterward. The Exchange Server can also generate severe errors, such as 4999, so you must execute the right methods to solve error 4999. Additionally, we have suggested using the advanced Kernel for Exchange Server tool, which offers an automated solution in a quick time.